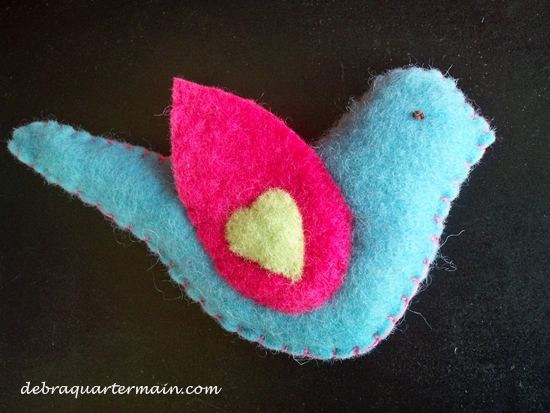
I have been having such fun lately with Rit Dyes and my favorite wool felt from National Nonwovens plus I love to needle felt so my pen tool from Clover came in handy to add dimenssion to the dove.
What you will need.

Rit Liquid Dye Aquamarine, Fuchsia, Lemon Yellow
2-9" x 18" pieces of Natural Wool Felt by National Nonwovens
2 ounces polyester stuffing
4 yards of white craft thread
1 yard black craft thread
Measuring Cup & Spoons
Spoon for stirring dye
2-Gallon Container
Large Pot for heating water
Rubber Gloves
Plastic Table Cover
Westcott Brand Scissors
Cutting Mat
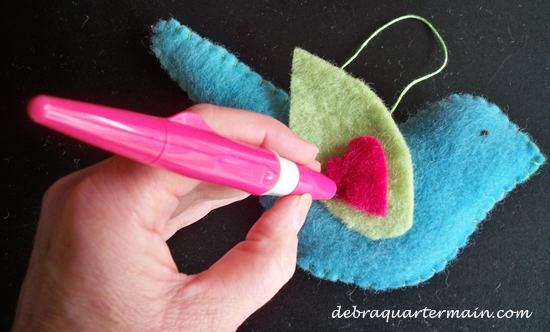
Clover Pen Needle Tool
Ruler
Embroidery needle
Pencil
Cardstock
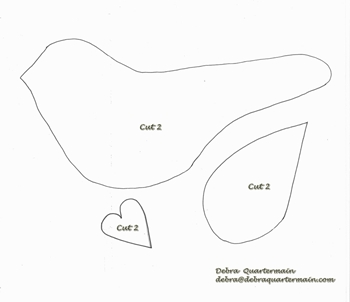
Pattern (enlarge 50%)
Step 1:
Prewash felt pieces to remove any finishes that may interfere with dye absorption.
Cut ¼ piece of felt off one 9" by 18" piece.
Step 2:
Cover work surface with a plastic table cover. Wear plastic gloves.
In a large pot, heat 4 cups of water on the stove until very hot, at least 140° F.
Dye Preparation: Wearing rubber gloves shake dye bottle and measure 1/2 cup of Aquamarine with 1 cup hot water. Stir well to mix dye and water.
Carefully transfer 4 cups heated hot water into large dye container. Pour dye solution into hot water and stir well.
Immerse a piece of wool felt in the dye bath and stir continuously for 10 minutes. Add 2 yards of craft thread to dye bath. Stir felt. Allow the felt to remain in the dye bath until the desired shade is achieved. Color will appear lighter when dry.
Remove the felt from the dye bath and squeeze out excess dye. Rinse in cold water running water until the water runs clear.
Repeat dyeing process with Fuchsia dye.
Repeat dyeing process with 2 cups of hot water measuring 2 1/2 Tablespoons plus 1/2 teaspoon of Lemon Yellow with ½ Tablespoon plus 1/2 teaspoon of Aquamarine with 1 cup hot water to make Lemon Lime. Immerse ¼ piece of wool felt.
Step 3:
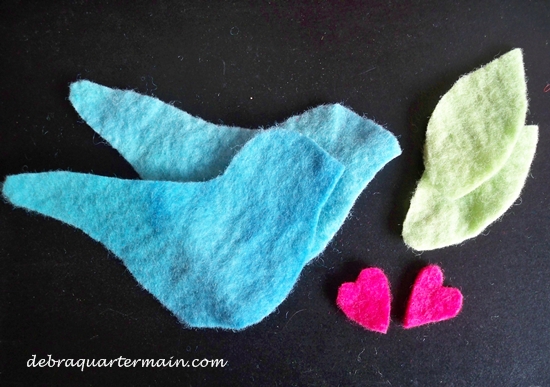
Transfer pattern to cardstock. Cut out two of each piece for one love bird.
Choose a matching or contrasting color of craft thread and blanket stitch around edge of bird, leave opening of 2", stuff and finish sewing shut. Repeat for second love bird. Make a french knot for eye taking thread between a seam stitch.
Step 4:
Place wing on bird. Needle felt around edges adhering it to the bird. Repeat for second wing. Place heart in center of wing. Needle felt. This will give dimension to the bird.
These are fun to hang from a branch in a vase for a centerpiece or in a baby's room. Dye up some beautitful holiday shades for your tree! Sew Inspired! 


