#
Debra Quartermain Design
Latest Posts
Categories

 the CEO! Creative Eternal Optimist! Blog 
Saturday, May 04 2013


This is an exciting week for one of my very talented designer friends, Ann Butler, her new stamp line with Unity is being released. These stamps are so versatile and cute! Flowers, stripes, diamonds, dots, leaves and much more, I loved being able to combine the stamps and create patterns.

 

For the release of this new product there is a 50% off coupon deal offered by Unity for anyone ordering the stamps between Thursday May 2, - Monday May 6 at midnight CST....the coupon code is Unity5.

So now for some wonderful ideas to use the stamps, Ann has put together a group of designers for a blog hop showcasing her new Unity stamp line. I am very pleased to be part of the hop!

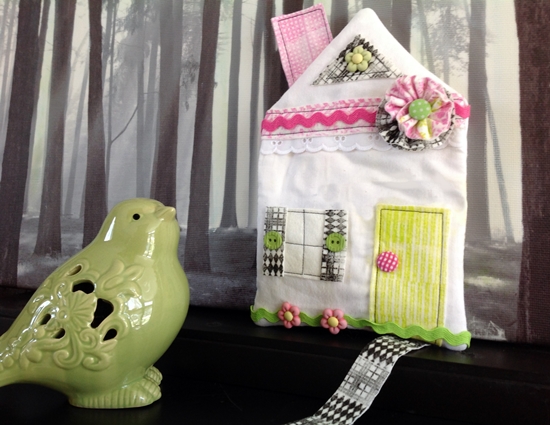
With the variety of patterns to choose from I wanted to use several in my design so I chose to make a whimsical cottage in the woods! A fun easy project ideal for using up scraps of fabrics, felt and trims.

How to!
You will need:
Ann Butler Unity Stamps 1" Leaves all Over, Diamonds & Plaid and Stripes. Dots. Hearts.
ColorBox Crafter's Stamp Pads, Sweet Pea, Limon, Night
Buttons Galore Buttons and Brads
8" x 26" white cotton fabric piece, quilt batt piece
9" x 12" Xotic Pina Colada  National Nonwovens Felt
9" lace
9" each of pink, green rickrack
Fabri-tac by Beacon Adhesives

Cutting matt, scissors Westcott Brand, pins, ironing board, iron, ruler, sewing machine, thread, needle.
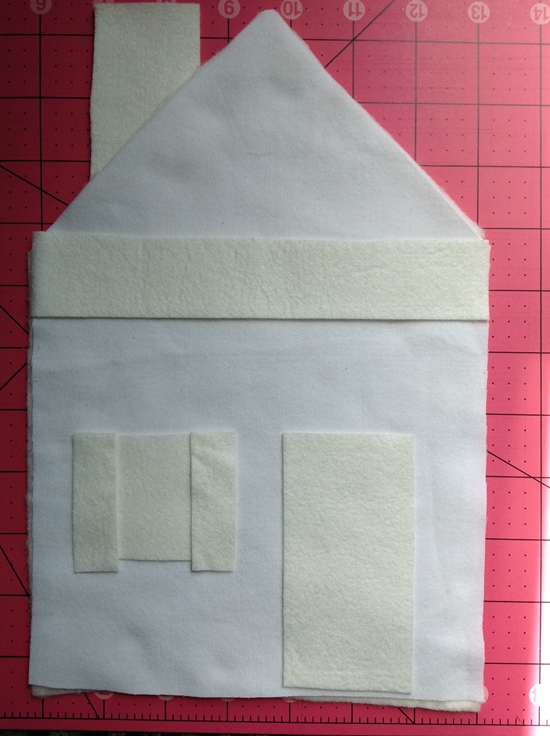

Step 1: Prepare cottage, cut two pieces of the fabric 7" by 11". Fold top corners in to meet at center making roof line. Press along those lines and cut. Cut two house pieces from quilt batt. Cut from felt a door 2" by 5", window 2 1/2" square, two chimney pieces, 2" by 3". 1" by 9" roof trim and 4" by 12" strip for flower and shutters, roof piece. 1" by 6" piece for flower.
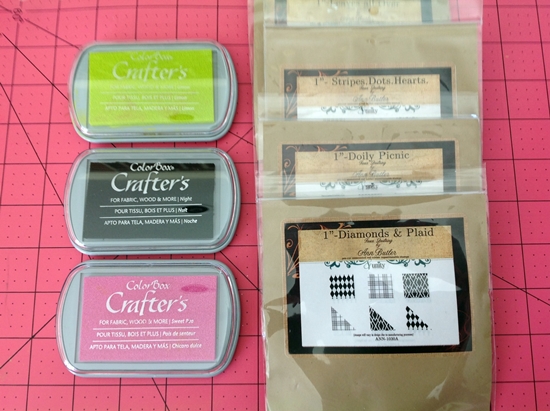
 

Step 2: Choose Stamps and color combinations. I alternated diamond and plaid with black ink for the shutters, flower and roof window. What I liked about the stamps too for smaller projects is after stamping you can trim the piece to size using the stamp line. Press very firmly when stamping.
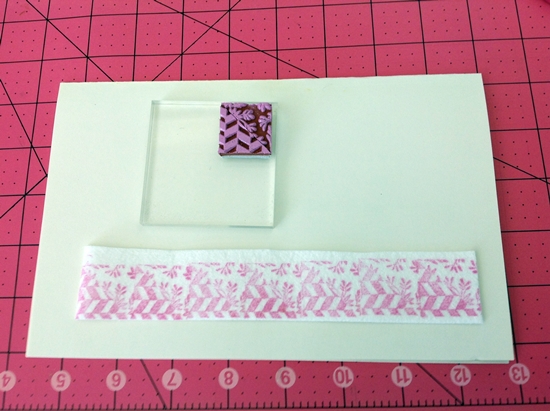

Step 3: For the roof trim I used the half leaf all over and graphic geometric together stamping along the felt piece, I trimmed it after. Finish stamping all pieces. Let dry. Stamping on felt requires a little longer drying time and needs to be heat set with an iron.

Step 4: Cut roof window 2" triangle. Place windows, door, lace, roof trim in place on cottage front. Topstitch. Place chimney pieces together and topstitch.

Step 5: Layer fabric cottages right sides together, add quilt batt piece to back. Insert chimney into place. Sew around house leaving opening at center bottom. Trim seams, clip corners turn right sides out.

Step 6: Cut shutters 2" by 3" and glue in place. Embellish with buttons and brads, rickrack.

Step 7: Cut one flower strip 1 1/2" by 9". Baste along edge, pull stitches tight. Baste along second flower piece edge 1" by 6"  pull stitches tight. Glue on top of each other and insert button or brad in center, glue to cottage.

Step 8: Stuff cottage lightly, sew opening shut.

Now onto the amazing designs by a group of professional and so creative designers found with the link below!

Enjoy!


Posted by: Debra Quartermain AT 01:00 am   |  Permalink   |  18 Comments  |  Email
Monday, April 08 2013

One of the very cool aspects of being a designer is the opportunity to try new products. I am not a jewelry designer but when asked to participate in a blog hop featuring the new line of Dazzle-it jewelry tools, stringing materials, beads , chains and containers I said yes. Besides with snow still on the ground here and there how could I not resist a hop with the theme "Summer Love"!

My package of goodies contained vibrant beads in fiesta colors designed by the amazing Fernando daSilva! As soon as I saw the bright peace symbol beads and hemp the colors were a perfect pairing with the Daydream Inspirations collection from National Nonwovens.

I cut three 1/2" x 10" strips of felt, braided them together and placed pins to hold it at either end. I chose the lime green hemp, threaded it on an embroidery needle, knotted it and stitched through braided end adding a round bead. Continuing to sew through center of bracelet with a simple running stitch in and out adding a peace bead on the up stitch.

At the opposite end I made a loop with the hemp, knotted it off and my bracelet was finished. So comfortable and soft to wear and it will go with several of my summer dresses! If and when summer decides to appear! Enjoy the hop, from the simple to the sophisticated this affordable, attractive line will appeal to anyone who enjoys the art of jewelry making. I am already planning a pendant to go with my bracelet from the remaining beads I was sent!

Posted by: Debra Quartermain AT 01:53 am   |  Permalink   |  3 Comments  |  Email
Monday, February 04 2013


It is the first Monday of the month and we are hopping with the Designer Crafts Connection Blog Hop. It is all about Valentine's, love is in the air! To catch all the love just hop along with the button in the sidebar!

This Valentine cutie I designed for Rit Dye , featured on their blog and is in the current issue of Crafts 'n Things.  Wool felt dyes beautifully, I demonstrated the techniques for an upcoming segment of PBS Quilting Arts with host Pokey Bolton.

This owl is made from a piece of ombre dyed felt with each segment of the felt strip held in the dye bath for a shorter period of time. I cut the pattern pieces for the owl so the heart wing halves were from the lighter end of the felt strip for contrast.

Enjoy the Valentine hop and make something special for the sweeties in your life!
Debra


Posted by: Debra Quartermain AT 01:00 am   |  Permalink   |  3 Comments  |  Email
Monday, November 05 2012


The first Monday of every month the Designer Crafts Connection hops with thirty of the Craft industry's top designers. We are all professional designers, members of the CHA designer section. (Craft & Hobby Association)

This month's theme is thank you gifts. November marks the beginning of the holiday season, invitations to holiday parties, gatherings, gift exchanges. My favorite thank you gifts to give are handmade ornaments. I design and create new ones each year. One of my favorite designs is this whimsical elf  popping out of a stocking. I create them in different color combinations to match the gift recepient's holiday decor.

The elf's head is a needle felted 1 1/2" Styrofoam brand foam ball and the stocking is made National Nonwoven's wool felt. The scroll design on the stocking die cut with the Sizzix Big Shot. It cuts felt beautifully. Bead and button embellishments complete the ornament.

Be inspired with the projects offered by the other members of this talented designer group, just hop along with the DCC button in the side bar!


Posted by: Debra Quartermain AT 01:34 am   |  Permalink   |  10 Comments  |  Email
Friday, October 26 2012


I enjoy my students, they are so creative and with a little direction they run with their own ideas. Once they get the technique I provide them with lots of color and material choices. One of my students wanted to needle felt owl ornaments for her new young stepsisters.

Since the girls both love pink and purple she decided to reverse the colors with one being more pink and the other more purple. They turned out so cute and will be sweet cherished gift, their first Christmas together as a blended family.

Creativity is a gift in itself, taking the time to craft a gift is special. Making something special for someone you love, in the act of creating love is woven in and so there is no greater gift than that.

It is the season to create with love! Always!

Posted by: Debra Quartermain AT 09:01 am   |  Permalink   |  2 Comments  |  Email
Monday, October 01 2012


Create your own Prim Pumpkin Patch, easy peasy fall decor
using Rit Dyes and STYROFOAM Brand foam balls.
Using two colors of Rit Dye, Tangerine and Dark Brown
I dyed sections of unbleached cotton,
Blumenthal Lansing nylon buttons and twine.

Follow the stove top dye technique
http://www.ritdye.com/dyeing-techniques/stovetop 
and dye a 12" x 36" strip of unbleached cotton
with 1 cup Tangerine, 8 cups of hot water. Remove strip from dye,
add 2 T of Dark Brown to pot with Tangerine, stir well.
Dye two more strips of unbleached cotton along with buttons and twine. 
Remove one strip along with twine and buttons.
Add anotherTbs of Dark Brown and stir with third strip in dye.
A mottled effect and darker shade will result. Wash and dry fabrics.

Use any size ball you wish to, I used several sizes from 3" to 5".
With a stick carve out a small middle hole for stem.
Glue stem in  place. Rip fabric strips into 2" widths.
Begin gluing end of strip by hole. Wrap NSEW going around stick.
Trim off excess and contiinue with next piece.

Add third color of strip filling in all gaps.

Embellish with bows and buttons.

Sew crow and don't turn right side out. Stuff and sew or glue opening

Paint crow with black craft paint. Let dry. Insert and glue into Pumpkin.

Glue some felt leaves in among burlap bow. 
Glue and insert bird! To follow along on the hop 
just click on the Designer Crafts Connection Blog Hop Button!

12 of our DCC designers will be taking part in another blog hop
 beginning Saturday October 13th featuring Makin's Clay. 

They will be giving out for the blog hop....
a prize package worth just over $100 retail cost.
In order to enter go to the Makin's Clay Blog
and leave a comment. Here is the link!
http://makinsclayblog.blogspot.com/2012/09/makins-clay-blog-hop-contest.html
Get inspired with some great clay ideas and enter for the pirze!
Happy creating!

Posted by: Debra Quartermain AT 04:31 am   |  Permalink   |  5 Comments  |  Email
Monday, July 16 2012


I have been having such fun lately with Rit Dyes and my favorite wool felt from National Nonwovens plus I love to needle felt so my pen tool from Clover came in handy to add dimenssion to the dove.


What you will need.


Rit Liquid Dye Aquamarine, Fuchsia, Lemon Yellow
2-9" x 18" pieces of Natural Wool Felt by National Nonwovens

2 ounces polyester stuffing

4 yards of white craft thread

1 yard black craft thread

Measuring Cup & Spoons
Spoon for stirring dye
2-Gallon Container
Large Pot for heating water
Rubber Gloves
Plastic Table Cover

Westcott Brand Scissors

Cutting Mat

Clover Pen Needle Tool

Ruler

Embroidery needle
Pencil

Cardstock

Pattern (enlarge 50%)


Step 1:

Prewash felt pieces to remove any finishes that may interfere with dye absorption.

Cut  ¼ piece of felt off one 9" by 18" piece.

Step 2:

Cover work surface with a plastic table cover. Wear plastic gloves.

In a large pot, heat 4 cups of water on the stove until very hot, at least 140° F.

Dye Preparation: Wearing rubber gloves shake dye bottle and measure 1/2 cup of Aquamarine with 1 cup hot water. Stir well to mix dye and water.

Carefully transfer 4 cups heated hot water into large dye container. Pour dye solution into hot water and stir well.

Immerse a piece of wool felt in the dye bath and stir continuously for 10 minutes. Add 2 yards of craft thread to dye bath. Stir felt. Allow the felt to remain in the dye bath until the desired shade is achieved. Color will appear lighter when dry.

Remove the felt from the dye bath and squeeze out excess dye. Rinse in cold water running water until the water runs clear.


Repeat dyeing process with Fuchsia dye.


Repeat dyeing process with 2 cups of hot water measuring 2 1/2 Tablespoons plus 1/2 teaspoon of  Lemon Yellow with ½ Tablespoon plus 1/2 teaspoon of Aquamarine with 1 cup hot water to make Lemon Lime. Immerse ¼ piece of wool felt.


Step 3:

Transfer pattern to cardstock. Cut out two of each piece for one love bird.

Choose a matching or contrasting color of craft thread and blanket stitch around edge of bird, leave opening of 2", stuff and finish sewing shut. Repeat for second love bird. Make a french knot for eye taking thread between a seam stitch.


Step 4:

Place wing on bird. Needle felt around edges adhering it to the bird. Repeat for second wing. Place heart in center of wing. Needle felt. This will give dimension to the bird.

These are fun to hang from a branch in a vase for a centerpiece or in a baby's room. Dye up some beautitful holiday shades for your tree! Sew Inspired!

Posted by: Debra Quartermain AT 07:28 am   |  Permalink   |  0 Comments  |  Email
Monday, July 09 2012


Continuing with my playing with dress forms. Dress forms have been around since the Middle Ages. In the Middle Ages the aristocrats had dress maker forms which were the exact measurements so they did not have to be bothered with fittings.

 Miniature versions were made wearing the fashion designed for the aristocrat which could then be sent off to a family member or esteemed friend to be recreated.

During the industrial revolution the dress form became very popular and today for designers as well as serious home sewers in indispensable tool allowing for design draping and fitting of garments.

I have designed a pin cushion using talented Tim Holtz's dress form die for Sizzix. Using wool felt from National Nonwovens which will keep pins and needles both sharp and together.


Cut two pieces of wool felt 3 1/2" x 6" and cut dress form die from fabric.

Blanket stitch around all four sides leaving opening, stuff lightly and finish blanket stitching closed. Use fabric glue to adhere dress form, embelish with ribbons and buttons. Enjoy!

Sew Inspired! 

Posted by: Debra Quartermain AT 06:28 am   |  Permalink   |  0 Comments  |  Email
Friday, July 06 2012

Well it is about time for Fowl Friday, remember me I am Fran! Debra has practically forgotten our existence, well not entirely she does feed us and keeps the nest tidy but! ....we are surrounded once again by boxes, a big flurry of activity with another moving day coming up! Apparently the new place is some sort of historic home on the river, ugh water, hopefully we won't have any water sports in our future.

Freda has tried water skiing and it wasn't pretty, first the bikini of choice well let's just say itsy bitsy does not work with Freda's figure. Strings can be problematic too lets just say once again Freda did a lot of dangling in very awkward revealing poses!

Debra is a romantic, flowy dresses, lace and lately Victorian crazed especially dresses and dress forms. Her favorite Sizzix die at the moment Tim Holtz's dress form die for Sizzix. Wonder if they ever wear out?

Our biggest fear is the tiny lace outfits we see being fashioned, not sure but they look fowl sized! Yikes! Follow the Fowl!

Posted by: Debra Quartermain AT 07:43 am   |  Permalink   |  1 Comment  |  Email
Monday, June 25 2012


Needle felting with Wool Wisps from National Nonwovens and Styrofoam Brand foam is one of my very favorite techniques. The above design I created for the 4th of July can also be adapted very easily for the Canadian July 1st celebrations. Photo courtesy of and complete instructions are available at CraftsnCoffee.com.

Crafty happenings, the talented and divine Ms. Margot Potter is on the new TLC Craft Wars show hosted by Tori Spelling. Can't wait to see her! Trailer promo http://tlc.howstuffworks.com/tv/craft-wars/videos/on-the-craft-battleground.htm

Have a creative week! Follow the Joy!

Posted by: Debra Quartermain AT 10:48 pm   |  Permalink   |  0 Comments  |  Email
Friday, June 15 2012


I have a love of the Victorian era and long ago most of my crafting was in that style. The steam punk trend which melds the style of the era both in the sentimental and mechanical is fascinating. This needle book I have designed is based on the popular vintage of a small book used to hold needles.

In the beginning needles were very scarce, in fact even well off households had only one which was cared for, kept sharp and rust free using a pin cushion filled with emery dust. Poorer households often shared a needle between several families.

Using Sizzix dies, wool felt from National Nonwovens which is ideal for holding needles and keeping them sharp plus the inspiration of a pin fabric I had in my stash my little book now graces my antique sewing basket.

Posted by: Debra Quartermain AT 07:28 am   |  Permalink   |  3 Comments  |  Email
Wednesday, May 30 2012


I have been "immersed" (excuse a very bad pun) in Rit Dye this week. The photo shows the after of ivory wool and white Xotic (Bamboo blend) felt from National Nonwovens and buttons from Blumenthal Lansing being dyed in three vibrant dye shades from Rit Dye's Spring color forecast.

I am creating a couple of projects using Rit Dye colors. It is really fun to watch whites become rainbows! From this to the above photo!

With the premixed liquid dyes and a website packed with tips, color formulas and inspiration, I am hooked on dye projects! Have you tried dyeing?


Posted by: Debra Quartermain AT 10:53 pm   |  Permalink   |  0 Comments  |  Email
Facebook
LinkedIn
Add to favorites
Twitter
Debra Quartermain Design

 Magical Mimi to Grandlittles, I love to create, decorate & celebrate. Sharing  joy and inspiration from our 200 year old home, Quartermain House B&B on the east coast of Canada.

" "
Facebook
LinkedIn
Add to favorites
Twitter
    Sign Guest Book  View Guest Book 

    Debra Quartermain Design
    Fredericton, NB
    Canada
    Web Design Debra Quartermain
    Illustration Deborah Peyton
    Content copyright Debra Quartermain
    Email: debraq53@gmail.com

    Design Your Own Website, Today!
    iBuilt Design Software
    Give it a try for Free