|
the CEO! Creative Eternal Optimist! Blog
|  |
Thursday, June 25 2015
Inside every great pillow is the perfect pillow form. My favourite pillow forms are from Fairfield. Our DCC, Designer Crafts Connection members are having a pillow fight challenge and Fairfield supplied the pillow forms for this fun blog hop!
I have a bench in the front hall which has been needing a couple of pillows. I chose Kunin's Shaggy Felt for the pillows. It is easy to sew and stuff and very soft. A good choice for a pillow fight! :)
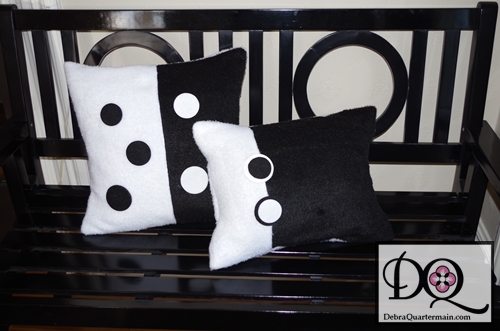
You will need:
1/2 yard of each cut by the yard Kunin Eco-fi TM ShaggiChic White, Black
9" x 12" craft cut Kunin Eco-fiTM Classicfelt, 1 White 1 Black
16" Home Elegance Pillow Form Fairfield
Circle Die by Sizzix
Fabri-tac by Beacon Adhesives
Big Shot, sewing machine and matching thread, scissors, pins, measuring tape, ruler, pencil, chalk

1. Cut two pieces each 18" x 18.5" from the white and black shaggi. The nap should run lengthwise with the 18" measurement.
2. Right sides together sew a black piece and white piece for front. For the back repeat leaving a 6" opening in center.
3. Right sides together place the front and black piece aligned. Sew around all four sides. Clip corners and trim.
4. Turn right sides out and insert pillow form. Slipstitch opening shut.
5. Diecut circles in black and white, adhere to front of pillow.
This is a super quick and easy pillow, the shaggi is washable and will continue to become softer with each wash. This makes great floor pillows for the kids from those on play mats to those with dorm rooms!
Get into the pillow fight by clicking on the DCC button in the sidebar to see what the other designers are tossing around!
And for a bonus you can use this coupon! AMYCOUP worth 20% off orders through the month of June on www.fairfieldworld.com
Thanks for stopping by!
Debra
Monday, June 01 2015

Happy June 1st! The DCC, Designers Craft Connection starts every month off with wonderful creative projects! This month it is all about Celebrations! So with number 9 and 10 "grandlittles" on the way, I get to be part of lots of fun birthday parties. This sweet grandlittle just turned 5 so her birthday party was themed for her favorite movie. Can you guess?
Every Queen needs a cape so I created this pretty Snowflake cape from Kunin's Eco-fi Felt, some pom pom, "Snowball" trim from Decorative Trimmings , Aleene's Quick Dry Fabric Fusion and glitter snowflakes. The full tutorial and pattern will be on the Kunin blog on Thursday.
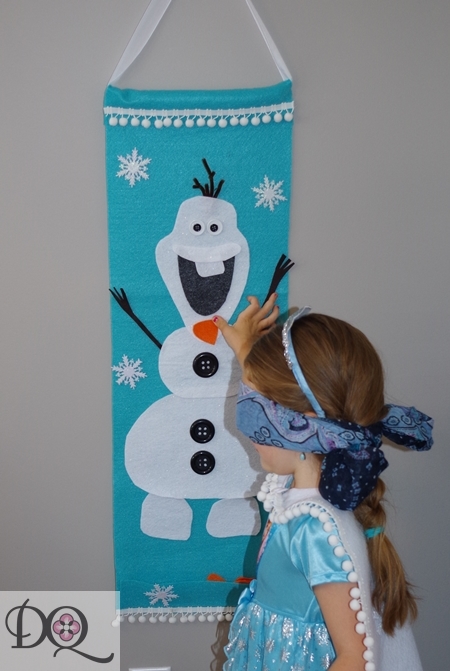
Of course we had to have a "Pin the Nose" on the Snowman game too! :) I made a pocket in the bottom to hold the felt noses. She got her wish, even though the end of May, the east coast of Canada can still stir up some snowflakes and it did for her birthday!
Keep the celebration going by hopping along with the DCC button!
Happy Creating!

Thursday, May 21 2015

The DCC, Designer Crafts Connection is hosting a special hop with the JOY company. They manufacture embroidered letters. With a special birthday coming up for my grand daughter I wanted to create a banner for her party.
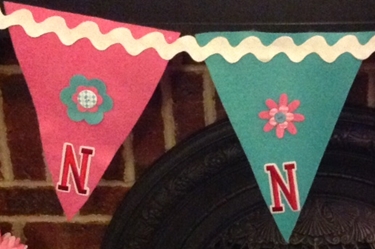
From Kunin Classic felt 72" wide cut by the yard I cut several 9" by 12" banners. Flowers and cupcake were die cut, love my Big Shot and Sizzix dies! Jumbo rick rack from Decorative Trimmings is used to hang the banner. Die cut flowers were layered on each banner, a button center finishes each flower.
The backing on the JOY letters was peeled off and each letter was simply adhered to the bottom of each banner. The rick rack was glued along the top. Now to make more, the yard has several yards of fence and the banners are to hang all along the fence!

Here is to the JOY of creating! Now catch some more great projects, just hop with the DCC button in the sidebar!
Debra
Monday, May 18 2015
This week I am very pleased to be taking part in a special blog hop, the CHA PaperArts + Blog Hop. Several CHA Designer members were paired up with companies participating in the summer CHA PaperArts Show. I was very fortunate to be paired up with one of my favourite companies Ellison/Sizzix, even better I got to design with Laura Kelly's dies with Ellison!
My project is a whimsical summer calendar centerpiece, great project for the kids to create and to use on summer vacation. They can write the date on the chalkboard tag each day and change out the sun for a cloud or raindrops to also monitor the weather.
Let's get started! You will need:
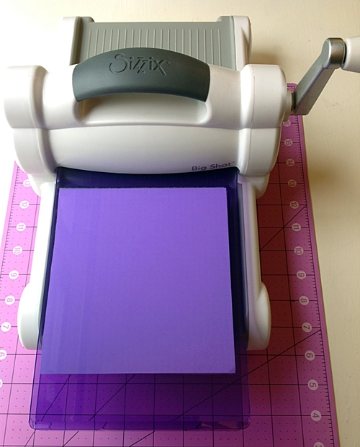
Sizzix Big Shot
Cutting Pads (I got to try out the colored ones!)
Flower Die by Laura Kelly
Sun Die by Laura Kelly
Add some color!
Polka dot and check papers
9" x 12" Craftcuts of Prestofelt by Kunin Felt, Yellow, Green, Red, Royal Blue
9" x 12" Classic Craftcut by Kunin Felt, Yellow
Chalkboard Tag
6-9 Assorted Buttons
Mason Jar
4-1/8" x 12" wood dowels
3-1.2 yard lengths of Craft Floss, Red, Yellow, Blue, Black
1 yard Red Rick Rack
1 yard 3/4" wide blue Ribbon
Scissors, Adhesive, Embroidery needle
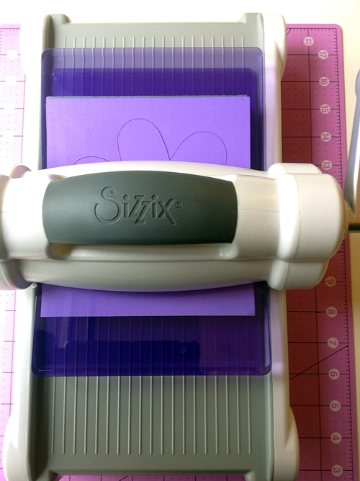
Cut two pieces of patterned paper and 1 piece of Prestofelt the size of the die. Now to make a "Sizzix Sandwich"! Place the die face up on one of the cutting pads, add the "filling", one piece of paper, the felt and the remaining piece of paper and place the second cutting pad on top. Now place the "Sizzix Sandwich" on the Big Shot and slowly push through turning the handle away from you.
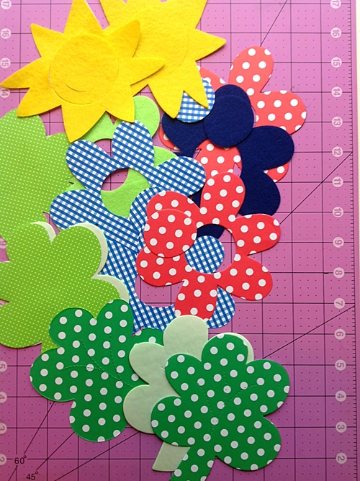
The "Sizzix Sandwich" will emerge out the opposite end with three perfect diecuts. Repeat for each flower, I cut extra to have several color combination choices.
As you can see, I cut out several extras for future projects. The colored cutting pads are so easy to find on the craft surface even as it becomes more and more covered with crat materials. Now to assemble flowers. Dowels can be painted or left plain.
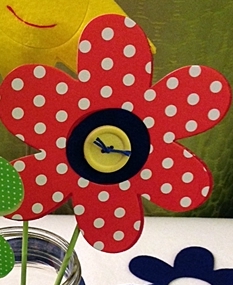
From scraps of felt cut three circles slightly larger than flower center circles. Peel backing off of Prestofelt flower and adhere adhesive side to back of paper flower. Place dowel end to center of flower. Peel larger circle back and place over center opening on back of flower. Add flower center to front of flower sandwiching dowel in between the two center pieces. Repeat for two remaining flowers. Tie floss through buttons and glue to flower centers.
For the sun, make two small stitches for eyes through felt. Repeat assembly as for flowers using yellow Prestofelt for back of sun. There is a small cut in felt center for a smile. Cut a piece of red floss to fit and press into place, it will adhere with the Prestofelt adhesive side.
Glue rick rack to center of blue ribbon. Tie ribbon around jar top. Slide on chalk tag. Stack buttons, tie through centers with floss. Glue to center of bow. There you have it, a quick easy summertime project for the whole family! Now for the contest details and how you can check out all of the great designer projects this week!
Win $500!
Follow the CHA Paper Arts+ Blog Hop all week on the CHA Blog for updates on new designer blog posts and projects. Each post will have a “password”, collect all of the passwords.
The first two people to tweet CHA @Craftandhobby the correct phrase will win:
1st Prize: $500 toward travel to the Paper Arts+ Show (trade only)
2nd Prize: $25 AMEX gift card
Here is your “password”: Chicagoland
Don’t forget, registration is now open for the CHA Paper Arts+ Show in Chicagoland where you’ll see, touch and learn about product, like the products that were donated for this Blog Hop by Ellison/Sizzix. Paper Arts+ is A CRAFT FUSION experience with exhibits offering everything from paper to jewelry to mixed media materials. The industry will be there looking for fourth quarter trends and new product SKUs. Members attend for FREE! For more information and to register, visit www.craftandhobby.org/paperarts.
Thank you for stopping by!
Debra
Monday, May 11 2015
It is the first Monday of the month and that means the DCC, Designer's Craft Connection is hopping! This month's theme it is all about the bling! I am sharing this snappy little design over on the Kunin blog tomorrow!
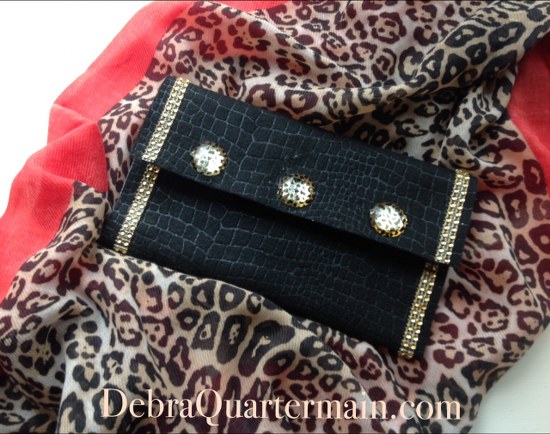
I admit to having a thing for animal print and how perfect it is that felt comes in several animal prints. Makes it very hard to choose which one to use though! My inspiration was an animal print scarf I just picked up recently and some very blingy animal print buttons. I also like small purses especially the clutch. This is a mini version, so I am calling it a clutchlet. Quick and easy, inexpensive too!
You will need:
9” x 12” craft cut Kunin Printzfelt™, 1 Brown Leopard
9” x 12” craft cut Kunin felt™, 1 Black
1 yard decorative trim
3-1” decorative flat beads
1 hook and loop fastener
Aleene’s Quick Dry Fabric Fusion
scissors, ruler, pins
 
How to:
1. Wrong sides together align the two pieces of felt on top of each other. Glue together.
2. Adhere trim along opposite sides of black.
3. With black side down fold up one end 4”. Place thin line glue down each side and finger press.
4. Adhere hook and loop fastener in place.
5. Glue flat beads to front edge.

There you have it, super easy and fast! Make a clutchlet to go with different outfits or use as jewelry or make up pouch! Check out more bling by hopping with the DCC button in the sidebar.
Thanks for stopping by!
Debra
Styled with Charm!
Wednesday, April 22 2015

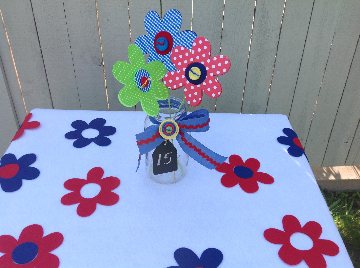
Spring has finally arrived and what fun to plan a spring wedding. Tulips are my favourite spring flower, the bright yellow of the tulips match perfectly the yellow felt. Felt, being such a versatile product it can be dressed up or down for any decor or special event.
This week I have paired up the felt with some fun trims from Decorative Trimmings. The giant rickrack gives a scalloped edge finish to the felt. Decorative Trimmings provided trims to a group of creative professional designers, the Designer Crafts Connection with a wedding theme challenge. They have a wide selection of quality trims and embellishments, it was hard to choose!
For a wedding with many tables to decorate this is an easy and fast way to dress them up. Finished off with tulips in a mason jar and chalkboard number.
You will need:
Per table
2-9” x 12” Craft cuts Kunin Prestofelt Yellow
1-9” x 12” Craft cut Kunin Printzfelt Saralma
1-12”x 18” Craft cut Kunin Premium Eco-fi Plus Felt White
6 yds Jumbo Yellow Ric Rac by Decorative Trimmings
Aleene’s Quick Dry Fabric Fusion
Westcott Brand 8”Scissors, ruler, pencil

- Measure and cut each of the 9” x 12” craft cuts into a 9” square.
- Glue ric rac around each side folding over at each corner. Snip off overlap at final corner. Repeat for all three pieces.
- Glue ric rac along both sides and across ends of white felt.
- Center Saralma square on white felt table runner on the diagonal. Glue down.
- Peel off backing from Presto felt pieces and place on either side of Saralma square.
As simple as that! Now add some embellishments. I glued ric rac around the top of the mason jar too.
Get inspired with all of the great designs from the DCC group. Just hop along with the button in the sidebar.
Thank you for stopping by, it is very much appreciated!
Till next time!
Wednesday, April 08 2015

April 22 is Earth Day and we are celebrating with a very special blog hop. Kunin Felt and Walnut Hollow, two “Made in the USA” companies committed to eco-friendly practices and quality products partner to bring you indoor, outdoor home decor projects.

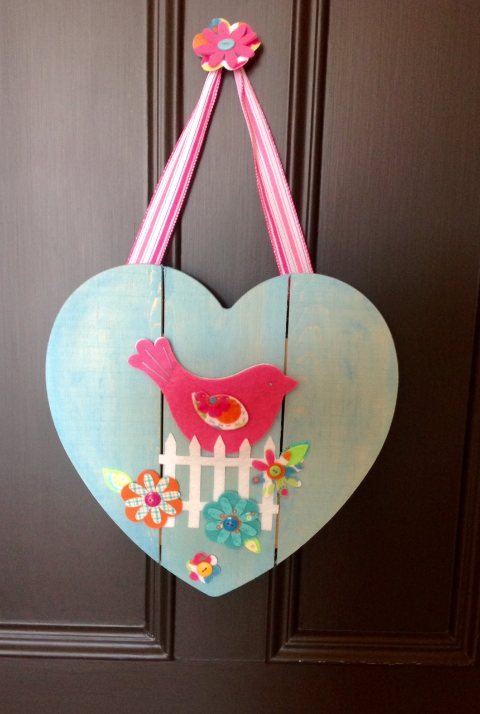
I love Hearts and when I saw the Rustic Heart Walnut Hollow® offers, that was it! I found my perfect piece. With spring in the air and the song birds returning I was inspired to create a song bird happily singing on a picket fence surrounded by colourful flowers. Now the fun part choosing the colours of felt to use, so many choices!
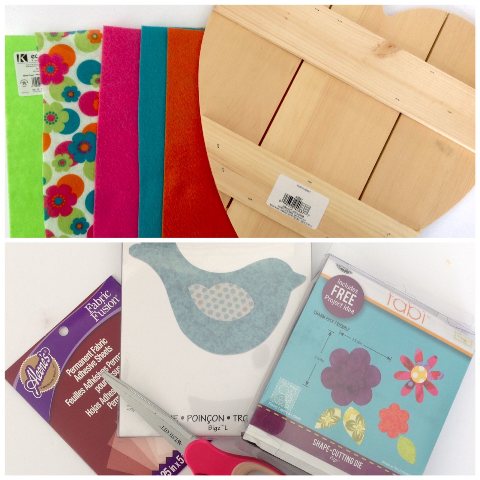
Here is what you need:
Rustic Heart by Walnut Hollow®
9" x 12" Craftcuts of Kunin Eco-fi Plus Felt: 1 Candy Pink, 1 Lagoon Blue, 1 Orange
9" x 12" Craftcuts of Kunin Prestofelt: 1 Neon Green, 1 White
9" x 12" Craftcut of Kunin Printzfelt: 1 Retro Floral
2 pkg Aleene's Permanent Fabric Adhesive Sheets
Assorted Buttons Laura Kelly Designs for Buttons Galore
Westcott Brand 12" scissors
Aqua, pink embroidery floss
3-6" print fabric squares
1 yd Ribbon for hanging
Aqua acrylic paint
Fabi Floral, Bird, Picket Fence Dies by Sizzix
Die cut machine
Brush, needle, soft cloth
1. Dilute a small amount of paint with water to create a wash. Test on back for colour depth. Apply to front and sides. Use the wet cloth to wipe the front bringing out the grain of the wood. Set aside to dry.
2. Cut felt pieces to fit die cuts. Apply adhesive sheets to back of fabric and felt pieces. (Prestofelt pieces already have an adhesive back.)
3. Die cut birds, a variety of flowers and a fence piece. (I die cut two birds as I wasn't sure which colour bird I wanted.) Any extras you do not use can be put aside for another project.
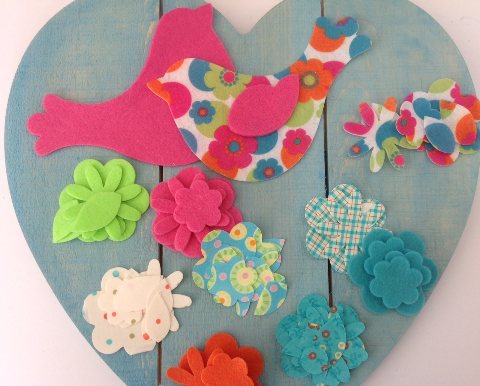
4. Begin layering flowers and arranging bird, fence and flowers on rustic heart. Add buttons on top of flowers. Once you are happy with your arrangement take a photo with your phone or tablet. (This will be helpful to refer to when adhering pieces in place.)
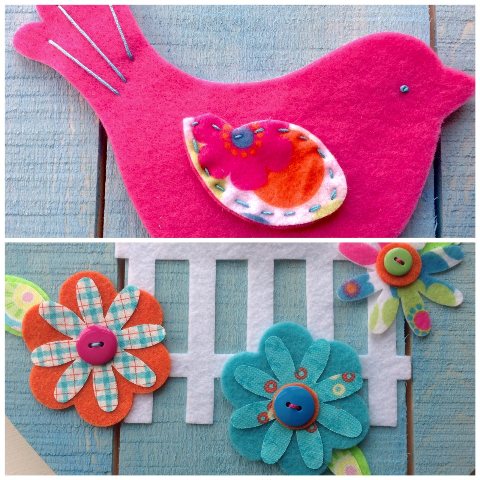
5. Adhere top flowers to bottoms and sew buttons to centers of flowers. Stitch around wing of bird. Stitch a French knot for eye. Straight stitch tail accents for bird.
6. Peel backing and adhere bird to heart. Add fence. Peel and adhere flowers in place.
7. Use a couple of tacks to fasten ribbon to back if hanging. Add flower to center ribbon loop.
Happy Spring! Want to learn more about these two Ecofriendly companies?
It all began with Stephen Seymour Kunin in the 1960’s, “the Father of Craft Felts”. Now The Kunin Group, located in NH manufactures adhesive-backed, die-cut, embossed, and stiffened fabrics in several color and style options using their Eco-fi fiber. Kunin turns trash into treasure using 100% post-consumer recycled plastic bottles. Over six hundred million bottles end up in landfills each year, so far this year Kunin has recycled over 350,000, 000 and counting. This adds the value of environmental stewardship to the fun of making crafts.
Connect with The Kunin Group here:
Website: http://www.kuningroup.com
Facebook: https://www.facebook.com/Kuninfelt
Instagram: http://www.instagram.com/kuningroupfelt
Twitter: http://www.twitter.comKuninfeltfc
Walnut Hollow® began as a small family-owned business in Dodgeville, WI in the 70’s. Walnut Hollow is committed to protecting the environment and replenishing natural resources. · The company’s owners and employees have been since the beginning strongly committed to preserving natural resources through its raw materials consumption practices, production processes, recycling activities, and community involvement. The Ladd's (owners and founders of Walnut Hollow) have planted more than 300,000 trees and shrubs on personal property in the surrounding area. Whenever possible, raw material is harvested from plantation and managed woodlands for the manufacture of their home décor items and wood surfaces. Through their manufacturing process no wood waste ends up in landfills, all is recycled. Walnut Hollow’s emphasis has always been to bring the best possible quality products to art and craft hobbyists.
Connect with Walnut Hollow® here and learn more:
Website: http://www.walnuthollow.com, http://www.walnuthollow.com/about-us
Facebook: https://www.facebook.com/walnuthollow
Pinterest: http://www.pinterest.com/walnuthollow1
Our teams are sharing projects that pair both the Kunin Group felt and Walnut Hollow wood products to create practical and beautiful home decor, organizing solutions, and entertaining items. You can make these projects all year long, not just for Earth Day. To see more inspiring projects, please hop along using the list below:
Jennifer Priest
Sabrina Alery
Steph Ackerman
Laura Kelly
Laura Bray
Marilyn Gossett
Abby Davis
Sue Eldred
Beth Watson
Walnut Hollow
Kunin Group
Celebrating the Made In the USA, eco-friendly fun, we're having a giveaway! We're sending an assortment of Walnut Hollow wood and Kunin Felt products to one lucky crafter. Use the widget above this post to enter to win! in this Earthfriendly Giveaway!
Keep Creating!
Debra
Monday, April 06 2015
Banners immediately brighten up a space. Even though there is still snow on the ground, inside it is Spring! This is the first Monday of the month and we are hopping with the Designers Craft Connection. Button is in the sidebar. This month's theme is flowers. One of my favourite flowers to make is the looped flower.
Project Supplies
18” x 36” single piece pack Kunin Printzfelt™, Saralma
9” x 12” craft cuts Kunin Classicfelt™, 1 Candy Pink, 1 Neon Green, 1 Orange, 1 White, 1 Yellow
Buttons, 3-1”, 4-1/2”
2 yards of 3/8” ribbon, orange
Aleene's Quick Dry Fabric Fusion
scissors, ruler, pencil
Directions
- Cut a 12” by 36” piece of the Saralma. Place wrong side up. Mark 9” widths across top edge. Across bottom edge measure in and mark 4 ½”. Continue measuring 9” across bottom.
- Use ruler as guide to draw a diagonal line from the top outer corner to the 4 ½” mark. Draw a second diagonal line from the first 9” mark to the 4 ½” mark making a triangle pennant piece. Repeat step 2 across the remainder of the felt piece. This will give you double pennant pieces. Cut along lines making eight pennants. Set extra pennant pieces aside for another project.
- Cut a 6” square from each of the Classic felt pieces. Measure 3” center point along one edge. Draw diagonal lines to the 3” center point to create a triangle. Repeat for each color. Cut along lines.
- Cut three large and four small floral medallions from remaining piece of Saralma felt.
- Glue a solid felt triangle to the top of each Saralma felt triangle. Glue a large medallion in the center of three of the pennants. Glue two smaller medallions on the two remaining pennants. Glue a button to the center of each medallion.
 For each flower cut a 2” by 12” piece of felt. Fold felt strip in half; begin cutting evenly spaced slits from the folded center to the edges leaving ¼” uncut. Keep strips folded and begin rolling, glue as you go. Glue to the end of the two triangles. For each flower cut a 2” by 12” piece of felt. Fold felt strip in half; begin cutting evenly spaced slits from the folded center to the edges leaving ¼” uncut. Keep strips folded and begin rolling, glue as you go. Glue to the end of the two triangles. - Lay out pennant pieces right sides down. Glue ribbon along top edges leaving 12” at either end.
Change up the felt colors to personalize the banner for any indoor room, outdoor event or personality! Check out the rest of the flower power designs with the DCC button in the sidebar!
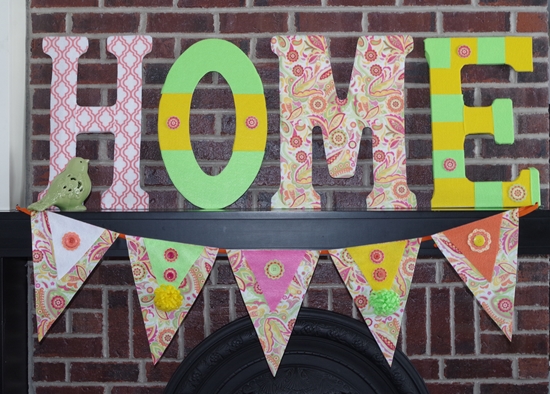
Tomorrow on the Kunin blog we are celebrating Earthfriendly crafts, the HOME on the mantle, easy peasy!
Keep creating!
Debra
Wednesday, March 18 2015
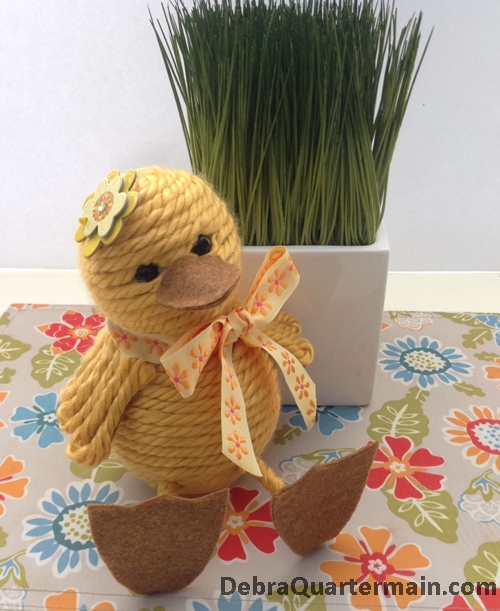
Well Miss Bernice B did not win but she placed well and is moving onward and upward! Thank you to everyone who voted for her, very much appreciated! She is moving on as Easter is right around the corner and every Easter basket not only needs a bunny or chick but a duck of course! Back by popular demand!
Meet Miss Bernice B! Wearing her best bow and a flower in her hair she is has returned from the Favecrafts Best Blogger 2015 Contest. Miss Bernie comes from a proud lineage, on her father's side, a good solid foundation Floracraft and on her mother's side, her pretty and soft good looks, Bernat. They met at a big event hosted by Prime Publishing and it was love at first sight. They became inseparable thanks to Aleene's Turbo Tacky Glue.

Want a little Miss B of your own? Here's how!
You will need:
Bernat Mega Bulky Yarn Gold (1 Skein will make several ducks)
Styrofoam Brand Foam: 4", 6" balls
9" x 12" Kunin Prestofelt Craftcut Copper Canyon
2-12mm Black Beads
1-12" x 1/4" Dowel
1/2 yard craft ribbon
Flower embellishment
Aleene's Turbo Tacky Glue
Printable Pattern

1. Begin at center end of ball, glue and wrap yarn.
Continue until ball is completely covered. Repeat for second ball.
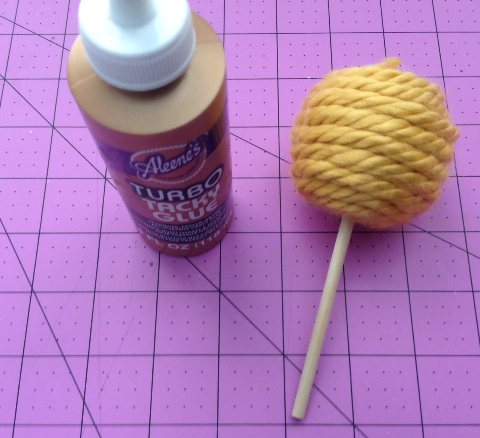
2. Cut dowel into 3 equal pieces. Insert one piece of dowel between the two
balls using the Turbo Tacky glue.
3. Print out pattern. Draw pattern onto paper backing of Prestofelt.
Cut out each piece.

4. For legs wrap dowels with yarn leaving a 1/2" at one end. Glue at both ends.
5. Peel off backing of felt wing. Place the yarn back and forth across the adhesive
back of the felt. Trim yarn. Repeat for second wing.

6. Peel backing off of both beak pieces. Place a small amount of yarn in center
of one beak piece for stuffing. Place adhesive sides together around edges.
Press to face, adhesive on felt with adhere to face. Insert beads on either side of
of beak pressing into face. Glue on place.
7. Trim top of wings off and glue to either side of body as shown.
8. Peel backing off feet pieces and press together. Glue to ends
of dowel. Insert opposite ends of dowels into body.
9. Cut a 12" and 3"piece of yarn. Fold the 12" piece back and forth three times.
Wrap 3" piece around one end and tie. Trim ends. Glue to duck back for
tail. Tie on bow and add flower.
Bernice was excited to be part of the contest, she practiced her talent, not sure pond diving is going to do it for her and the swimsuit portion well you have seen her figure. However she is cute, sassy and confident, what more can a duck be!
Thank you to Prime Publishing for the opportunity and to all the wonderful manufacturers who provided great product.
Thank you for stopping by! I truly appreciate it! Thank you too for those who voted for Miss Bernice! Now on to Easter crafting!
Friday, February 06 2015
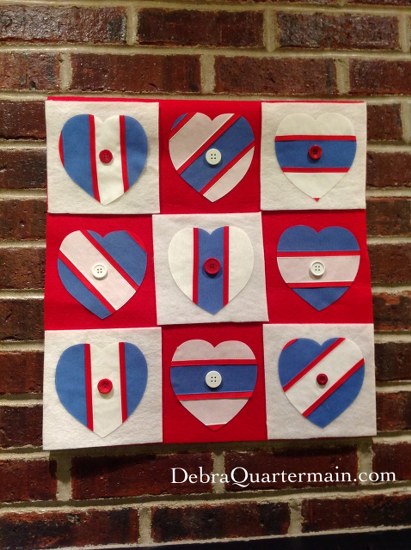
Belonging to the DCC, Designer Crafts Connection, a group of professional international designers/bloggers offers creative and fun challenges. This month Offray Ribbon sent each of us a selection of colorful ribbons, mine were red, white and blue! With Valentine's next week and a new heart die, my design had to include hearts. Now to showcase the pretty ribbon with an interesting technique. I came home from CHA with a stack of Aleeene's Adhesive sheets. They would adhere the ribbon very nicely and die cut easily. I was inspired to design a 9 patch no sew wall hanging. Play time! By placing strips of ribbon at different angles and combinations on the adhesive sheets, patchwork hearts. Felt makes a perfect material for the wall hanging base.
You will need:
4 yards of 1 1/2" White, True Blue Ribbon by Offray
4 yards of 1/4" Red Ribbon by Offray
3 packages of Aleene's Fabric Adhesive Sheets
Aleene's Fabric Fusion
3-9" x !2" craftcuts Eco-fi Plus, White by Kunin
1/2 yard of Eco-fi Plus, Red by Kunin
Heart Die by Laura Kelly for Sizzix
9 Buttons, Red, White by Laura Kelly for Buttons Galore
Westcott Brand scissors
Ruler, pencil, rotary cutter, cutting mat
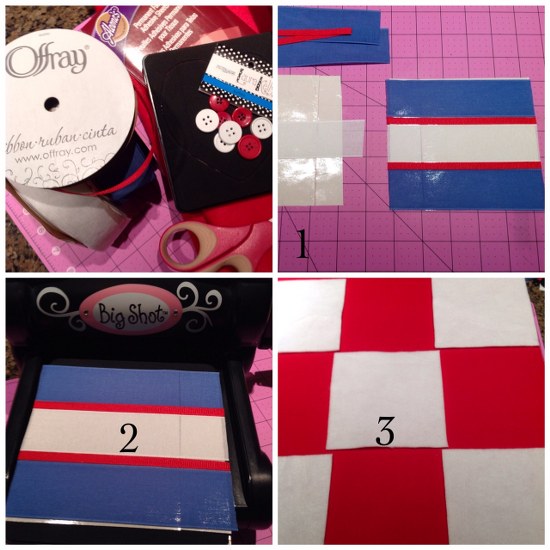
1. Cut 6"pieces from each of the three ribbons, eighteen of each color. Since the die is slightly latger than the adhesive sheet, cut three of the sheets into four equal pieces. Peel off paper from one side of a full sheet and one of the smaller strips. Place side by side. Begin by placing a piece of ribbon across the center of the sheet. Leave a 1/4" space on either side and add the contrasting ribbon. Fill in the 1/4"spaces with the red ribbon.
2. Trim ribbon around edges. Die cut. Repeat for nine hearts.
3. From white felt cut five 6" squares and from the red, an 18" by 22" piece of red felt. Alternate the white squares on the red, glue in place.
4. Peel off the paper backing from each heart, adhere to center of each red and white square. Glue button to center of each heart. Flip wall hanging over and fold top over 3.5" Glue leaving a sleeve to insert a rod to hang.
Easy peasy 123! Hang and enjoy!
Thank you Offray! Sign up for their newsletter filled with information on new products and projects! Receive a 15% discount code on first purchase when you do at Offray.com!
Follow the DCC button to check out the other creative ribbon designs!
Thanks for stopping by!
Debra
|