|
the CEO! Creative Eternal Optimist! Blog
|  |
Thursday, June 13 2013
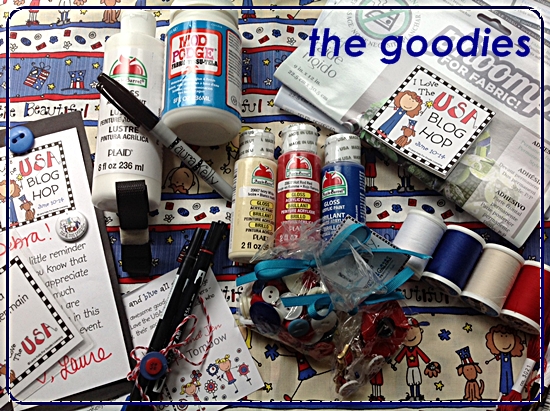
What a fun hop with such talent and goodies! Laura Kelly's new fabric line available at Joann's!
Fabric: http://www.joann.com/holiday-inspirations-patriotic-fabric-america-the-beautiful/zprd_12267134aButtons
Buttons: http://www.buttonsgaloreandmore.com/ProductDetails.asp?ProductCode=LK151
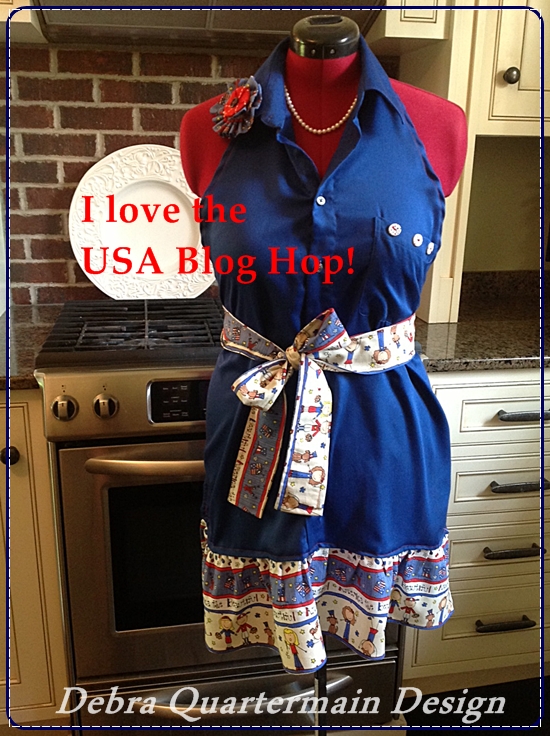
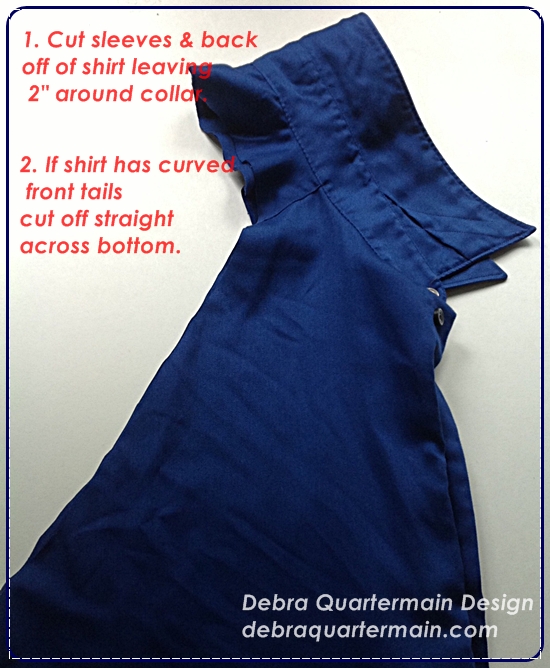
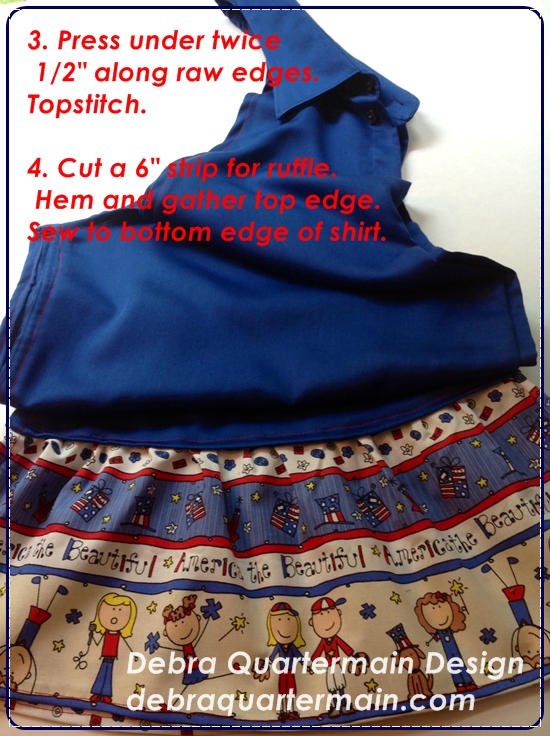
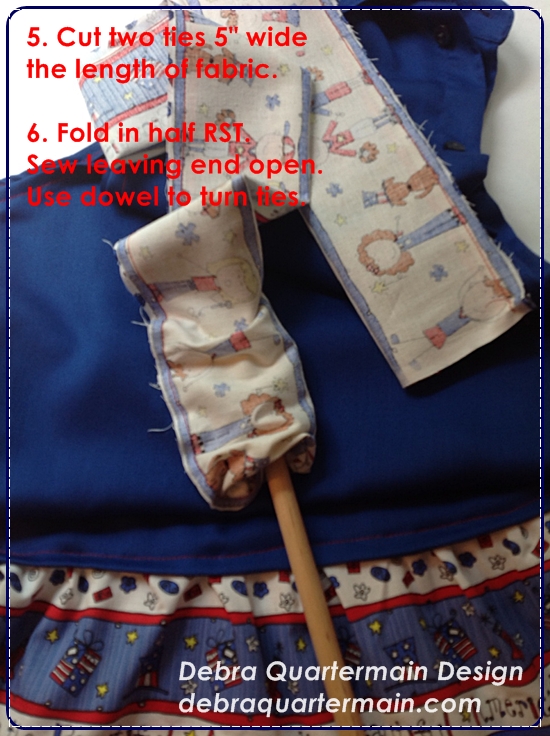
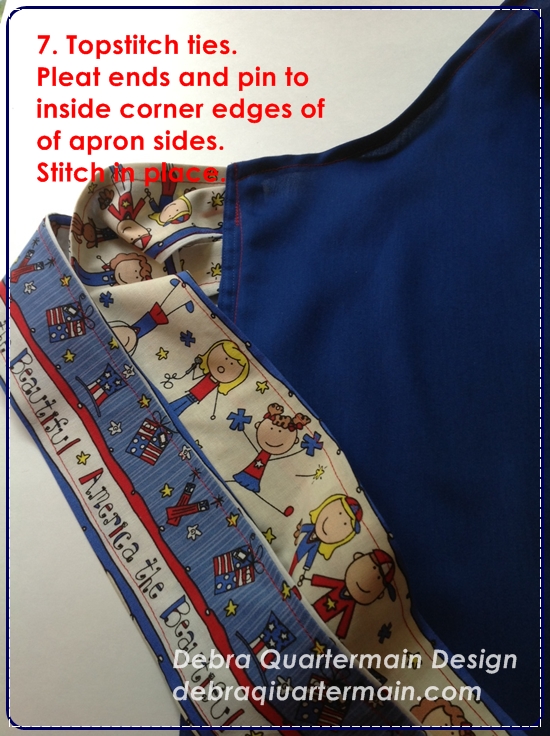
Since I also run a B&B I am wearing aprons everyday. I have been making them for all occasions and have been upcycling men's shirts into full length aprons called "Shirt Tails!" I had the perfect blue shirt for this hop and will now have a wonderful apron to wear for my USA visiting guests! I decided to try and use all of the fabric and extra shirt pieces to create a collection for the B&B to entertain with a USA theme!
(oops, looks like I used the Italian spelling of my name! Mama Mia!)
Now for the fun part finishing the apron! I added some buttons, a ruffled flower to the collar! Check out all the wonderful designs below! Laura Kelly and Jen Goode hosted a fun energetic hop, loved the goodies, so sweet (candy was too!) 
Wednesday, June 12 2013
What a fun creative week! The I Love the USA blog hop featuring designer friend Laura Kelly's new fabric! Cutest fabric and awesome projects from a group of talented designers! I join the hop tomorrow!
Locally 10 awesome days of Giveaways for edVentures! Creative workshops all summer! I am teaching! Full class details on my Class Page!

Monday, June 03 2013
This month's DCC Blog Hop theme Happiness!
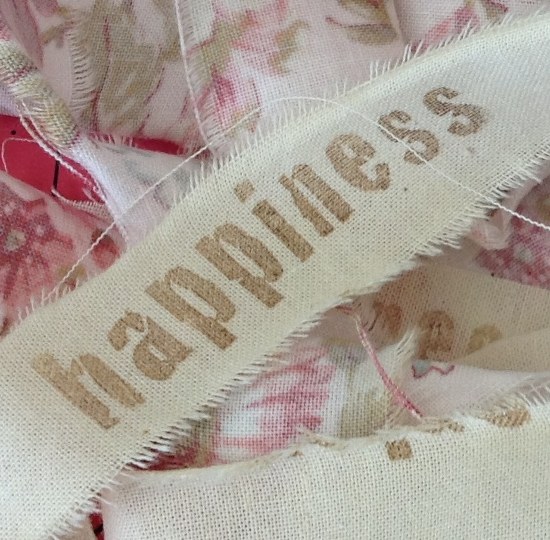
Usually for the blog hop I create a crafty design with stepouts, this week was incredibly full and left me scrambling late this evening on what to do for the hop. Two months ago I opened a Bed and Breakfast in a heritage home in my very pretty city Fredericton, NB, Quartermain House B&B. This past week I hosted guests staying for UNB graduation, hosted a Red Hat special birthday party in the Parlor, helped host our local Women in Business and decorated for the ACFA Cat Show.
i also thought about how do I define HAPPINESS, creating makes me happy, it is an energy that feels like a big smile inside, creating to share for others to enjoy and so here is to a very special Happy week!
For each event I created food and decor. More than that though was the common thread through the creativity of this week, the people, the gatherings and the celebrations. There was laughter and smiles, hugs among friends, proud and beaming parents chatting across the table mixed with the aroma of fragrant French toast and rich coffee. There was HAPPINESS!
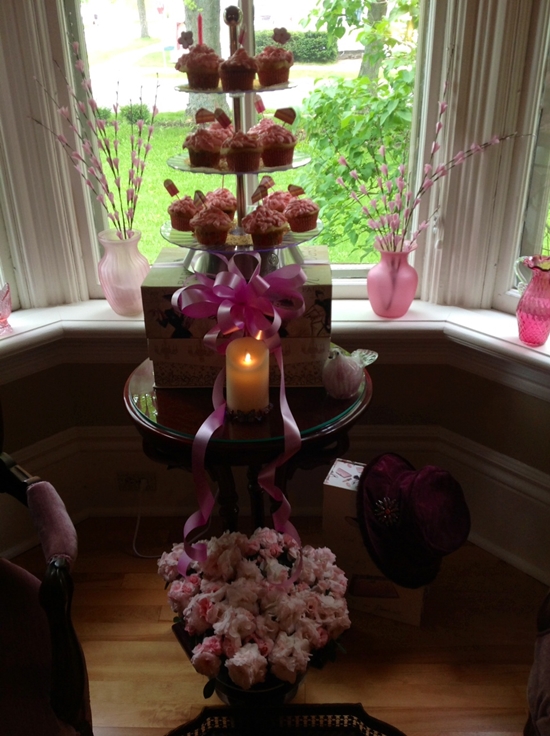
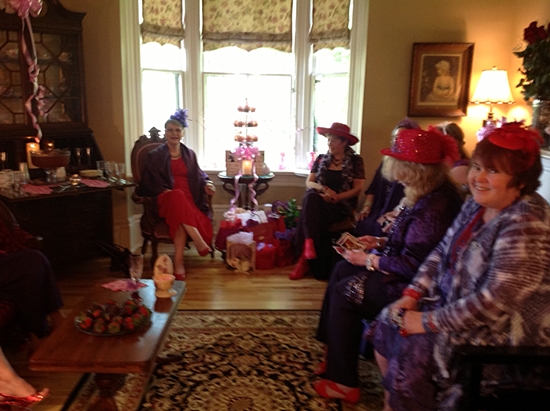
The "Scarlett's" enjoying the Parlor and my pink lemonade cupcakes along with champagne!

Two of our lovely Women in Business members modelling my "Shirt Tail" Aprons made from men's shirts, each with a story for a day of the week!
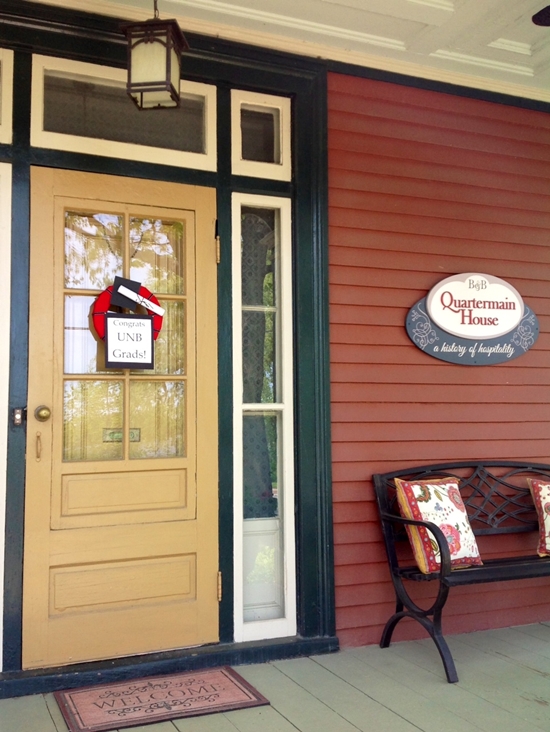
My simple wreath created with a foam wreath, ribbon and cardstock welcoming my visiting UNB graduate parents and their accomplished grads!
To HAPPINESS, to those moments, to that feeling, to those times that make our hearts & spirits sing! To the Joy, to life's celebrations! for more Happiness just hop along with our DCC, Designer Crafts Connection button in the sidebar!
Wednesday, May 22 2013
 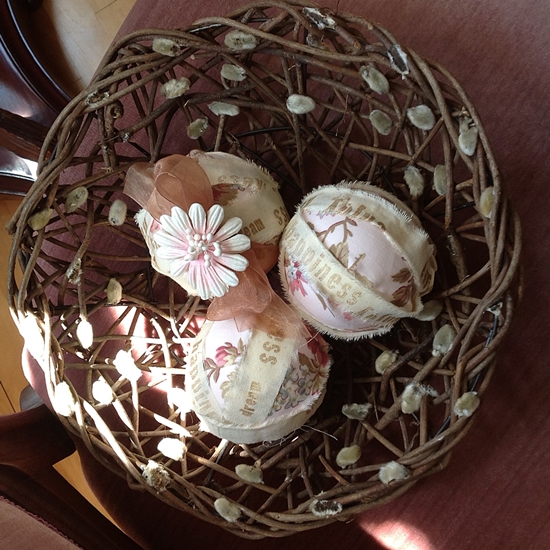
Words evoke feelings, inspiring words like " joy, dream, happiness, soar, love, peace" displayed remind us in the moments of everyday of the richness of life. These stamped sentiment spheres are so easy to create using Smoothfoam balls. The full instructions are on the Smoothfoam blog. I keep them displayed in this natural willow basket in the foyer, a lovely reminder each time I walk by!
Monday, May 06 2013
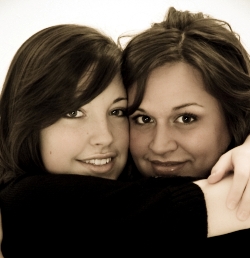
The first Monday of the month, the DCC Designer's Crafts Connection Blog Hop! Our theme this month is Wishes! "Make a wish", "three wishes", wish upon a star", classic, timeless, the power of the wish. If I had a magic wand  and were to "Make a wish" in this week leading up to Mothers Day it would be wishing my Mom could be here. She would love my "new" heritage home, seeing her chairs in the parlor and her artwork in the library, her cane resting in the umbrella stand by the front door. She would meet my darling man and get to dress up like she loved too for our upcoming wedding. The last picture I have of my Mom is with her grand daughters three weeks before she passed away. She would love to see these young accomplished women, happy and productive in their lives, Amanda now a nurse and engaged to a wonderful young man, Kate happy on the Island doing what she loves. I know she watches over us but to have her here once more is still a wish for Mothers Day.
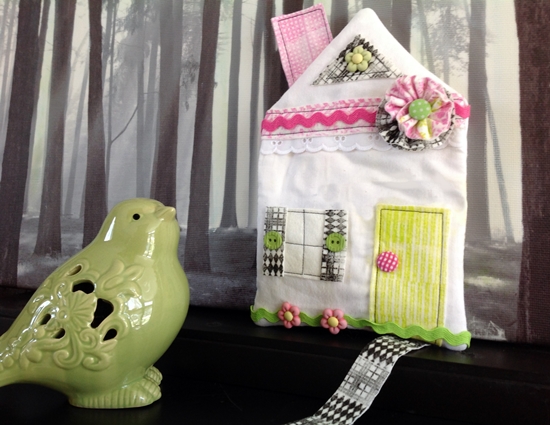
My design for the blog hop is one of whimsical house, a cottage, a design just featured Saturday for the release of designer friend Ann Butler's new stamp line with Unity. It is an ideal gift for Mothers Day, create a cottage or house for your Mom, personalize it with a house number, other details that recreate her home. I celebrate my new home and the memory of my Mom. To make this cute cottage, instructions are here! To see more delightful designs, just hop along with the DCC button in the side bar! To "wishes coming true!" 
Saturday, May 04 2013
This is an exciting week for one of my very talented designer friends, Ann Butler, her new stamp line with Unity is being released. These stamps are so versatile and cute! Flowers, stripes, diamonds, dots, leaves and much more, I loved being able to combine the stamps and create patterns. 
For the release of this new product there is a 50% off coupon deal offered by Unity for anyone ordering the stamps between Thursday May 2, - Monday May 6 at midnight CST....the coupon code is Unity5. So now for some wonderful ideas to use the stamps, Ann has put together a group of designers for a blog hop showcasing her new Unity stamp line. I am very pleased to be part of the hop! With the variety of patterns to choose from I wanted to use several in my design so I chose to make a whimsical cottage in the woods! A fun easy project ideal for using up scraps of fabrics, felt and trims. How to!
You will need:
Ann Butler Unity Stamps 1" Leaves all Over, Diamonds & Plaid and Stripes. Dots. Hearts. ColorBox Crafter's Stamp Pads, Sweet Pea, Limon, Night
Buttons Galore Buttons and Brads
8" x 26" white cotton fabric piece, quilt batt piece
9" x 12" Xotic Pina Colada National Nonwovens Felt
9" lace
9" each of pink, green rickrack
Fabri-tac by Beacon Adhesives
Cutting matt, scissors Westcott Brand, pins, ironing board, iron, ruler, sewing machine, thread, needle. 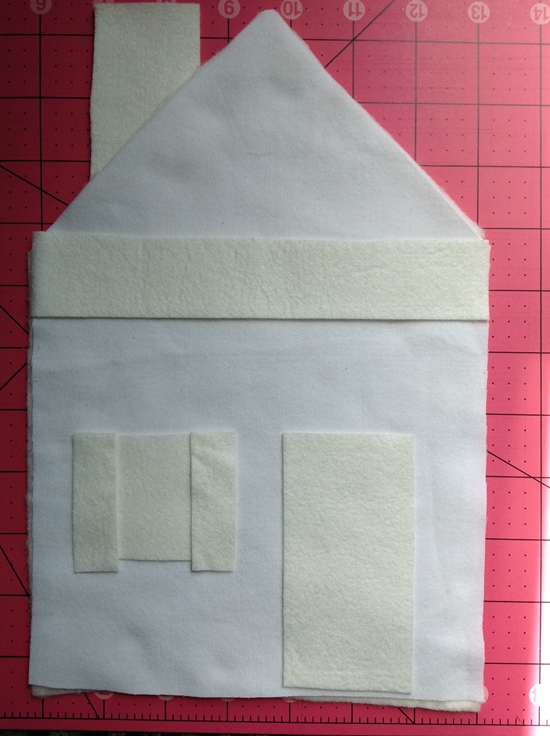
Step 1: Prepare cottage, cut two pieces of the fabric 7" by 11". Fold top corners in to meet at center making roof line. Press along those lines and cut. Cut two house pieces from quilt batt. Cut from felt a door 2" by 5", window 2 1/2" square, two chimney pieces, 2" by 3". 1" by 9" roof trim and 4" by 12" strip for flower and shutters, roof piece. 1" by 6" piece for flower.
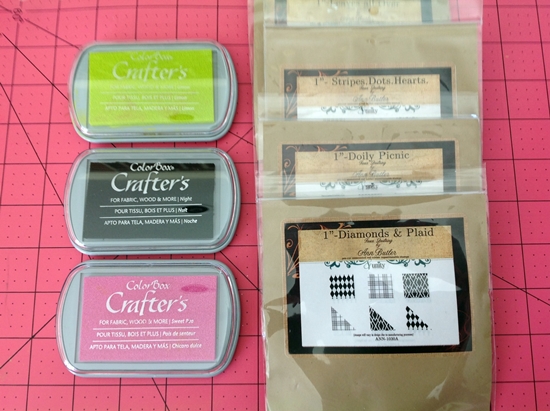
Step 2: Choose Stamps and color combinations. I alternated diamond and plaid with black ink for the shutters, flower and roof window. What I liked about the stamps too for smaller projects is after stamping you can trim the piece to size using the stamp line. Press very firmly when stamping.
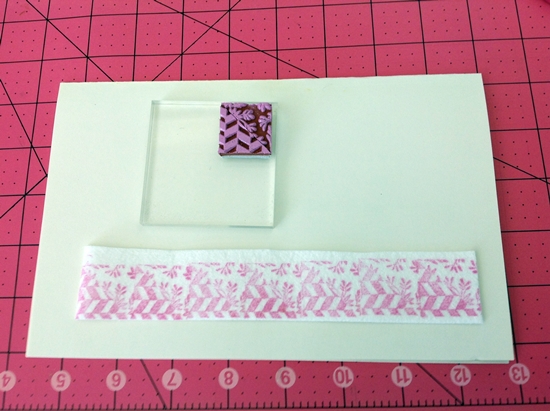
Step 3: For the roof trim I used the half leaf all over and graphic geometric together stamping along the felt piece, I trimmed it after. Finish stamping all pieces. Let dry. Stamping on felt requires a little longer drying time and needs to be heat set with an iron. Step 4: Cut roof window 2" triangle. Place windows, door, lace, roof trim in place on cottage front. Topstitch. Place chimney pieces together and topstitch. Step 5: Layer fabric cottages right sides together, add quilt batt piece to back. Insert chimney into place. Sew around house leaving opening at center bottom. Trim seams, clip corners turn right sides out. Step 6: Cut shutters 2" by 3" and glue in place. Embellish with buttons and brads, rickrack. Step 7: Cut one flower strip 1 1/2" by 9". Baste along edge, pull stitches tight. Baste along second flower piece edge 1" by 6" pull stitches tight. Glue on top of each other and insert button or brad in center, glue to cottage. Step 8: Stuff cottage lightly, sew opening shut. Now onto the amazing designs by a group of professional and so creative designers found with the link below! Enjoy!
Tuesday, April 09 2013

As a Designer I have the opportunity to review new products, this week it is Cousin's exciting new very cool Slide-Bracelet program available at Jo-Ann stores. The program consists of high quality leather bracelets and stylish components to "slide" on. Once the bracelet is cut to size, the clasp pieces are glued to either end. Cousins sent a package with several pieces to work with, I loved the flower slide with the center gem sparkle. What goes well with sparkle for this girl is a ruffle or two. I had dyed Organza ribbon with Rit Tan Dye and used this to create a ruffly center for my Slide-Bracelet. 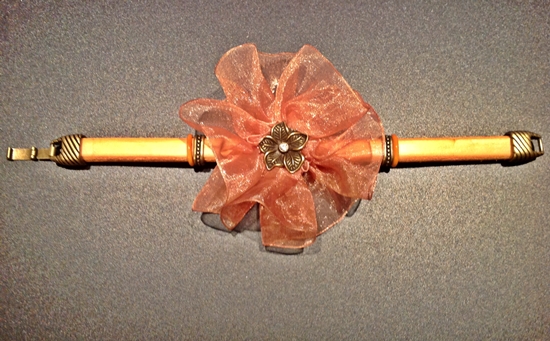
You will need:
Bicast Leather Strap 34740058
Metal Slide 34740012
Metal Clasp 3470005
E-6000 Adhesive
12" Organza ribbon (I used Rit Tan Dye or use ribbon color of choice)
Needle and thread, Jewelry Cutters, Scissors 1. Sew a running stitch along one end of ribbon. Pull tight and tie ends leaving a small opening in center.
2. Insert over back end of Flower Slide. 
3. Following the excellent Cousin video to assemble the Slide-Bracelet, measure and cut to desired length. YouTube how-to video 4. Insert slides on bracelet and stoppers. Glue clasps to either end, let dry. Wear! I do not make jewelry, so my skill set going into this is minimum compared to the other designers involved in the DCC Blog Hop for Cousin, click on the button in the sidebar to see what they created. I found the Slide-Bracelet components high quality and very user friendly. The Slide icons are designed beautifully in metals. The clasps co-ordinate and in just a few minutes you can create a lovely bracelet to enjoy and wear! Well done Cousin! Like their products, like them on FaceBook!
https://www.facebook.com/CousinCorp/app_137541772984354

Monday, April 08 2013

One of the very cool aspects of being a designer is the opportunity to try new products. I am not a jewelry designer but when asked to participate in a blog hop featuring the new line of Dazzle-it jewelry tools, stringing materials, beads , chains and containers I said yes. Besides with snow still on the ground here and there how could I not resist a hop with the theme "Summer Love"! My package of goodies contained vibrant beads in fiesta colors designed by the amazing Fernando daSilva! As soon as I saw the bright peace symbol beads and hemp the colors were a perfect pairing with the Daydream Inspirations collection from National Nonwovens. 
I cut three 1/2" x 10" strips of felt, braided them together and placed pins to hold it at either end. I chose the lime green hemp, threaded it on an embroidery needle, knotted it and stitched through braided end adding a round bead. Continuing to sew through center of bracelet with a simple running stitch in and out adding a peace bead on the up stitch. At the opposite end I made a loop with the hemp, knotted it off and my bracelet was finished. So comfortable and soft to wear and it will go with several of my summer dresses! If and when summer decides to appear! Enjoy the hop, from the simple to the sophisticated this affordable, attractive line will appeal to anyone who enjoys the art of jewelry making. I am already planning a pendant to go with my bracelet from the remaining beads I was sent! 
Monday, April 01 2013
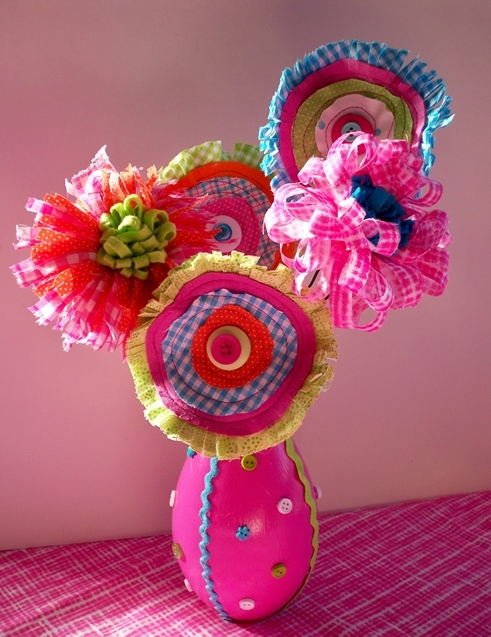
It is the first Monday of the month and time for the DCC Designer Craft Connection Blog Hop! We are thinking spring, spring flowers and the challenge to use items we find around the house. Well as professional designers we have a lot of items around the house to design with! Being a sewer one thing we always have are lots of scraps. I first designed these flowers for the PBS show Creative Living with Sheryl Borden. I used circles of fabric and felt sewn together beginning with a 6" circle and cutting each circle 1" smaller. Sew center and fringe edges. Add a button to center and glue a piece of wire to back.

The vase was a dollar store item I had and I freshened up with a coat of paint, buttons and rick-rack trim! Step into spring, stop and smell the flowers along the way with the DCC blog hop! (button in sidebar!)
Monday, March 25 2013
I love bunnies! I had a favorite bunny about thirty years ago, Willoughby, he was white with black nose and ear tips. Housetrained he would also walk on a leash and growl at the cats!
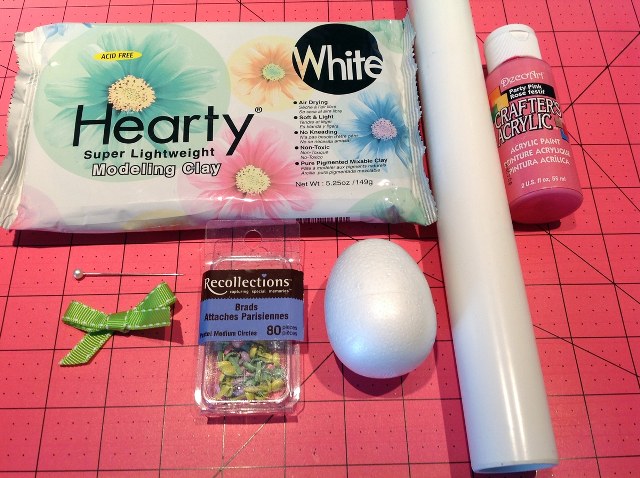
I have made many bunnies these past few years, needle felted, fabric, felt and clay. For the Smoothfoam blog I created a bitsy bunny with ACTIVA Hearty airdry clay. Quick and easy requiring just a foam egg and clay plus a few embellishments. He seems to have forgotten something!

You will need:
3"Egg of Smoothfoam
1 pkg of Hearty Clay by ACTIVA
Brads by Recollection
12" piece of green ribbon
Party Pink Acrylic paint by DecoArts
Clay roller
(Pin, knife, ruler, plastic cup, craft mat, ziplock bag)
1. Break off 1/3 of packaged clay. Cut in half. Roll out one half for bunny body. Break off other half into five pieces.
2. Shape four pieces into long ovals for the feet and paws. Shape last piece into a rough ball for tail.
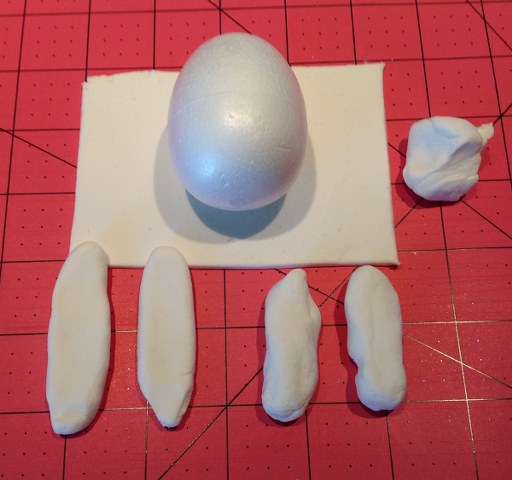
3. Wrap flat rolled piece of clay around egg, smooth and remove excess. Use finger dipped in water to smooth seams.
4. Refer to finished photo and insert eyes, nose, tummy brads into body. Use pin to make a hole if needed. Make eyelash, mouth marks with pin.
5. Attach paws and feet. Dip finger in water and smooth seams. Arrange paws in place. Add tail to back so bunny stands easily.
6. Break off another piece of clay for ears, make two long ovals flattening them in center. Place a drop of pink paint on mat. Wet finger and touch paint, rub lightly along center of ears. Repeat for cheeks.
7. Attach ears to top of head. Dip finger in water and smooth seams. Tie and add bow with a brad to top of head.
A package of clay will make a couple more bunnies or a batch of eggs, color easily with markers or paints. Keep hopping in National Craft Month and find all kinds of fun projects on the Smoothfoam Blog!
|