|
the CEO! Creative Eternal Optimist! Blog
|  |
Monday, January 27 2014

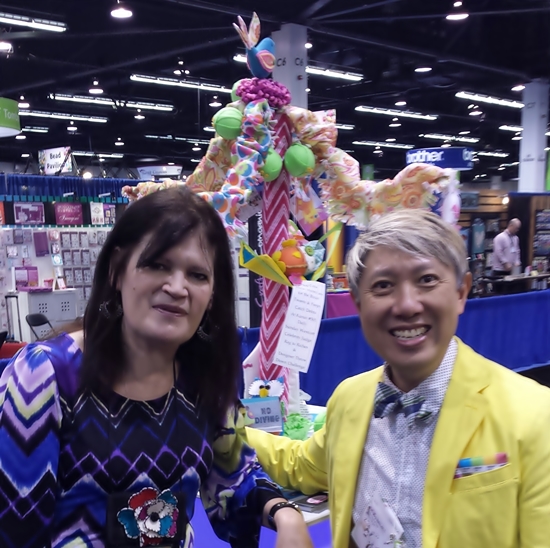
CHA, the Craft & Hobby Show 2014, what a great show! Here I am with one of the nicest guys in the business Mark Montano of Make Your Mark. Super talented and super nice. Here we are hanging out at the Prime Publishing (Favecrafts)blogger event, what a great evening, food fabulous, lots of swag and connections. The craft industry has the best people, super talented and super nice! Thank you Prime Publishing!
Over at my favorite hangout, the Kunin booth we were crowning royalty. I built a throne from pink polka dot felt and the attendees made fun felt crowns.
In the land of Palm trees I built a Palm tree of my own in the Designer Showcase with some bright and lively prints from Kunin. Designer friend Jonathon Fong "Style with a Smile" even dressed to match my display! :)
Since I survived the CHA flu bug, here I am with Suvivor Superstar Rupert. Tiedyed up a storm all day without gloves, hands a very interesting color. We caught up at the I Love to Create pampering party.
There is so much more, catch up with more details on my blog over at Kuningroup.com. What a wonderful company, they were the best to work with at the show! I had a great time in the booth. Thank you to all who made the show such a great success! Debra
Monday, January 06 2014
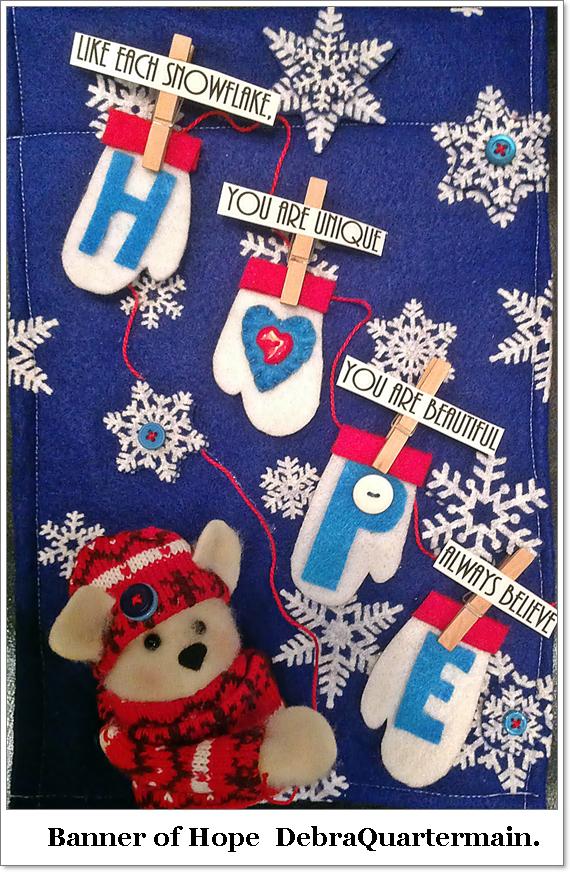
It is the first Monday of the month, the Designer Connection Blog Hop is on, our diversely talented group of designers is showcasing this month's theme with favorite techniques, tools or products. We are all also scurrying the last few days before the trip to the CHA, Craft and Hobby trade show in Anaheim. I am excited to be involved in several events and working with the Kunin Group Felt Fabric and Crafts at Booth 501. I write their new blog and enjoy sharing my love of their product.
The seasonal felt embossed with several designs is fun, festive and colorful! One of my favorites is the snowflake design. Much warmer to handle than the real stuff that is piled five feet high outside! An easy technique to create dimension is to cut out individual icons from the felt and sew to the matching icons on project. Varying dimension can be achieved by layering two, three or even more icons on top of each other. Beacon's Fabri-tac is an excellent glue for felt. Finish off with a colorful button. I am a big fan of the bright collection from Laura Kelly.
I used this easy technique in a project dear to my heart, the Banners of Hope CHA Designer project. Led by the new Fabric Arts Council of CHA individual banners with messages of Hope are being created in every medium. In my post on Tuesday over on the Kunin Blog I give all details. Create & enjoy! 
Monday, December 16 2013
The year is coming to a close and for me 2013 has been an exciting one indeed! I recently got married after 20 years on my own raising two darling daughters, opened a 5Star B&B in a historic property along the river in pretty Fredericton, NB, Canada. New wonderful beginnings and now another exciting turn to where my design career began with Kunin Felt.
I have always loved working with felt and have my entire life. My professional design career began with felt and now I am working with the Kunin Group, writing their blog twice a week and preparing some fun demos at the CHA, Craft and Hobby Show in Anaheim in January. The Kunin Blog by Debra Quartermain http://kuningroup.com/2013/12/09/kunin-craft-blog-debra-quartermain/
To new beginnings!
Debra
Friday, November 15 2013
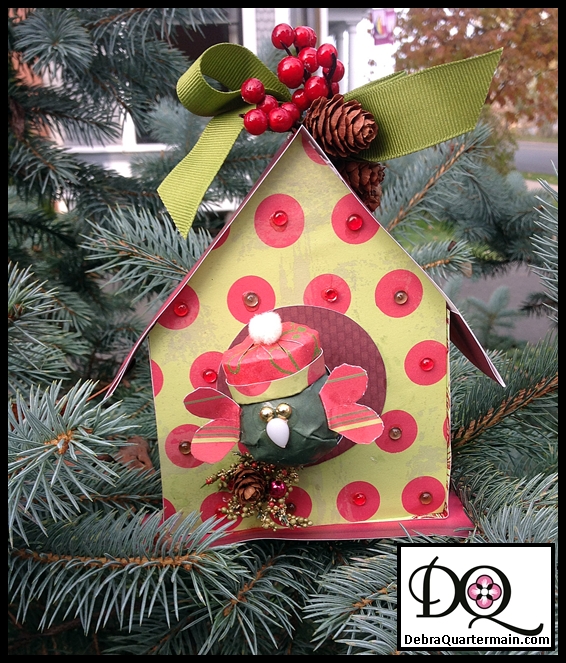
Holiday time and a special DCC blog hop featuring Robin’s Nest pretty papers, embellishments and Smoothfoam! I couldn’t resist, I love birds and in honor of the pairing on this hop, a holiday bird house with a wee birdie wearing my favorite hat, a tam! Smoothfoam makes an ideal ornament base, lightweight for hanging.
You will need:
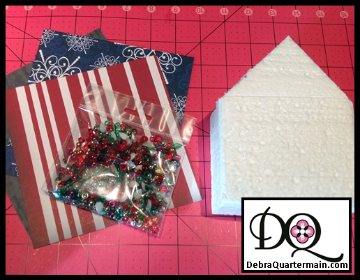
2”x 4”x 8” block, 2” ball of SmoothFoam
2- 12” sheets from the Christmas Collection (polka dot and stripe patterns) The Robin’s Nest
1 package Jolly Dew Drops from The Robin’s Nest
½ yard of 1” Green Grossgrain ribbon
Berries, mini pinecones embellishments
Fabri-Tac™ by Beacon
4” Westcott Brand® Titanium Steel Scissors
(3” Circle template, cutting mat, measuring tape, ruler, knife, pencil, paper cutter)
- Measure down 2” from end of block, draw line across. Mark center point. Measure down another 2” on either side. Draw line from that mark to center point for roof line. Repeat for opposite side. Cut along these lines. Cut a slice off bottom of ball.
- Use house block as a template to place on wrong side of paper and draw a front and back. Cut house pieces from polka dot. From stripe cut two roof pieces 2 1/2” by 6”. Cut two stripe side pieces 2” by 6” and a third piece for bottom. Cut a 3” circle. For little birdie cut a 3” by 6” piece of paper for body and a 1” by 5” piece for hat. Cut two 1” heart shapes for wings
- Glue paper to front and back of house. Glue paper circle to center of house. Glue red and green drops into center of polka dots. Glue paper pieces to sides extending to cover bottom. Fold roof pieces under 1 ½”. Center roof pieces and glue meeting at roof point with folded ends extending beyond sides. Glue bottom piece extending ½” beyond front.
- Tie bow for top of house. Trim ends. Glue pinecones and berries to bow.
- Snip both sides of birdie paper piece ½” for body. Snip one side of hat ¼”. Round both pieces some by shaping in hand. Glue large piece over ball with flat side being back of bird. Slits will allow overlapping of paper to make a quite smooth front. Glue gold drops for eyes and a white dew drop for beak. Fold end of heart under ¼”.
- Fold unclipped end of hat up ¼”. Overlap ends and glue. Glue slit pieces overlapping into center of hat. Glue pompom to center of hat. Glue hat on head..
- Glue bird to front of circle. Add some berries, pinecones under bird.
The best thing about a blog hop is being able to just hop along and see lots of eye candy ornaments by talented designers guaranteed to spark some holiday creativity! Follow along at the Robin's Nest!
Monday, November 04 2013
This month is all about Gratitude! My American friends celebrate their Thanksgiving and many are expressing their gratitude throughout the month. So as it is the first Monday of the month the Designer Crafts Connection is hopping with Thank you gifts as the theme.
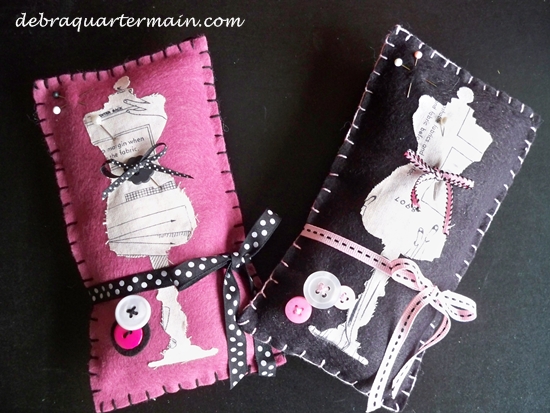
As a sewer and someone who has worked with felt and fabric constantly, I am very grateful for my Big Shot and Sizzix dies where I can cut out many pieces quickly. I love the dress form die. These pin cushions are just two rectangle pieces of felt embellished with the dress form, buttons and ribbon. Quick and easy and a gift I often give as a thank you. I will be making some in Holiday colors as they will also make a cute tree ornament for sewer and quilter friends.
Gratitude, this month my heart is filled, I am getting married to a darling man, I celebrate a milestone birthday and this is the month my darling daughter finally arrived, a precious bundle at thirteen days old. Life is such a gift. So share in the season of the gifts of gratitude, follow the DCC blog hop with the button in the sidebar. Check out on the Smoothfoam blog the Handmade Holidays blog hop and the awesome giveaway which ends today!
Coming up on the 15th more Holiday creativity! We hop again with Smoothfoam and The Robin's Nest!
Ornaments make a great thank you gift, each year the recipient gets to enjoy the gift anew and be reminded of the spirit in which it was given! May you enjoy a month of creativity and gratitude! Love to hear what you are most grateful for! Debra
Sunday, October 27 2013
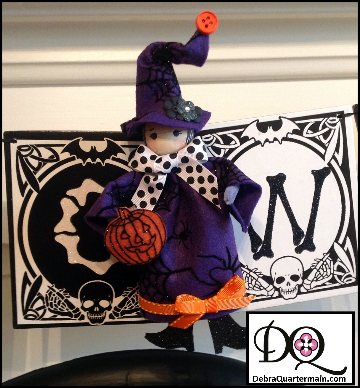
It is almost BOO Day! This month as the featured designer for KUNIN Felt I had great fun designing with their Halloween Seasonal Felt, vibrant purple and orange with embossed spiders and pumpkins. KUNIN felt is made with ecofil which is the process of turning plastic water bottles into their fun felt! As part of the Smoothfoam Design Team I combined a Smoothfoam egg and KUNIN seasonal felt to create this wee witch! Full instructions found on the Smoothfoam blog. I love to sew but sometimes it is also fun to make a project look like it is sewn and this little witch is a so easy no sew design. Just glue!
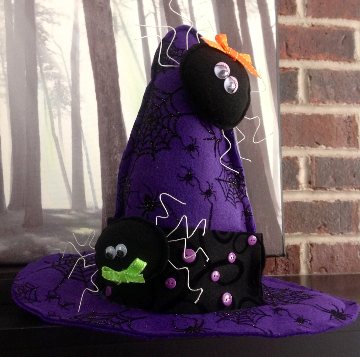
This little witch has a very tiny hat. I also made a very large hat sporting two not so scary spiders for KUNIN. It is hard for a spider to look scary when it has eyelashes and wears a bow! I just could never get into the scary side of Halloween. Scary movies still give me nightmares so I spend much of this time of year trying to avoid TV. A few years ago I went to the movies to see "Interview with a Vampire", somehow I was talked into it, all I can say is I had my eyes shut most of the time and screamed out loud still at least twice! Never again, just give me "Ghostbusters".
Halloween trick or treaters, parties, decorations, it is a very colorful and creative time of year! Little ones and not so little ones are transformed into all kinds of creatures. My daughter just went to a Halloween party dressed as a makeup table, a box top over her head covered by a tablecloth and glued on makeup. Having her birthday close to Halloween the parties were always filled with costumed kids and activities like pin the broom on the witch and pumpkin or mask decorating. I must admit to also enjoying dressing up for the night too while handing out the treats! Last year I sported a purple feather trimmed witch hat. What are you thinking about dressing up as? Happy Halloween! 
Tuesday, October 15 2013

This month the Designer Crafts Connection Blog Hop features designs with Sticky Sticks! Sticky Sticks are a craft stick with an instant and strong adhesive strip at one end which adheres to a multitude of surfaces. I was inspired by the fields of brilliant sunflowers and created a large flower to hang on my kitchen's brick wall.
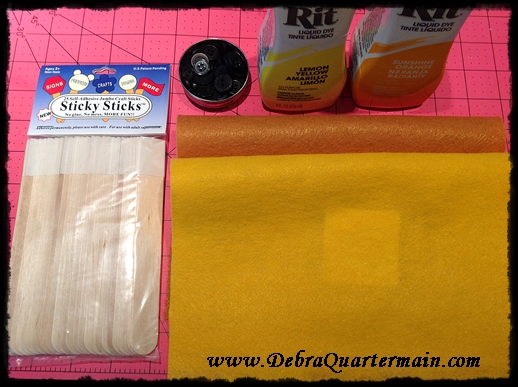
You will need: 1 pkg of Sticky Sticks; Lemon Yellow, Tangerine Rit Dye; Gold, Yellow Kunin Felt; Black buttons by Button Galore; 3" Smooth foam ball; Westcott Brand scissors and Fabri-tac glue by Beacon.
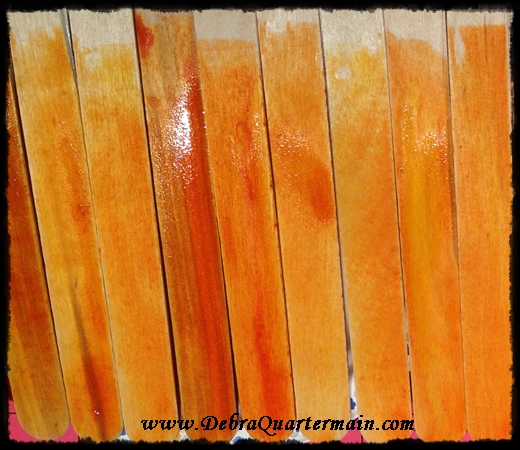
Step 1: Dye the sticks to the adhesive line. Brush or dip sticks in Lemon Yellow dye and brush on Tangerine along edges, reverse colors, mix colors, have fun! Set aside to dry.
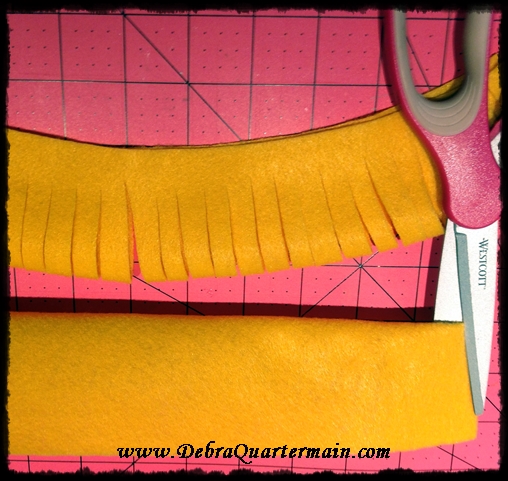
Step 2: Cut Yellow felt piece in half lengthwise. Fold each piece in half lengthwise and cut slits from center fold to 1/4" from edges.
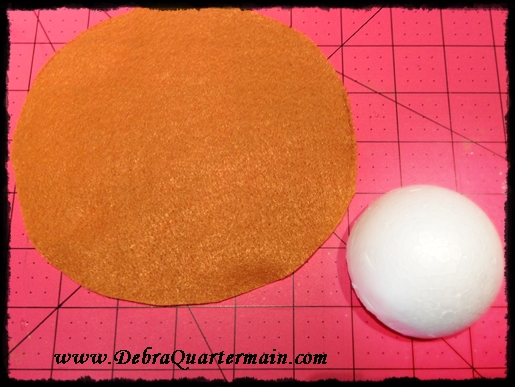
Step 3: Cut a 6" circle from Gold felt. Cut a 3" circle for back. Cut Smooth foam ball in half. Center ball round side down on felt circle. Smooth and glue felt edges to bottom of foam ball.

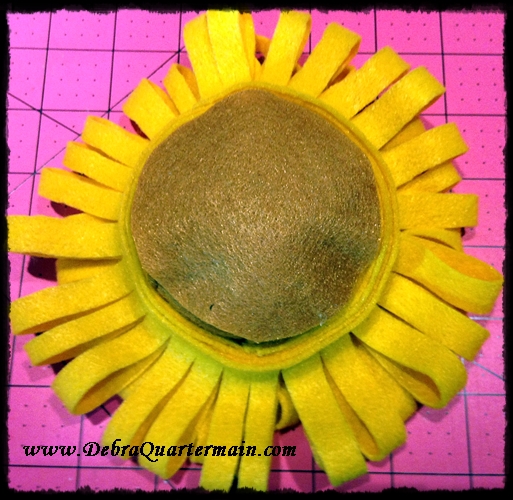
Step 4: Glue black buttons to cover gold foam ball. Begin at edge and glue folded yellow strips around foam ball half. Glue second strip overlapping first piece.
Step 5: Turn ball over and glue a 3" circle of Gold felt to flat side. Fasten adhesive ends of sticks around the circle. Add ribbon or cord loop and hang! Enjoy many more crafty ideas with Sticky Sticks, just click on the DCC button in the sidebar! Enjoy! 
Thursday, October 10 2013
October, fall, Canadian Thanksgiving and time for Halloween decor! This month on the Smoothfoam blog
I made a not so scary spider! Fast and easy, full directions here! http://www.smoothfoam.com/blog/halloween-spider-decoration

Monday, July 01 2013
This month the DCC Designer Craft Connections Blog Hop is all about Celebrations!
For my US friends July 4th is the big day this week and for us Canadians July 1st today
is Canada Day!
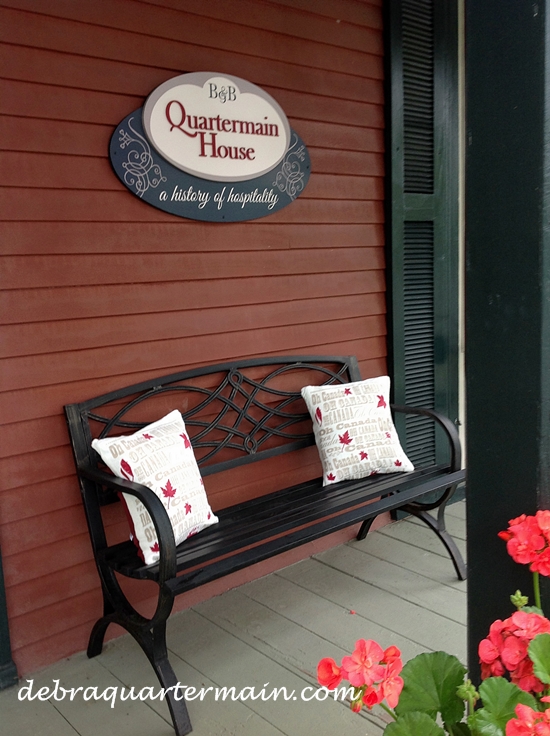
At the B&B we are all about celebrating every holiday, the front porch which greets
our guests is always the first place to start the celebrations! I made some super
easy and speedy pillow covers from a package of Canada Day tea towels.
At a local bedding shop I picked up a package of six Canada Day dish towels for $12!
Their width was exactly the pillow size width I was covering!
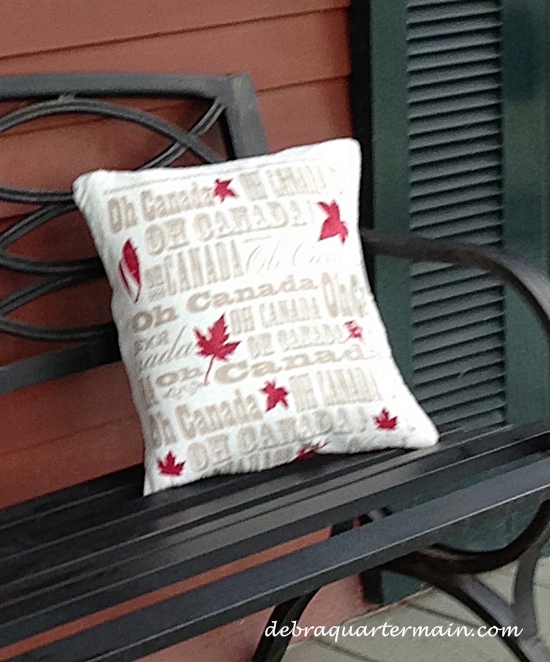
How to! Measure pillow form, I recovered existing 14" pillows. Cut front pillow piece
leaving 1/2" seam allowance. Cut from second towel two pieces for back from each end of towel,
towel width and 9" in length. Overlap the back pieces with finished edges as the overlap.
Place right sides together with front, Pin and sew all four sides.
Trim and turn through the center overlap opening.
Insert pillow, that is it! Less than an hour for four pillows!
I made pillow wraps for the
pillows below by measuring around the pillow. Cut the towel excess off leaving 1" for seam.
Fold right sides together, sew or if you don't sew use a fabric glue like Fabri-tac by Beacon.
Turn right side out and slide on pillow, easy peasy!
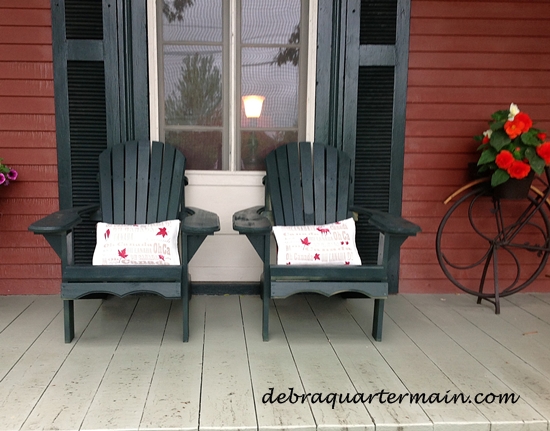
Happy Canada Day!
Saturday, June 15 2013
As a designer we get to try all kinds of cool craft products, often new and sometimes ones that have been
around for awhile. Etchall is one of those products from B&B Etching Products Inc. , a staple in the Craft Industry.
Etchall is a creme that when applied to glass, porcelain, ceramics or marble using a stencil and masking off areas
beautiful designs can be created! It is so easy!
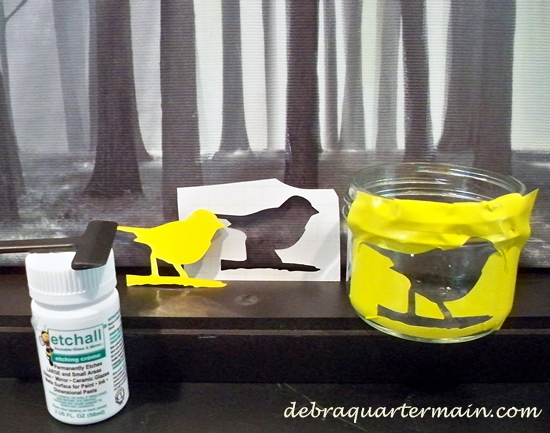
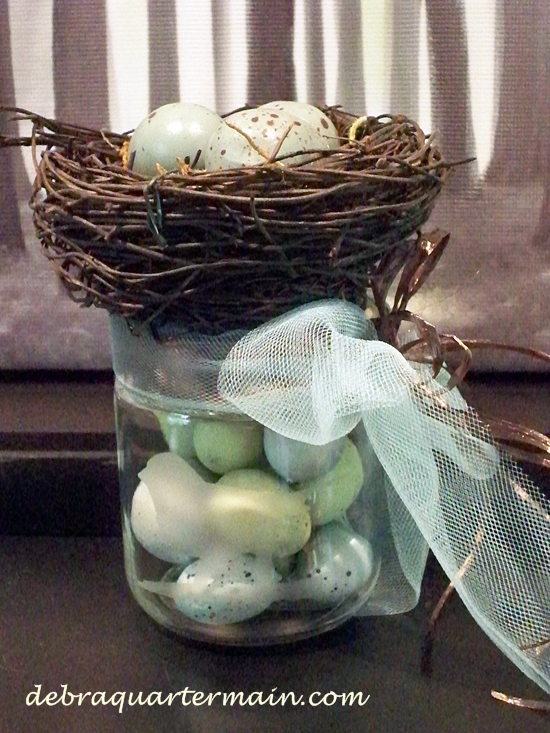
I took an empty glass mason jar, used one of my favorite die cuts, a bird to create a stencil and
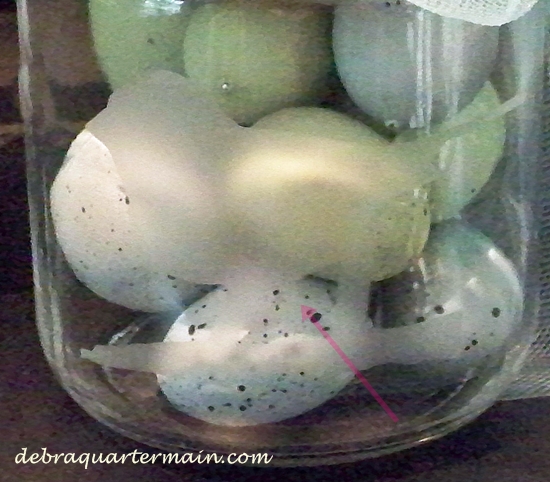
twenty minutes later I had an etched design on the jar. Added some candy or foam birds eggs, jar cover,
tied around ribbon, tulle and rafia, glued a nest on the top. A sweet tweet hostess gift or
centerpiece for the table in less than an hour! It is addictive, I love birds, thinking a whole set of glasses
coming up!
Tips: Choose a die cut for a stencil that the area around the die cut will make a good stencil.
The etchmask vinyl will go through a die cut machine very easily.
With the bird stencil I also needed to use the little center piece between the legs.
Make sure you smooth the vinyl using the Etchall squeegee so there are no gaps,
I added extra strips to cover more of the surface to protect the remaining glass.
Then it is just a matter of adding the Etchall creme with the squeejee.
Wait fifteen minutes, scrape excess back in jar to reuse!
Wash off and remove stencil under running water, no muss, no fuss,
no smell. Dry and admire!
In the above photo you can see how important adding the extra detail stencil piece was.
If not my bird would have had a stump for legs! I can't wait to try some more projects!
Check out some other great designs from our talented Designer friends! Just hop along
with the DCC button in the Sidebar! Enjoy!
|