|
the CEO! Creative Eternal Optimist! Blog
|  |
Saturday, May 04 2013
This is an exciting week for one of my very talented designer friends, Ann Butler, her new stamp line with Unity is being released. These stamps are so versatile and cute! Flowers, stripes, diamonds, dots, leaves and much more, I loved being able to combine the stamps and create patterns. 
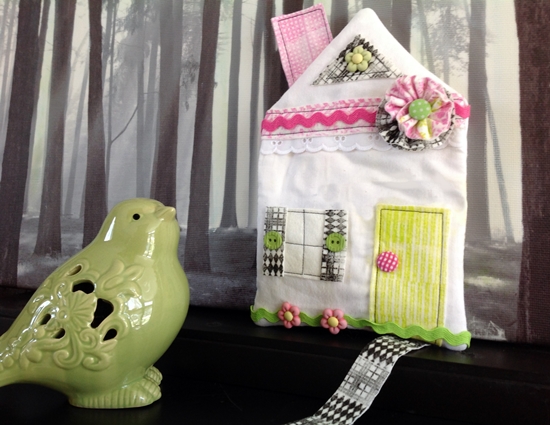
For the release of this new product there is a 50% off coupon deal offered by Unity for anyone ordering the stamps between Thursday May 2, - Monday May 6 at midnight CST....the coupon code is Unity5. So now for some wonderful ideas to use the stamps, Ann has put together a group of designers for a blog hop showcasing her new Unity stamp line. I am very pleased to be part of the hop! With the variety of patterns to choose from I wanted to use several in my design so I chose to make a whimsical cottage in the woods! A fun easy project ideal for using up scraps of fabrics, felt and trims. How to!
You will need:
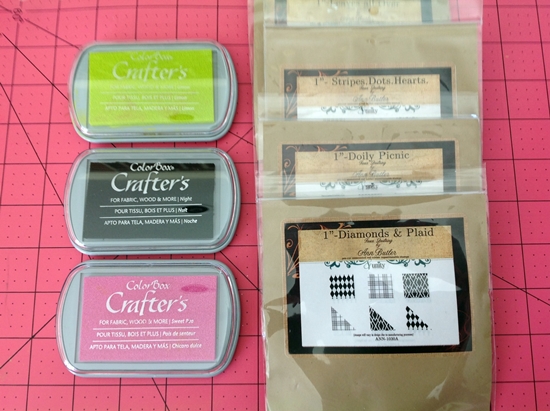
Ann Butler Unity Stamps 1" Leaves all Over, Diamonds & Plaid and Stripes. Dots. Hearts. ColorBox Crafter's Stamp Pads, Sweet Pea, Limon, Night
Buttons Galore Buttons and Brads
8" x 26" white cotton fabric piece, quilt batt piece
9" x 12" Xotic Pina Colada National Nonwovens Felt
9" lace
9" each of pink, green rickrack
Fabri-tac by Beacon Adhesives
Cutting matt, scissors Westcott Brand, pins, ironing board, iron, ruler, sewing machine, thread, needle. 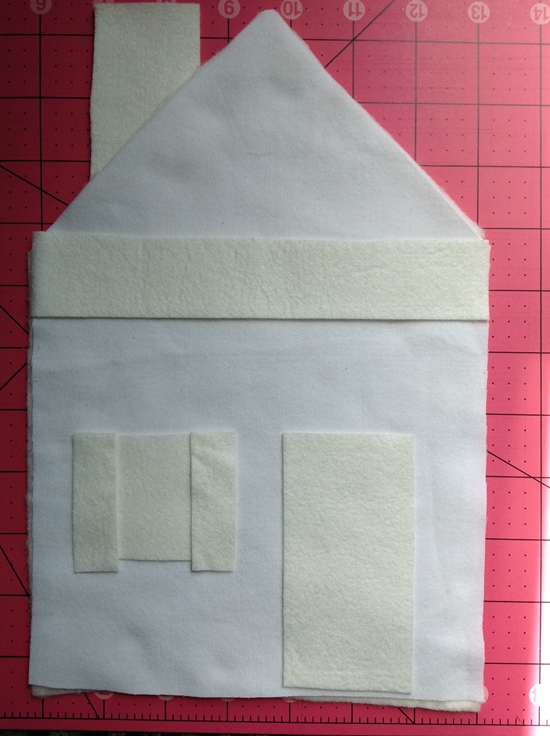
Step 1: Prepare cottage, cut two pieces of the fabric 7" by 11". Fold top corners in to meet at center making roof line. Press along those lines and cut. Cut two house pieces from quilt batt. Cut from felt a door 2" by 5", window 2 1/2" square, two chimney pieces, 2" by 3". 1" by 9" roof trim and 4" by 12" strip for flower and shutters, roof piece. 1" by 6" piece for flower.
Step 2: Choose Stamps and color combinations. I alternated diamond and plaid with black ink for the shutters, flower and roof window. What I liked about the stamps too for smaller projects is after stamping you can trim the piece to size using the stamp line. Press very firmly when stamping.
Step 3: For the roof trim I used the half leaf all over and graphic geometric together stamping along the felt piece, I trimmed it after. Finish stamping all pieces. Let dry. Stamping on felt requires a little longer drying time and needs to be heat set with an iron. Step 4: Cut roof window 2" triangle. Place windows, door, lace, roof trim in place on cottage front. Topstitch. Place chimney pieces together and topstitch. Step 5: Layer fabric cottages right sides together, add quilt batt piece to back. Insert chimney into place. Sew around house leaving opening at center bottom. Trim seams, clip corners turn right sides out. Step 6: Cut shutters 2" by 3" and glue in place. Embellish with buttons and brads, rickrack. Step 7: Cut one flower strip 1 1/2" by 9". Baste along edge, pull stitches tight. Baste along second flower piece edge 1" by 6" pull stitches tight. Glue on top of each other and insert button or brad in center, glue to cottage. Step 8: Stuff cottage lightly, sew opening shut. Now onto the amazing designs by a group of professional and so creative designers found with the link below! Enjoy!


Monday, April 08 2013

One of the very cool aspects of being a designer is the opportunity to try new products. I am not a jewelry designer but when asked to participate in a blog hop featuring the new line of Dazzle-it jewelry tools, stringing materials, beads , chains and containers I said yes. Besides with snow still on the ground here and there how could I not resist a hop with the theme "Summer Love"! My package of goodies contained vibrant beads in fiesta colors designed by the amazing Fernando daSilva! As soon as I saw the bright peace symbol beads and hemp the colors were a perfect pairing with the Daydream Inspirations collection from National Nonwovens. 
I cut three 1/2" x 10" strips of felt, braided them together and placed pins to hold it at either end. I chose the lime green hemp, threaded it on an embroidery needle, knotted it and stitched through braided end adding a round bead. Continuing to sew through center of bracelet with a simple running stitch in and out adding a peace bead on the up stitch. At the opposite end I made a loop with the hemp, knotted it off and my bracelet was finished. So comfortable and soft to wear and it will go with several of my summer dresses! If and when summer decides to appear! Enjoy the hop, from the simple to the sophisticated this affordable, attractive line will appeal to anyone who enjoys the art of jewelry making. I am already planning a pendant to go with my bracelet from the remaining beads I was sent! 
Saturday, March 09 2013
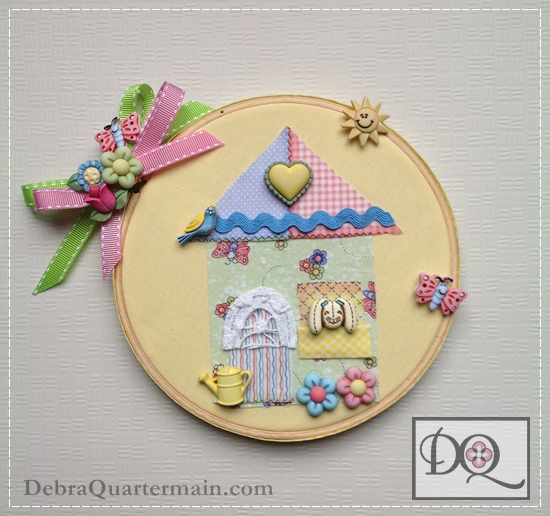
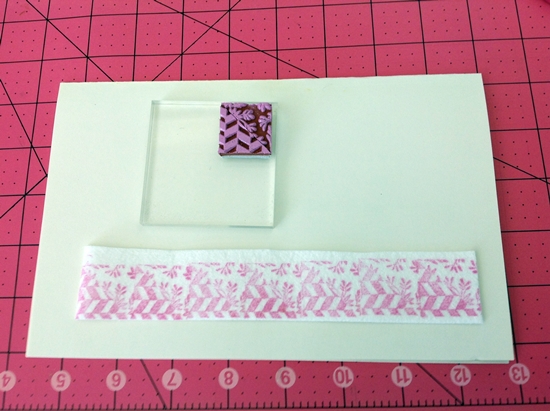
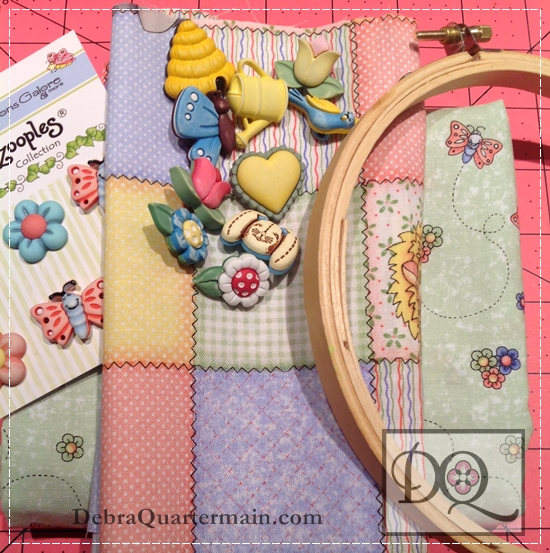
The Designer Craft Connection Challenge is on with the cutest buttons from Buttons Galore and More. I got to work with the Spring Fling Collection designed by the talented Vicki Schreiner. I had some of her fabrics and Bazooples buttons so I added those to this little cottage scene. An easy peasy no sew project!
Materials:
1 dozen assorted Spring Fling & Bazooples Buttons from Buttons Galore
6" hoop
7" x 14" piece of cotton fabric
Fabric, lace, trim scraps
6" square fusible web
½ yard each of two ribbons
Fabri-Tac by Beacon
5", 8" Westcott Brand® Titanium Steel Scissors
(Ruler, pins, measuring tape, pencil, invisible marker, iron, ironing board, pliers)
1. Fold fabric rectangle in half. Open up hoop and place fabric between hoop pieces. Tighten.
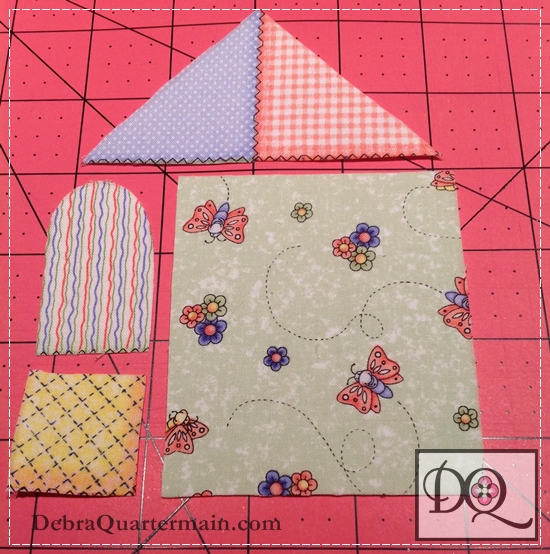
2. Draw pattern pieces on fusible web. Main House 3" by 3 ½". Roof Triangle 3" by 4". Window 1 ¼" square. Door 1 ¼" by 2" rectangle, round top of door.
3. Fuse pieces to hoop fabric with hoop screw off centered. Begin with main house, add roof, door and window. Tighten hoop again if needed. Trim excess fabric from hoop.
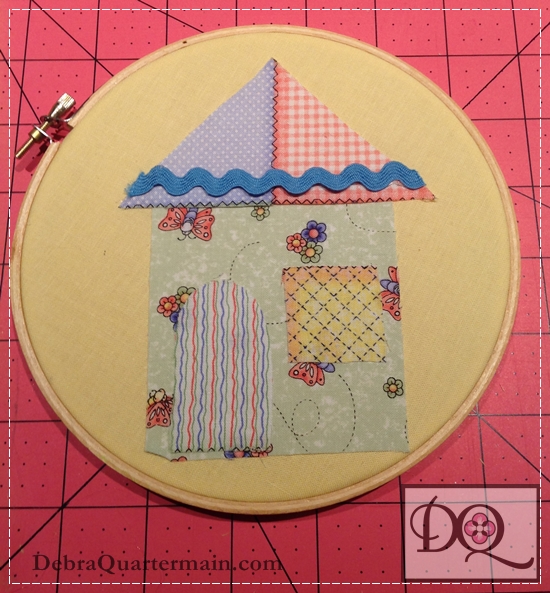
4. Embellish cottage. Tie ribbons through hoop screw. Snap off button backs to lay flat and glue to hoop.
This is such a fun project, one of those cute fabric ideas that does not require any sewing. Some stitches could be added for embellishment. Enjoy, create a whole neighborhood.
For this Designer Challenge Buttons Galore is offering a great giveaway collection of buttons and ribbon in a stylish container from Viewtainer! To win one of the Viewtainers filled with ribbons and buttons - Leave a comment on the Buttons Galore Blog Post. http://wp.me/p2hPby-1Du. The comment should contain your favorite project from the hop, and the container you would like to win. Comments need to be made by March 17th, 2013 at 11:59 eastern standard time. Hop to all the great designer button projects with the DC Button in the right Sidebar! Happy Hopping and Crafting!

Saturday, August 11 2012
Coming up this Monday at noon EST the talented, delightful Marisa Pawelko of Westcott will be demoing live on Cool2Craft. Westcott Scissors on Cool2Craft TV - T-Shirt Remix by Debra Quartermain Monday August 13, 2012 - cra www.cool2craft.com She is demoing my Tsihirt curup technique from winter CHA's designer challenge where in twenty minutes using Westcott's Etreme Edge scissors and a T-shirt I created a full length dress!
(photo courtesy of Westcott Brand)
Tune in Monday to see how easy it is! One of my dear friends and super talent Marie Browning will be on the show too for Tombow! Have a great weekend! 
Monday, July 30 2012
In between packing I had the pleasure of working with Rit Dye. The colors are gorgeous and the liquid beautifully shaped bottles are so easy to use. I transformed a white T-shirt into a fun vibrant beach cover up with a fun cut up design using my very favorite scissors from Westcott Brand! Full tutorial on the Rit Dye blog along with several other beachy designs from talented designer friends!
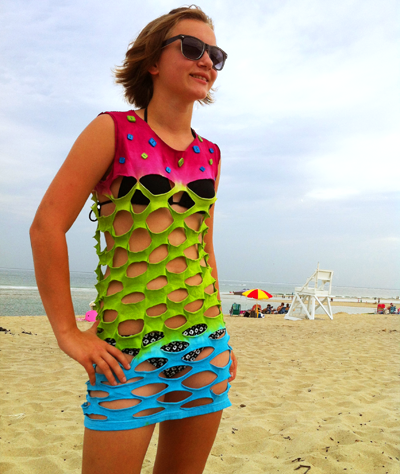
(photo courtesy of Rit Dye)
Here's to summer, certainly been one to spend at the beach for sure!
Hope you are all staying cool! 
Monday, July 16 2012
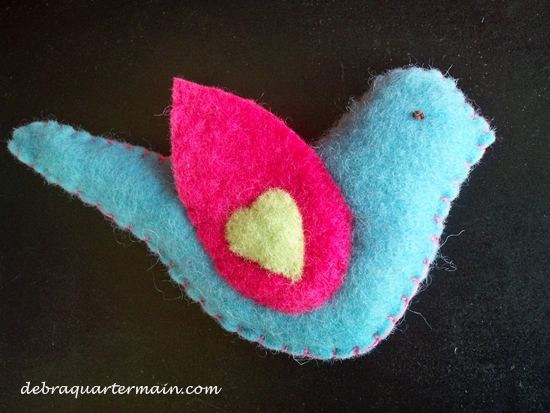
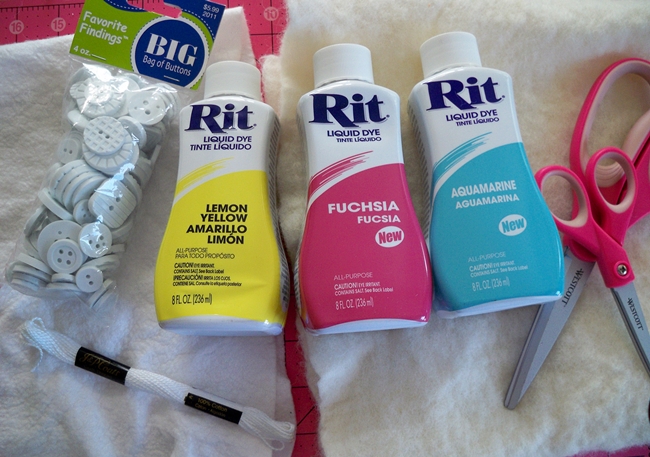
I have been having such fun lately with Rit Dyes and my favorite wool felt from National Nonwovens plus I love to needle felt so my pen tool from Clover came in handy to add dimenssion to the dove.
What you will need.

Rit Liquid Dye Aquamarine, Fuchsia, Lemon Yellow
2-9" x 18" pieces of Natural Wool Felt by National Nonwovens
2 ounces polyester stuffing
4 yards of white craft thread
1 yard black craft thread
Measuring Cup & Spoons
Spoon for stirring dye
2-Gallon Container
Large Pot for heating water
Rubber Gloves
Plastic Table Cover
Westcott Brand Scissors
Cutting Mat
Clover Pen Needle Tool
Ruler
Embroidery needle
Pencil
Cardstock
Pattern (enlarge 50%)
Step 1:
Prewash felt pieces to remove any finishes that may interfere with dye absorption.
Cut ¼ piece of felt off one 9" by 18" piece.
Step 2:
Cover work surface with a plastic table cover. Wear plastic gloves.
In a large pot, heat 4 cups of water on the stove until very hot, at least 140° F.
Dye Preparation: Wearing rubber gloves shake dye bottle and measure 1/2 cup of Aquamarine with 1 cup hot water. Stir well to mix dye and water.
Carefully transfer 4 cups heated hot water into large dye container. Pour dye solution into hot water and stir well.
Immerse a piece of wool felt in the dye bath and stir continuously for 10 minutes. Add 2 yards of craft thread to dye bath. Stir felt. Allow the felt to remain in the dye bath until the desired shade is achieved. Color will appear lighter when dry.
Remove the felt from the dye bath and squeeze out excess dye. Rinse in cold water running water until the water runs clear.
Repeat dyeing process with Fuchsia dye.
Repeat dyeing process with 2 cups of hot water measuring 2 1/2 Tablespoons plus 1/2 teaspoon of Lemon Yellow with ½ Tablespoon plus 1/2 teaspoon of Aquamarine with 1 cup hot water to make Lemon Lime. Immerse ¼ piece of wool felt.
Step 3:
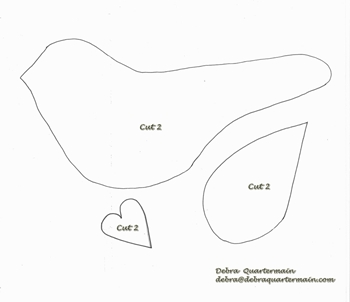
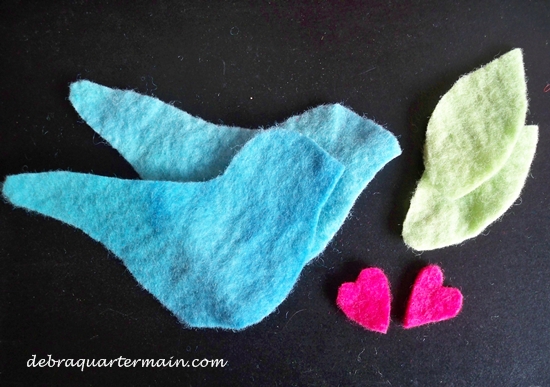
Transfer pattern to cardstock. Cut out two of each piece for one love bird.
Choose a matching or contrasting color of craft thread and blanket stitch around edge of bird, leave opening of 2", stuff and finish sewing shut. Repeat for second love bird. Make a french knot for eye taking thread between a seam stitch.
Step 4:
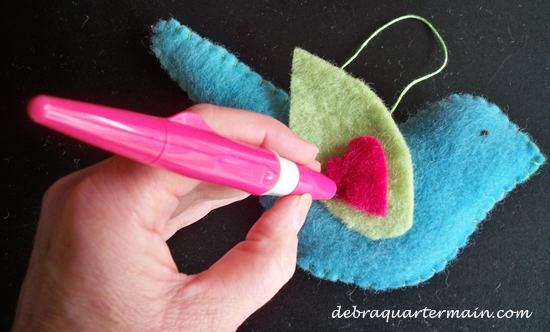
Place wing on bird. Needle felt around edges adhering it to the bird. Repeat for second wing. Place heart in center of wing. Needle felt. This will give dimension to the bird.
These are fun to hang from a branch in a vase for a centerpiece or in a baby's room. Dye up some beautitful holiday shades for your tree! Sew Inspired! 
Wednesday, May 30 2012
I have been "immersed" (excuse a very bad pun) in Rit Dye this week. The photo shows the after of ivory wool and white Xotic (Bamboo blend) felt from National Nonwovens and buttons from Blumenthal Lansing being dyed in three vibrant dye shades from Rit Dye's Spring color forecast.
I am creating a couple of projects using Rit Dye colors. It is really fun to watch whites become rainbows! From this to the above photo!
With the premixed liquid dyes and a website packed with tips, color formulas and inspiration, I am hooked on dye projects! Have you tried dyeing? 
Monday, May 21 2012
It is a holiday Monday in Canada, Victoria Day in honor of Queen Victoria, the longest reigning monarch who reigned from 1837 to 1899. The Victorian era had a huge influence on on every aspect of life. Our quaint city has many examples of Victorian Gothic architecture, Christ Church Cathedral being the most famous one.

Today is also the last day to enter the ImpressArt fabulous giveaway! Go to their FB page https://www.facebook.com/pages/ImpressArt/155664424487844 for all the details to enter by midnight EST tonight! The stamps will imprint on a variety of materials besides metal, like wood, clay and mat board.

This week I get to play with Rit Dye and t-shirts creating some fun fashion. I love the liquid dyes and the website has extensive tips and color charts to create endless vibrant colors!
Looking for a fun crafty site to hang out and get inspired, connect and share, check out Westcott Brand's new community site CraftingRocks!
It is Monday, a creative week ahead, get inspired, get creative, it is all about the Joy! Inspiring the JOY of Creativity! 
Monday, May 07 2012
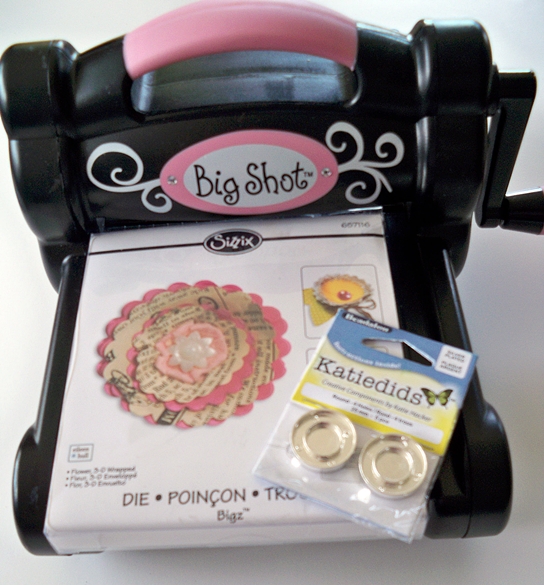
The Designer Craft Connection Blog Hop is all about jewelry this month! I wasn't sure what I was going to come up with as jewelry is not my area of expertise. I had a couple wood bracelets in my craft stash and I have been wanting to make a few dyed projects. I decided on a vintage kind of feel for my bracelet, gathered some other supplies and chose a color from the ColorRit Color Formula.
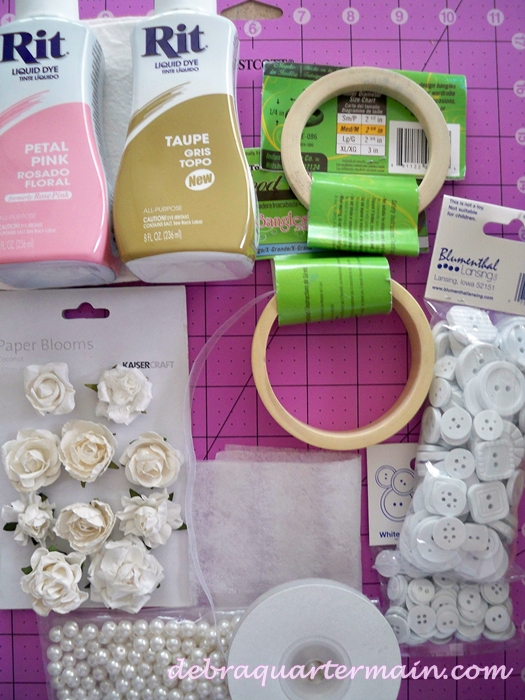
Materials:
Rit Liquid Dye Petal Pink and Taupe
9" x 12" Pina Colada XoticFelt by National Nonwovens
Favorite Findings Buttons by Blumenthal Lansing
Wood Bracelet by Diy Bangles
Sizzix Big Shot
Flower Die, 3-D Wrapped by Eileen Hull for Sizzix
KaiserCraft Paper Blooms
Pearls
1/2 yd Lace, 2 yd Ribbon, Aleene's Tacky Glue, Westcott Brand scissors, paper towel, plastic drop cloth, gloves, measuring utensils and container.
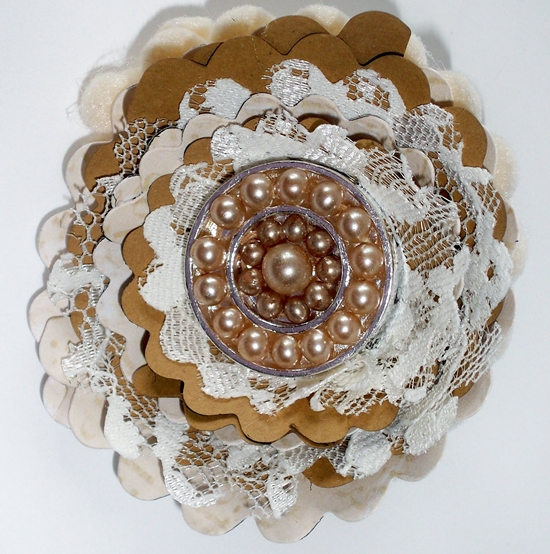
I wanted to create a tone on tone, an ombre effect by dyeing different materials in the same color family of whites and creams. The pearls did not dye so I substituted some colored ones I had on hand. I followed the directions and dyed all of my materials. I did not read my color formula directions carefully and added equal amounts of the Petal Pink and Taupe dyes instead of double the Pink to Taupe. However I like the color I created.
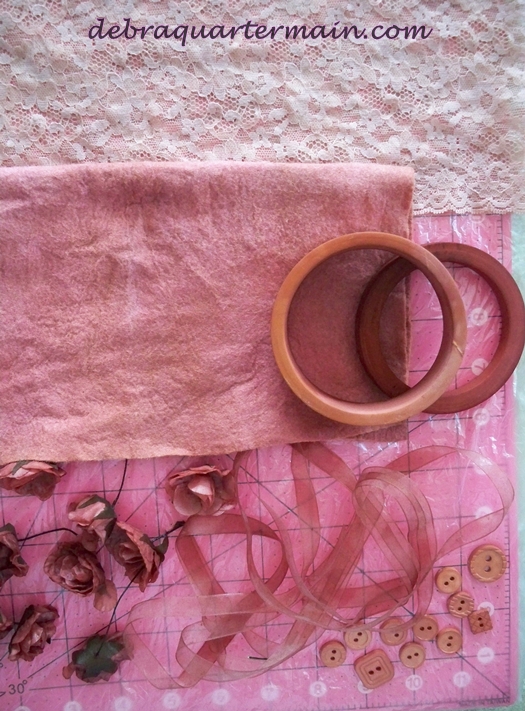
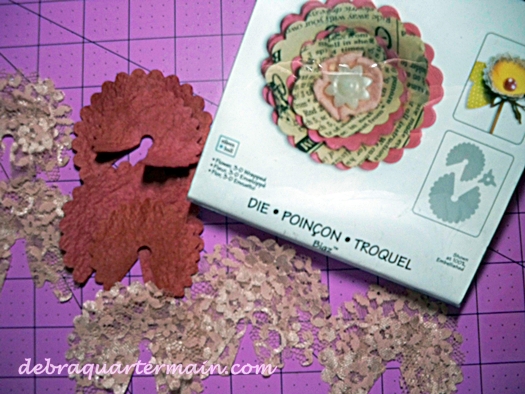
Use the Big Shot and Flower Dye to cut out several flowers from the lace and felt.
Begin assembling the flowers mixing the lace and felt. Insert a paper flower through the center of each flower.
Cut a thin strip of lace and wrap bracelet gluing ends. Glue three larger flowers side by side to bracelet. Fill in with remaining paper flowers. Tie ribbon into half dozen bows, glue in between flowers. Glue on pearls and buttons. Wear and Enjoy! 
Happy Hopping, be inspired to create! Upcoming this Saturday the 12th twenty of us hop again with designs created from the fabulous ImpressArts metal stamps!
Monday, April 23 2012
I have been a little scissor happy of late, my Westcott Brand pink scissor collection hangs on the wall as anything pink in my studio is on display. Since the T-shirt Remix contest at CHA I have been trying different cutting techniques on a variety of fabrics.
Being spring, flowers are just starting here to bloom so I am inspired to create a blossom pillow using fleece. I cut two 10" fleece circles and then several 6" strips of fleece. Folding the strips and cutting even slits from the fold in to create the looped fringe. With fabric glue begin gluing the fleece fringe from the outside in to the center. A contrast color adds interest. Glue the two circles shut leaving an opening and stuff. Glue opening closed.

Sunday, April 08 2012
Happy Easter! Happy Spring although we are getting snow here!
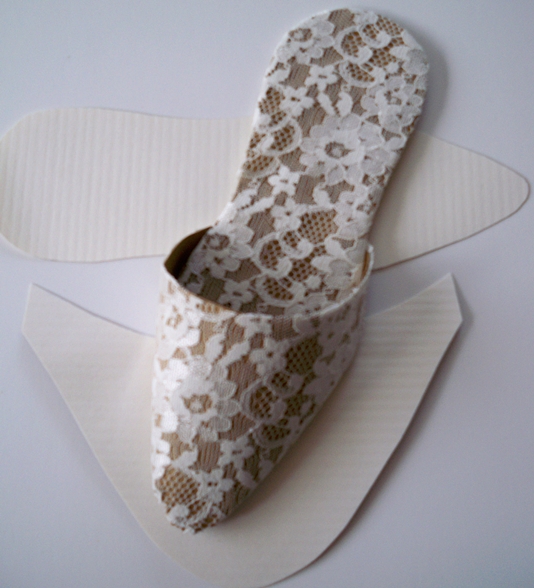
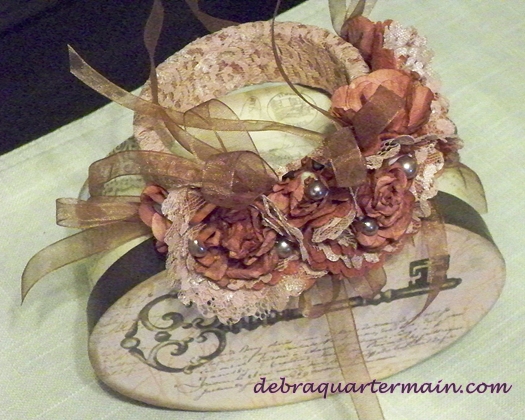
Over at cool2craft it is "All About Shoes" for this week's Creative Muse Linky Party. My entry is a lace paper slipper a little while ago with a wee mousy sleeping inside which in my fuzzy world is the perfect shoe! Check out all the fabulous shoe projects with the button in the sidebar and vote for your favorite! Enjoy!
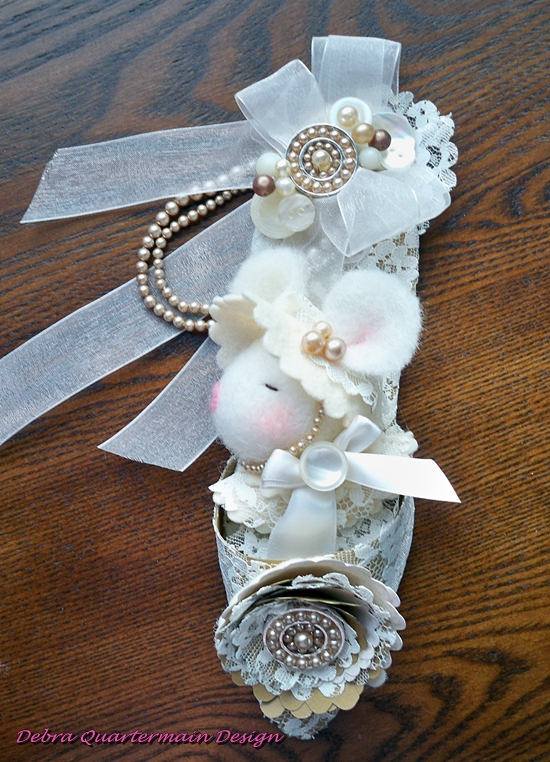
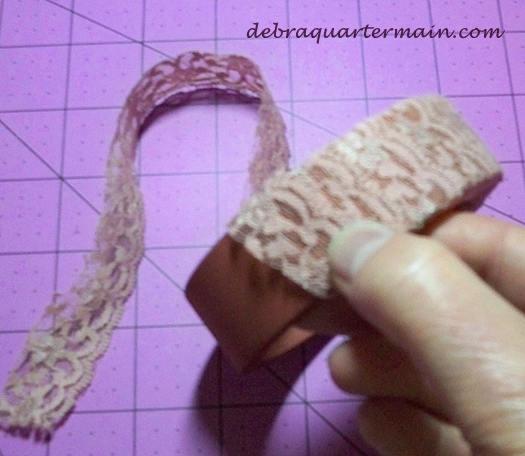
Vintage Slipper with Wee Mousekin
I was inspired by some lace I found in my stash and a bag of broken pearl necklaces I picked up at the flea market. The pearls are a range of gorgeous vintage hues. Not being a jewelry designer Katiedid components were ideal to use as I could glue broken pieces of pearl necklace into the doughnut components. 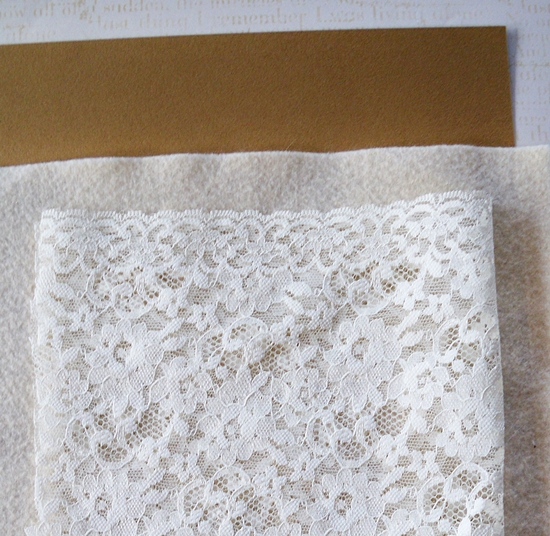 Making the slipper, tan cardstock covered with lace. Create the flower as shown in die instructions. Add pearl filled Katiedid doughnut to center of flower. Flower is glued to show front.
Finish decorating slipper with ribbons, buttons, pearls and second component. Add a rolled note as second option to give as a gift. Create mouse by following Needle Felting techniques here. Layer flower lace and felt flower pieces to make hat and dress. Add pearls and ribbon.
Monday, March 19 2012
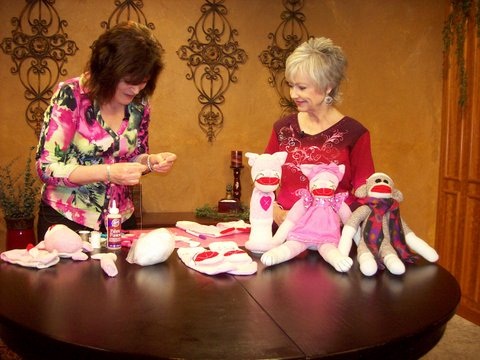
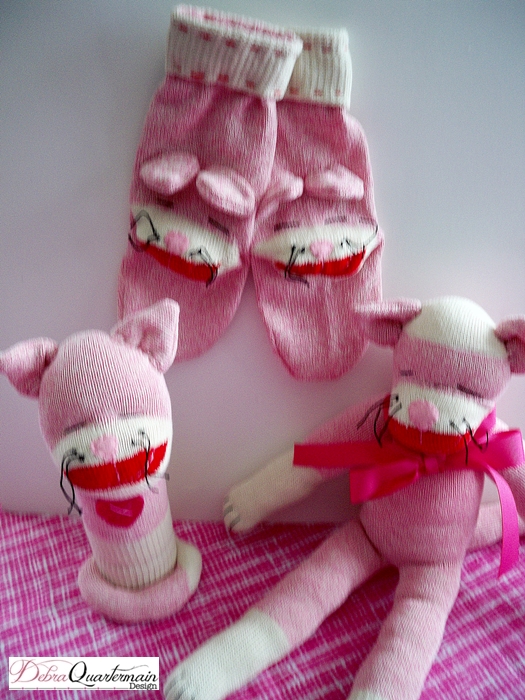
March is interNational Craft month so let's get crafting. One of the segments I taped for Creative Living with Sheryl Borden was showing how to make a Sock Kitty Water Bottle Cover. With one sock you can create an easy bottle cover.
Materials:
1 Fox River red heel sock
2 oz of polyester fibrefill
Scraps of Fuchsia, Seashell Pink, Caribbean Surf ( teal) Xotic Felt by National Nonwovens
1 skein each of black and pink embroidery floss
Aleene's Fabric Fusion™
Upholstery thread
Embroidery Needle
5", 8" Westcott Brand® Titanium Steel Scissors
(Ruler, pins, measuring tape, pencil, invisible marker)
1. Turn the sock inside out. Place flat with heel centered and facing up. Use a 4" circle to draw head curve just above red heel which is the muzzle. Draw two triangle ears and tail along opposite folds at end of sock.
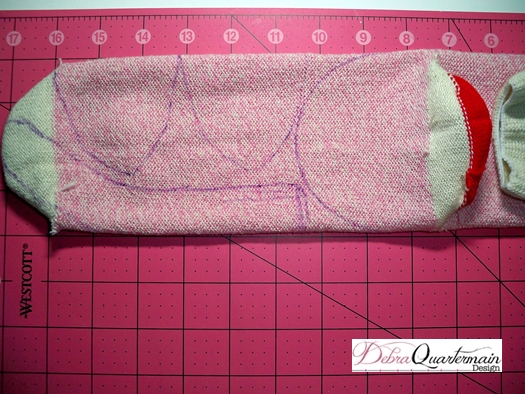
2. Pin pieces. Sew along drawn pattern line. Carefully cut around pieces leaving a ¼" border.
3. Turn tail and head body pieces right side out. Cut small slit in fold of each ear and turn right side out.
4. Stuff head pushing stuffing into heel which is cat's muzzle. Under head stitch in a circle through sock and pull tight to create neck. Secure threads and cut.
5. Put a dot of glue in center of muzzle above red muzzle. Using pink floss embroider nose in place with small straight stitches. Embroider down from nose and across muzzle to make smile.
6. Anchor black floss at back of neck bring through to edge of white above muzzle as shown in photo. Make a ¾" stitch for eye taking floss through to back of neck. Pull stitch tightly to indent slightly. Repeat for second eye.
7. Secure floss at back of head. Take floss back through front of muzzle on one side of nose. Make a knot, leave a 3" length for whisker and cut floss. Repeat this for remaining three whiskers.
8. Fold raw edges of ear slit in. With upholstery thread stitch a small line along bottom of ear. Pull to gather. Secure thread. Place on seam line of sock and stitch in place. Repeat for second ear.
9. Stuff tail. Turn raw ends under and stitch around opening. Pull stitches tight and secure. Place tail along bottom of sock. Stitch in place.
10. Fold a collar piece 1-1/2" by 4". Stitch with pink floss. Place around neck and stitch in place. Cut two hearts, place together and embroider initial or add two crossed stitches with pink floss. Sew or glue to cat or collar.
Here is the water bottle cover shown along with a Sock Kitty and a pair of mittens. Socks are an easy way to craft and an even better wat to use up stray socks! Happy crafting!
Monday, March 05 2012
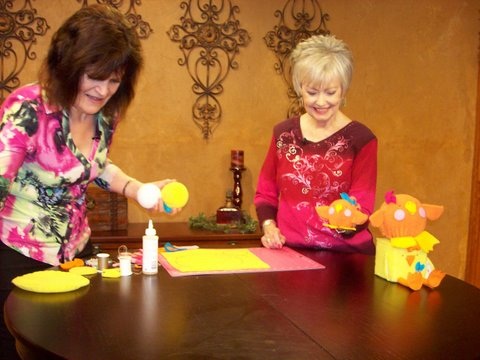
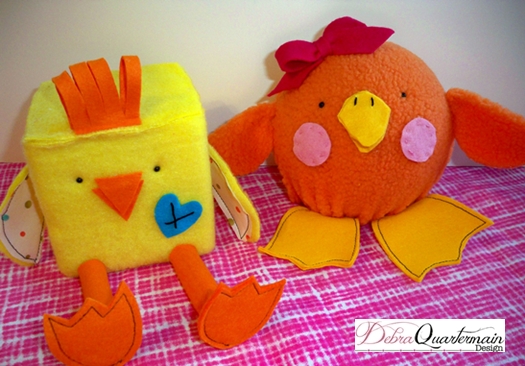
It is the first Monday of the month, time for the Designer Blog Hop Crafts Connection! Forty talented designers strut their stuff and offer some surprises as you hop along! We are celebrating interNational Craft Month! With Easter just a few weeks away I am featuring the tutorial for the cute chick/duck I demoed for a segment of Creative Living with Sheryl Borden.
Sheryl is holding the baby duck in the photo that I demoed on the show. In yellow it becomes a cute chick!
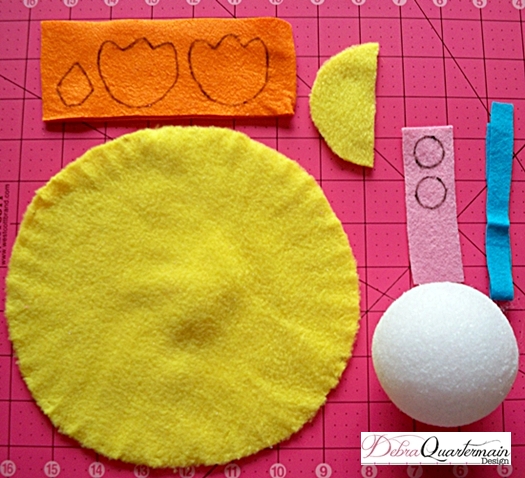
Materials:
3", 6" balls, 4" cube of MakeitFun STYROFOAM ™ Brand Foam
1/6 yard yellow fleece
1/3 yard orange fleece
9" x 12" pieces of Canary (yellow), Papaya (orange) scraps of Fuchsia, Seashell Pink, Caribbean Surf ( teal) Xotic Felt by National Nonwovens
6" fabric scrap
1 chenille stem
1 skein black, pink embroidery floss
6 black, 12 colored head quilt pins
Aleene's Fabric Fusion™
Upholstery thread
Embroidery Needle
5", 8" Westcott Brand® Titanium Steel Scissors
(Ruler, measuring tape, pencil, circle templates for large duck 12", small 8")

- Making the Ducks: For both the 3" and 6" ducks construction is exactly the same. The pattern pieces included are for both sizes. Any variations will be indicated in instructions. For the 3" duck cut a 3" and 8" fleece circle. For the 6" duck cut two 3" and one 12" circles. Cut two of each cheeks, beaks and four of each foot from felt. Cut ½" by 9" strip of felt for bows.
.
- With upholstery thread anchor thread at edge of the large circle. Sew a small basting stitch around the complete circle.
- Pull stitches slightly. Place circle over ball pulling stitches tightly. Circle should stretch to close. (On larger duck if this does not happen, a small circle can be glued on bottom to finish the body.) Secure thread and cut.
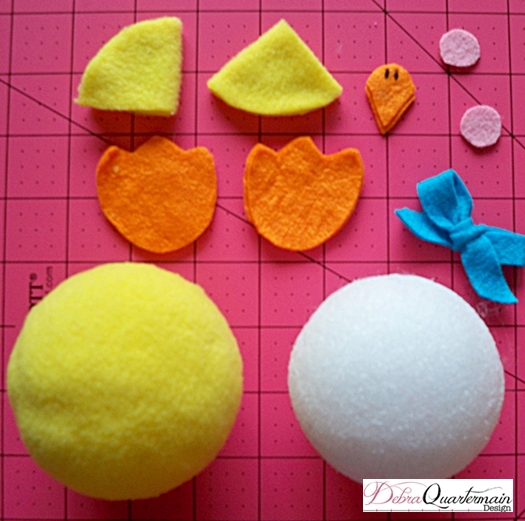
- For small duck cut 3" circle in half. Fold in half again wrong sides together and glue. For large duck fold each 3" circle in half wrong sides together and glue. Glue wings to sides of body as shown in photo.
- Glue beak pieces together angling top one slightly higher than lower beak. Make two small stitches at top of beak. (These stitching details are optional; they can also be recreated with a fabric marker.) Glue beaks to center of face slightly above wing line.
- Insert two black head pins as eyes. Adjust until you are pleased with location. Remove and dip in glue, reinsert pushing in to indent in face slightly.
- Sew around cheek circles with pink floss if desired or use fabric marker or add just as is. Glue to face of duck under eyes. Refer to photo for placement.
- Place feet together in pairs, reverse one pair. Glue together. Outline in black floss with a small stitch as an option. Glue feet to bottom of bird. Tie bow from felt strip, pin or glue to head.
- Making the Chicken: Use the ruler to cut a 4" by 16" strip of fleece. Cut two 4" squares of fleece and one 3" circle. Cut one 1 ½" by 3" topknot piece, two beaks, two 3" by 3" strips and four feet from orange felt. Cut one 3" circle from fabric scrap. Cut one heart from teal.
- Begin at one edge of cube and glue long fleece strip. Wrap fleece piece around cube bringing it back to the edge to meet. Glue in place. Glue each 4" square on the opposite two remaining sides along edges. Press fleece seams together, add more glue if needed.
- Cut 3" fleece and fabric circles in half for wings. Glue or sew with black around edges. Pin or glue in place on either side of chicken. (Approximately at 3" mark.)
- Cut chenille stem in two 3" pieces. Roll an orange strip around each leg and glue. Place feet in pairs reversing one set. Glue or topstitch in black around edges. Glue to end of each leg. Glue to edge of body.
- Glue beak pieces together with top one slightly above lower beak. Glue to face. Insert two black head pin eyes. Add glue to ends and reinsert indenting slightly.
- Fold topknot in half, cut through from fold to 1/4 " from ends. Glue to top of head. Stitch through heart with black floss. (Optional or use fabric marker.) Glue heart to body.
Have fun hopping! Leave a comment here to enter your name for a fabulous pair of Westcott Brand® Extreme EdgeTitanium Steel Scissors! 
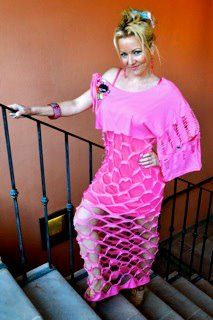
Thursday, February 23 2012
At CHA twelve talented designers took part in Westcott Brand's Tshirt Remix challenge. Video is posted on my Home page. I created a dress from my Tshirt, we had twenty minutes! How did I do it with fingers mentally crossed and Westcott Brand's Extreme Edge Scissors! Add a fun lining or wear it as a beach coverup.
Here is the scoop and the Tut!
You will need:
1 XL Tshirt
Extreme Edge Westcott Brand® Titanium Steel Scissors
Embellishments
Fabri-Tac Glue by Beacon
Ruler

- Fold Tshirt in half lining up seams with sleeves flat. Fold in half three more times smoothing as you go.

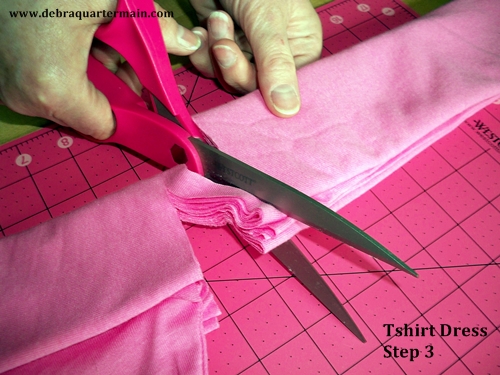
- Begin below sleeve. Cut from one folded edge through to ½" from opposite folded edge.
- Turn Tshirt and cut from opposite fold. Repeat. Cut evenly spaced slits. The narrower the slits the longer the dress will be. I suggest about 2" width. (This has to be cut carefully so as to not cut completely through either side. The Extreme Edge scissors will cut through several layers easily.)

- Continue to the bottom of Tshirt. I left about a 3" wide border on the bottom. Carefully open up the Tshirt and put it on. Gently stretch it out with your legs, the border at the bottom will create a wavy effect. (An added and unexpected surprise!)
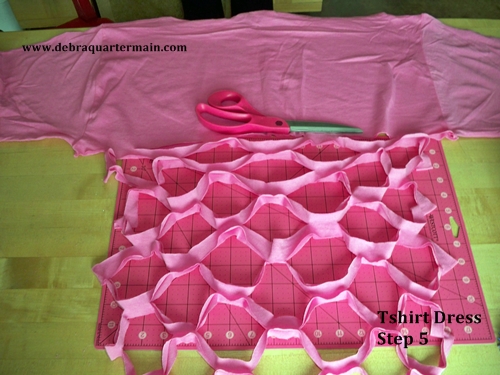
- For the dress top I cut off one sleeve, glued it to bottom of opposite sleeve. Fan folded sleeve and cut small slits through one side only. The neckline was cut off by 2" and scrap piece used to tie opposite shoulder tight. Embellish as desired. Enjoy!

Monday, February 20 2012
The CHA (Craft & Hobby) show in Anaheim is filled with events from morning till night. Being an exhibitor in the License and Design section of the show meant I wasn't as free to walk the floor. I still took part in several events one being the very fun Westcott Brand Tshirt Remix Contest where twelve talented industry designers competed using the Westcott Brand Extreme Edge scissors, a Tshirt and twenty minutes to mix it up. What fun, from purses to a squid the scissors cut through layers of Tshirt to create twelve unique amazing pieces.
My idea was an evening gown, being a dress girl and with a lot of folding of layers which the Extreme Edge scissors cut through easily I ended up with a full length dress! The video is now released :) and you can see it all! Posted on my front page! What a fun challenge! Follow the JOY!
Wednesday, February 15 2012
I filmed a segment with Sheryl Borden of Creative Living recently making fun Fringed Flowers ideal for a burst of colourful spring home accent.
The flowers are easy to make and a great way to use up fabric and felt scraps.
You will need:
9" x 12" pieces of Fuchsia, Caribbean Surf ( teal), Grass Skirt (green) Xotic Felt by National Nonwovens
1/6 yard each of blue, pink gingham check fabric
6" x 24" fabric pieces
Fabric scraps
Aleene's Fabric Fusion™
Garden wire green coated
Assorted buttons (2 per flower)
5", 8", Extreme Edge Westcott Brand® Titanium Steel Scissors
(Invisible marker, sewing machine, black thread, ruler, cutting mat, measuring tape, pencil, circle templates 1", 2", 3", 4" 5", wire cutters )
Gerbera Daisy: For each flower cut a felt center 3" by 9". Cut two gingham fabric strips, one 2" by 44" and one 3" by 44". Cut a 12" piece of wire.
Fold the center felt strip in half lengthwise and then in half again the width wise. With 5" scissors cut carefully from fold through to ¼" from edge. (This has to be cut carefully so as to not cut completely through either side.)
The outside of the flower is created by fringing the flat strips of the two fabrics. Fold each fabric in half four times width wise. The Extreme Edge scissors will cut through several layers easily. Cut through strips leaving ½" uncut. Repeat entire length of strips. (The closer together the cuts the finer the fringe.)
Putting the flower together, the center is wrapped carefully gluing the roll at end around wire. The outside two fringed fabrics are rolled together around the outside of the center gluing as it is wrapped.
Making a Mum: The mum is the reverse of the Gerbera Daisy. Cut a felt strip 1-1/2" by 12". Cut a fabric strip 4" by 44". Cut a 12" piece of wire.
Fold the center felt strip in half width wise and then in half again width wise. With 5" scissors cut carefully through to ¼" from edge. Repeat entire length of strip. (The closer together the cuts the finer the fringe.)
Fold fabric in half lengthwise and in half four times width wise. Cut from folded edge through to ½" from raw edge. Cut evenly spaced slits. (This has to be cut carefully so as to not cut completely through either side.) The Extreme Edge scissors will cut through several layers easily.
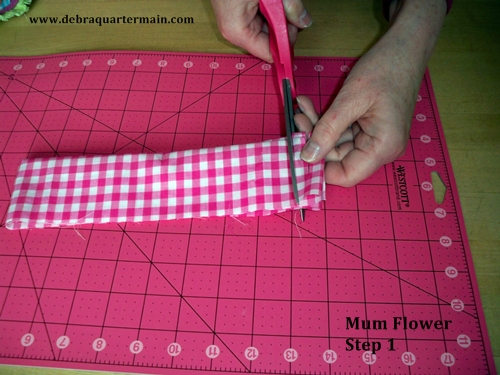
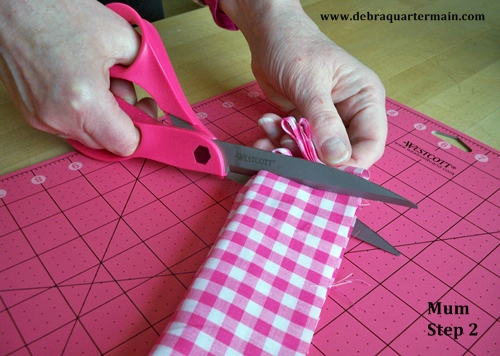
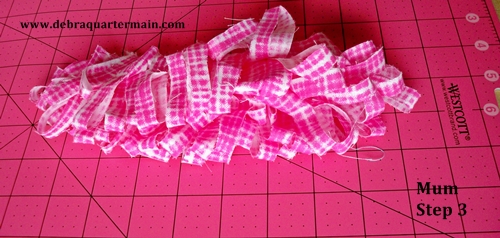
Putting the flower together, the center is wrapped carefully gluing the roll at end around wire. The outside folded fabric is rolled around the outside of the center gluing as it is wrapped.
Making the Circle Flower: Fold four layers of 6" by 24" fabric piece and cut four 5" circles. Cut a felt 1" and 4" circle. Cut from fabric scraps a 2" and 3" circle. Cut a 12" piece of wire.
Stack the flower layers together beginning with the largest circles. Pin the circles together in the center layers. Fringe just into the felt 4" circle layer all the way around the circle.
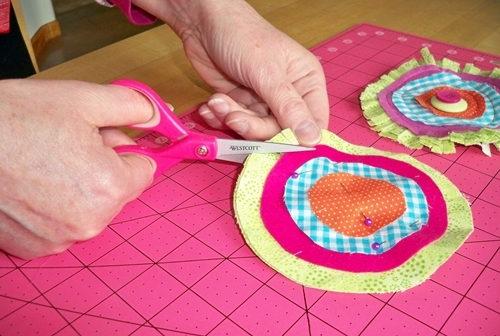
Using the black thread on machine topstitch in a circular motion through all layers of the flower spiralling smaller into the center of the flower. This will make the flower curve naturally.
Glue wire to back of flower covering with 1" felt circle. Embellish center of flower with two stacked buttons.
|