|
the CEO! Creative Eternal Optimist! Blog
|  |
Saturday, March 11 2017
This has been my blog for many years but my creative life is now more about "Making and Celebrating Heart, Home and Holidays!" so check out my new blog, you don't have to go far, :) A sincere thank you for stopping by!
Tuesday, April 19 2016
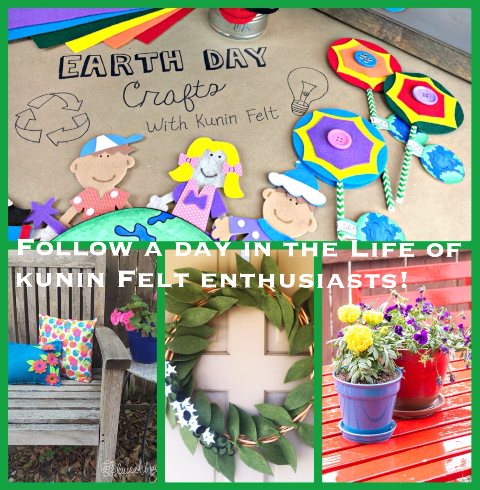
Welcome to a day in the life of Kunin Enthusiasts. That would be me! I love Kunin felt. I have been using Kunin felt for crafting my whole life! The fact that Kunin felt is made from recycled plastic water bottles, over 350,000,000 so far this year is incredible! It also is amazing to use around the house in many ways and in the garden. Say good bye to weeding.
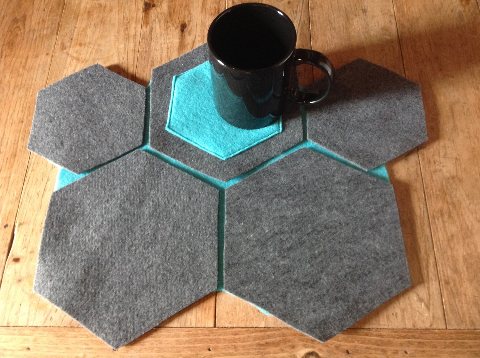
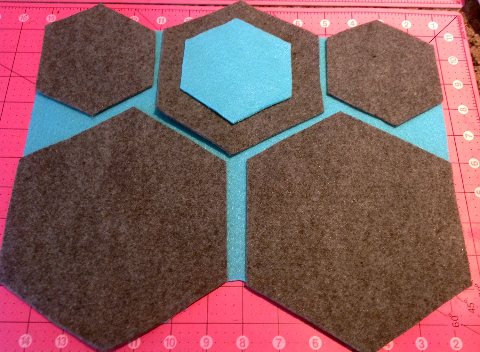
Right now I am enjoying a cup of coffee on my hexi mug rug made from the Premium felt which is super soft and thick. I made a slightly larger mug rug to hold a plate of cookies. Today is definitely a three cookie day!
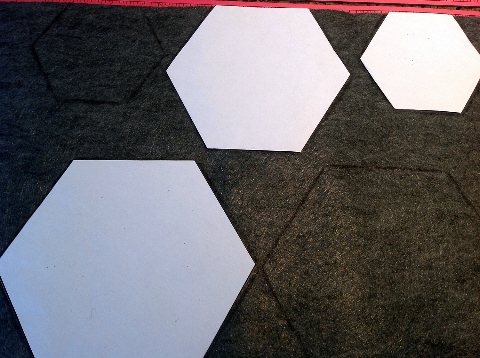
You will need: (for each placemat)
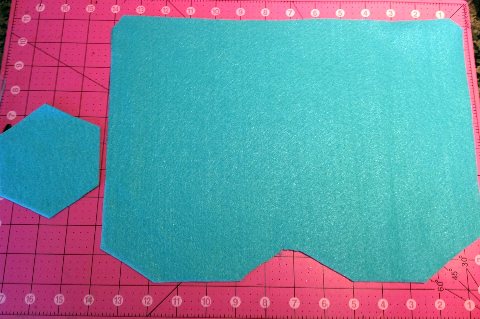
12” x 18” Kunin Eco-fiplus™ Premium Felt, 1 Charcoal, 1 Lagoon
Fabri-tac Adhesive by Beacon www.beaconadhesives.com
Hexi patterns available online, 7”, 5”, 3”
Scissors, plain paper, ruler, pencil
Instructions:
1. From the gray felt trace and draw two 7”, two 5” and one 3” hexi. Cut out hexis.
2. Place gray hexis on lagoon piece as shown to create pattern. Draw around. Cut out lagoon piece. Cut one 3” hexi from lagoon scrap piece.
3. Arrange and glue hexis in place.
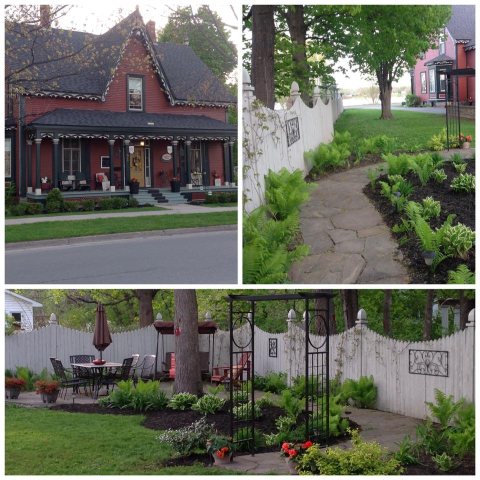
Here is my garden, always a work in progress but definitely looking good. I weeded, cleaned up and then unrolled a bolt of felt, cutting holes to fit existing plants. I added mulch over top. The mulch adheres to the felt so on the slopes it does not slide off. You can match your felt color to the mulch and it is also inexpensive and easy to work with. Here is to a weed free summer!
Thank you for stopping by. Enjoy visiting all of the other Kunin enthusiasts found here. Visit
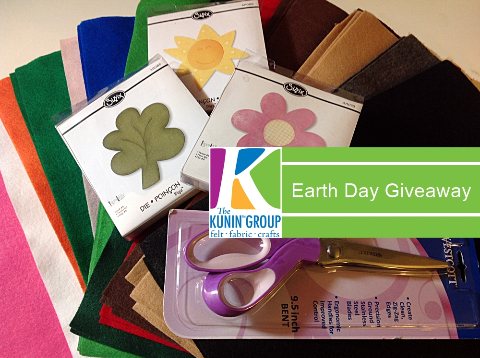
Check out the Kunin Facebook for more EARTH DAY inspiration and to enter the Earth Day Giveaway. Only a couple days left!
Thanks for stopping by.
Debra
Thursday, March 17 2016
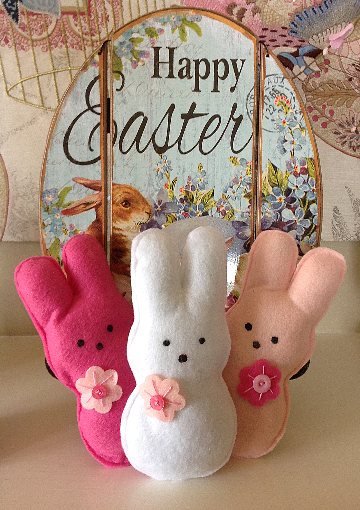
Who doesn't love a Peep this time of year! Bunny Peeps are my personal favorite. I created these for the Kunin blog, full tutorial here.
The Designer Crafts Connection is having a special blog hop. Check it out with the button in the sidebar.
Thanks for stopping by! Keep making & celebrating!
Monday, December 07 2015
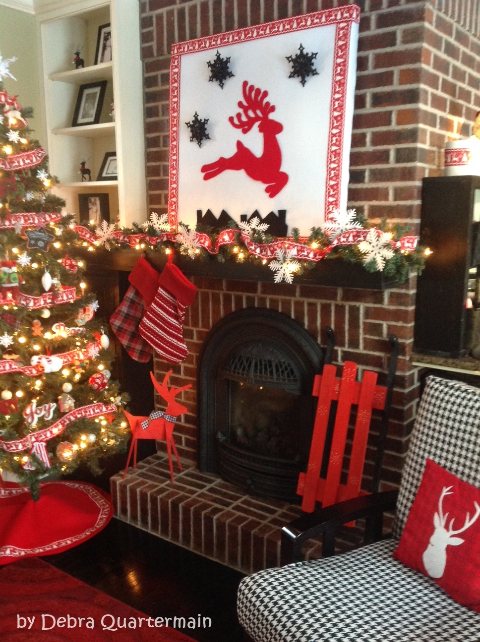
This year for our family room I created some reindeer decor. It was super easy using felt to cover my existing wall canvas art. I share the how to here. http://kuningroup.com/2015/12/01/holiday-reindeer-wall-canvas/
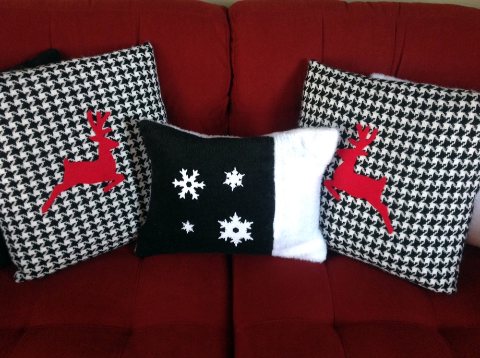
Using copyright free templates I cut out patterns and then applied them to the canvas and existing pillows. The snowflakes are die cut.
To create the deer canvas and pillow silhouettes, snowflakes you will need:
9” x 12” craft cuts Kunin Eco-Fi™ Prestofelt™, 2 Red, 1 White
1 – 1 ½ yd cut by the yard Kunin Eco-FiPlus™ Premiumfelt™ , Black
½ yd cut by the yard Kunin Eco-FiPlus™ Premiumfelt™ , White
Snowflake Die and Big Shot by Sizzix
Beacon Fabri-tac Adhesive
Scissors, ruler, chalk.
Have fun with felt and cover wall art for the holiday season! Check out other great DIY holiday ideas with the DCC blog Hop. Just follow along!
'Tis the season!
Debra
Monday, November 16 2015
This was my favourite Halloween ever! Having our children and ten grandlittles live close by and having a room filled with felt courtesy of my design work with Kunin felt. What more could you want for creating terrific costumes! Here is my daughter as the Queen of Hearts leaving the B&B. Notice my pillows, Chevron felt. All the tutorials for the costumes are found on the Kunin Felt Blog.

Thursday, June 25 2015
Inside every great pillow is the perfect pillow form. My favourite pillow forms are from Fairfield. Our DCC, Designer Crafts Connection members are having a pillow fight challenge and Fairfield supplied the pillow forms for this fun blog hop!
I have a bench in the front hall which has been needing a couple of pillows. I chose Kunin's Shaggy Felt for the pillows. It is easy to sew and stuff and very soft. A good choice for a pillow fight! :)
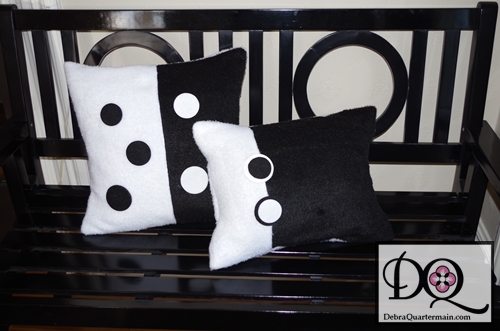
You will need:
1/2 yard of each cut by the yard Kunin Eco-fi TM ShaggiChic White, Black
9" x 12" craft cut Kunin Eco-fiTM Classicfelt, 1 White 1 Black
16" Home Elegance Pillow Form Fairfield
Circle Die by Sizzix
Fabri-tac by Beacon Adhesives
Big Shot, sewing machine and matching thread, scissors, pins, measuring tape, ruler, pencil, chalk

1. Cut two pieces each 18" x 18.5" from the white and black shaggi. The nap should run lengthwise with the 18" measurement.
2. Right sides together sew a black piece and white piece for front. For the back repeat leaving a 6" opening in center.
3. Right sides together place the front and black piece aligned. Sew around all four sides. Clip corners and trim.
4. Turn right sides out and insert pillow form. Slipstitch opening shut.
5. Diecut circles in black and white, adhere to front of pillow.
This is a super quick and easy pillow, the shaggi is washable and will continue to become softer with each wash. This makes great floor pillows for the kids from those on play mats to those with dorm rooms!
Get into the pillow fight by clicking on the DCC button in the sidebar to see what the other designers are tossing around!
And for a bonus you can use this coupon! AMYCOUP worth 20% off orders through the month of June on www.fairfieldworld.com
Thanks for stopping by!
Debra
Monday, June 01 2015

Happy June 1st! The DCC, Designers Craft Connection starts every month off with wonderful creative projects! This month it is all about Celebrations! So with number 9 and 10 "grandlittles" on the way, I get to be part of lots of fun birthday parties. This sweet grandlittle just turned 5 so her birthday party was themed for her favorite movie. Can you guess?
Every Queen needs a cape so I created this pretty Snowflake cape from Kunin's Eco-fi Felt, some pom pom, "Snowball" trim from Decorative Trimmings , Aleene's Quick Dry Fabric Fusion and glitter snowflakes. The full tutorial and pattern will be on the Kunin blog on Thursday.
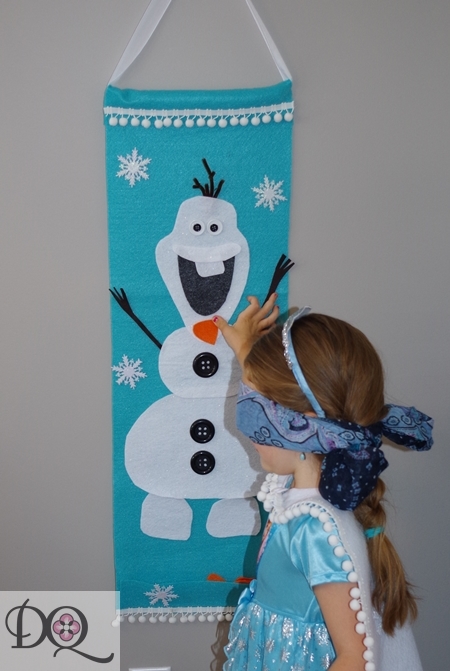
Of course we had to have a "Pin the Nose" on the Snowman game too! :) I made a pocket in the bottom to hold the felt noses. She got her wish, even though the end of May, the east coast of Canada can still stir up some snowflakes and it did for her birthday!
Keep the celebration going by hopping along with the DCC button!
Happy Creating!

Thursday, May 21 2015

The DCC, Designer Crafts Connection is hosting a special hop with the JOY company. They manufacture embroidered letters. With a special birthday coming up for my grand daughter I wanted to create a banner for her party.
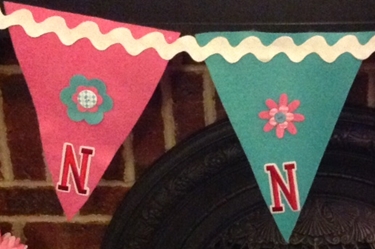
From Kunin Classic felt 72" wide cut by the yard I cut several 9" by 12" banners. Flowers and cupcake were die cut, love my Big Shot and Sizzix dies! Jumbo rick rack from Decorative Trimmings is used to hang the banner. Die cut flowers were layered on each banner, a button center finishes each flower.
The backing on the JOY letters was peeled off and each letter was simply adhered to the bottom of each banner. The rick rack was glued along the top. Now to make more, the yard has several yards of fence and the banners are to hang all along the fence!

Here is to the JOY of creating! Now catch some more great projects, just hop with the DCC button in the sidebar!
Debra
Monday, May 18 2015
This week I am very pleased to be taking part in a special blog hop, the CHA PaperArts + Blog Hop. Several CHA Designer members were paired up with companies participating in the summer CHA PaperArts Show. I was very fortunate to be paired up with one of my favourite companies Ellison/Sizzix, even better I got to design with Laura Kelly's dies with Ellison!
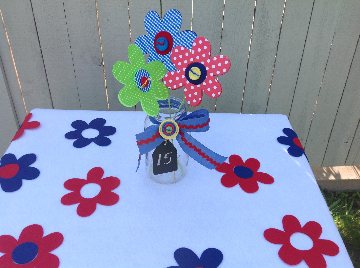
My project is a whimsical summer calendar centerpiece, great project for the kids to create and to use on summer vacation. They can write the date on the chalkboard tag each day and change out the sun for a cloud or raindrops to also monitor the weather.
Let's get started! You will need:
Sizzix Big Shot
Cutting Pads (I got to try out the colored ones!)
Flower Die by Laura Kelly
Sun Die by Laura Kelly
Add some color!
Polka dot and check papers
9" x 12" Craftcuts of Prestofelt by Kunin Felt, Yellow, Green, Red, Royal Blue
9" x 12" Classic Craftcut by Kunin Felt, Yellow
Chalkboard Tag
6-9 Assorted Buttons
Mason Jar
4-1/8" x 12" wood dowels
3-1.2 yard lengths of Craft Floss, Red, Yellow, Blue, Black
1 yard Red Rick Rack
1 yard 3/4" wide blue Ribbon
Scissors, Adhesive, Embroidery needle
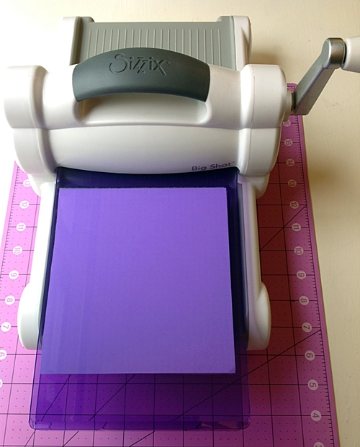
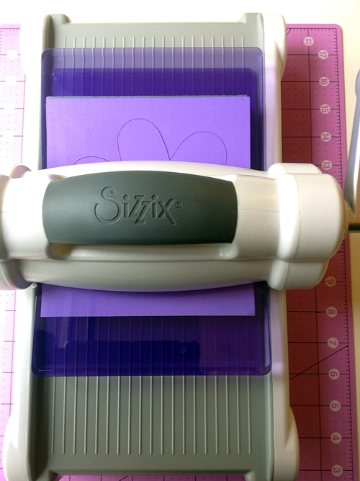
Cut two pieces of patterned paper and 1 piece of Prestofelt the size of the die. Now to make a "Sizzix Sandwich"! Place the die face up on one of the cutting pads, add the "filling", one piece of paper, the felt and the remaining piece of paper and place the second cutting pad on top. Now place the "Sizzix Sandwich" on the Big Shot and slowly push through turning the handle away from you.
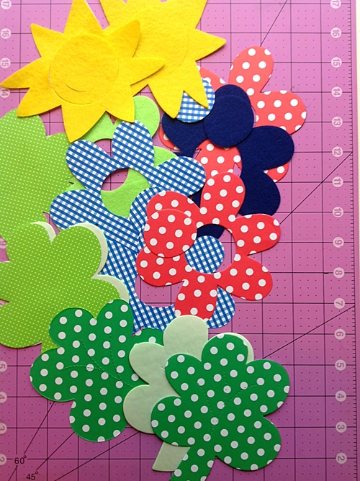
The "Sizzix Sandwich" will emerge out the opposite end with three perfect diecuts. Repeat for each flower, I cut extra to have several color combination choices.
As you can see, I cut out several extras for future projects. The colored cutting pads are so easy to find on the craft surface even as it becomes more and more covered with crat materials. Now to assemble flowers. Dowels can be painted or left plain.
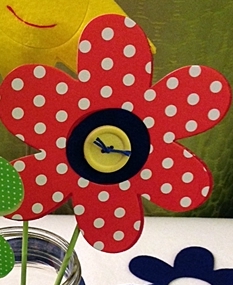
From scraps of felt cut three circles slightly larger than flower center circles. Peel backing off of Prestofelt flower and adhere adhesive side to back of paper flower. Place dowel end to center of flower. Peel larger circle back and place over center opening on back of flower. Add flower center to front of flower sandwiching dowel in between the two center pieces. Repeat for two remaining flowers. Tie floss through buttons and glue to flower centers.
For the sun, make two small stitches for eyes through felt. Repeat assembly as for flowers using yellow Prestofelt for back of sun. There is a small cut in felt center for a smile. Cut a piece of red floss to fit and press into place, it will adhere with the Prestofelt adhesive side.
Glue rick rack to center of blue ribbon. Tie ribbon around jar top. Slide on chalk tag. Stack buttons, tie through centers with floss. Glue to center of bow. There you have it, a quick easy summertime project for the whole family! Now for the contest details and how you can check out all of the great designer projects this week!
Win $500!
Follow the CHA Paper Arts+ Blog Hop all week on the CHA Blog for updates on new designer blog posts and projects. Each post will have a “password”, collect all of the passwords.
The first two people to tweet CHA @Craftandhobby the correct phrase will win:
1st Prize: $500 toward travel to the Paper Arts+ Show (trade only)
2nd Prize: $25 AMEX gift card
Here is your “password”: Chicagoland
Don’t forget, registration is now open for the CHA Paper Arts+ Show in Chicagoland where you’ll see, touch and learn about product, like the products that were donated for this Blog Hop by Ellison/Sizzix. Paper Arts+ is A CRAFT FUSION experience with exhibits offering everything from paper to jewelry to mixed media materials. The industry will be there looking for fourth quarter trends and new product SKUs. Members attend for FREE! For more information and to register, visit www.craftandhobby.org/paperarts.
Thank you for stopping by!
Debra
Monday, May 11 2015
It is the first Monday of the month and that means the DCC, Designer's Craft Connection is hopping! This month's theme it is all about the bling! I am sharing this snappy little design over on the Kunin blog tomorrow!
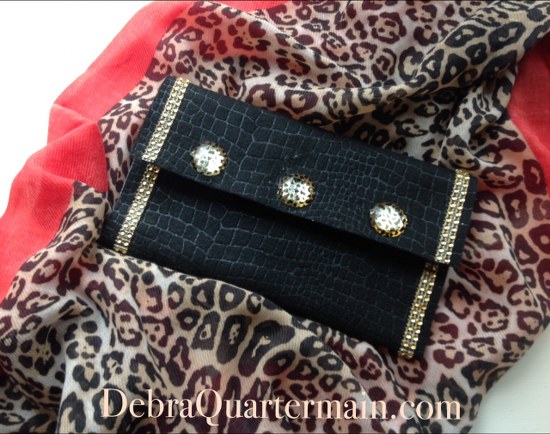
I admit to having a thing for animal print and how perfect it is that felt comes in several animal prints. Makes it very hard to choose which one to use though! My inspiration was an animal print scarf I just picked up recently and some very blingy animal print buttons. I also like small purses especially the clutch. This is a mini version, so I am calling it a clutchlet. Quick and easy, inexpensive too!
You will need:
9” x 12” craft cut Kunin Printzfelt™, 1 Brown Leopard
9” x 12” craft cut Kunin felt™, 1 Black
1 yard decorative trim
3-1” decorative flat beads
1 hook and loop fastener
Aleene’s Quick Dry Fabric Fusion
scissors, ruler, pins
 
How to:
1. Wrong sides together align the two pieces of felt on top of each other. Glue together.
2. Adhere trim along opposite sides of black.
3. With black side down fold up one end 4”. Place thin line glue down each side and finger press.
4. Adhere hook and loop fastener in place.
5. Glue flat beads to front edge.

There you have it, super easy and fast! Make a clutchlet to go with different outfits or use as jewelry or make up pouch! Check out more bling by hopping with the DCC button in the sidebar.
Thanks for stopping by!
Debra
Styled with Charm!
|