|
the CEO! Creative Eternal Optimist! Blog
|  |
Sunday, September 07 2014

Creative home decor, Kunin Felt is co-sponsoring a Blog Hop with Beacon (www.beaconadhesives.com) and Buttons Galore (www.buttonsgaloreandmore.com) Professional CHA Designers from the Designer Crafts Connection are sharing great designs all week! There is also a great giveaway with over $150 worth of goodies from the three sponsors!
Home Décor storage solutions are always needed, this stylish container is both super easy and sturdy. Make several in different colors, they can be stacked flat and then assembled when needed in about a minute. Made from Eco-fi Plus™. “Eco-fi Plus is an 8-ounce premium felt that uses natural silver and copper cleansing ions to resist mold, mildew, and odor and is made from recycled plastic bottles.” This luxury weight of felt is ideal for both stylish wearables and sturdy functional home décor accents. Available in ten rich colors, match any room décor!
You will need:
½ yard of each color, cut by the yard Kunin Eco-fi Plus™, Red, Black
BigZ Circle die by Sizzix (www.sizzix.com)
Fabri-tac™ by Beacon Adhesives (www.beaconadhesives.com)
Hook and Loop circles, 4 pairs
Big Shot diecut machine, scissors, ruler, pins, pencil, paper, chalk, rotary cutter, cutting mat
How to:
-
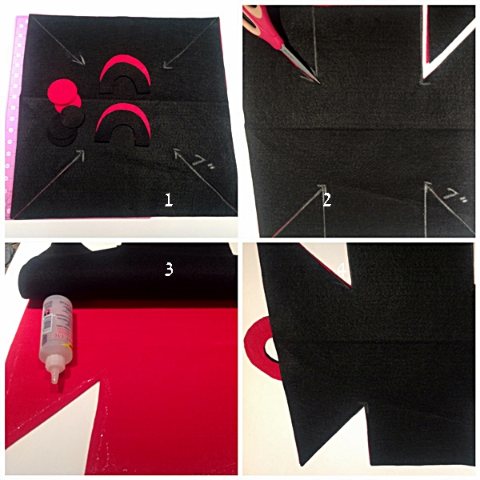
Cut two 18” square pieces for the container. Die cut 3 sets of circles in each color of felt. Cut two 3” by 4 ½” pieces from each color for handles. Draw a 3” by 4 ½” rectangle on the paper and cut out. Draw a half oval on the piece of paper piece making it 1” in width. Cut out to use as pattern. Pin to felt handle pieces and cut out.
-
From each corner draw a diagonal line 7” in length. Draw a second line vertically across all four corners intersecting the ends of the diagonal lines. Cut out along both lines.
-
Glue handle pieces in pairs, smoke with pink and black with red. Place cut squares in pairs on top of each other, red with black.. Glue along all edges.
-
Insert handles into center of both long sides and press felt pieces together.
-
Fold up one short end and overlap the long points over it. Insert a hook and loop in between points. Repeat for opposite side.
-
Glue circles together in a contrasting stack of three. Center and glue to front point or to center point under handles.

Make several, experiment with different sizes and colors. Now get ready set go fill! And check out all of the great designs included by hopping along on the DCC button in the sidebar. Like the Designer Crafts Connection on Facebook and enter our great giveaway!
https://www.facebook.com/DesignerCraftsConnection/app_228910107186452
Debra
Wednesday, September 03 2014
Back to school means early mornings, lunches to pack and then the scramble out the door to the bus. With seven grandchildren and two just starting preschool, kindergarden, cute little lunch bags are required. Laura Kelly's new Pet Shop Collection of dies with Sizzix/Ellison, can't get any cuter than that!
You will need:
9" x 12" Craft cuts of Kunin Embossedfelt™ , 2 Alligator Cocoa Brown
9" x 12" Craft cuts Kunin Classicfelt™, 1 Orange, 1 Walnut, 1 Cashmere Tan
Laura Kelly Buttons with Buttons Galore
Aleene's Quick Dry Fabric Fusion
Puppy Diecut from Laura Kelly Pet Shop Colection for Sizzix
Circle Diecut or circle templates, 2", 2 1/4", 2 1/2".
Sizzix Big Shot
Orange, brown embroidery floss
Velcro dot
Scissors, pencil, pins, needle, ruler
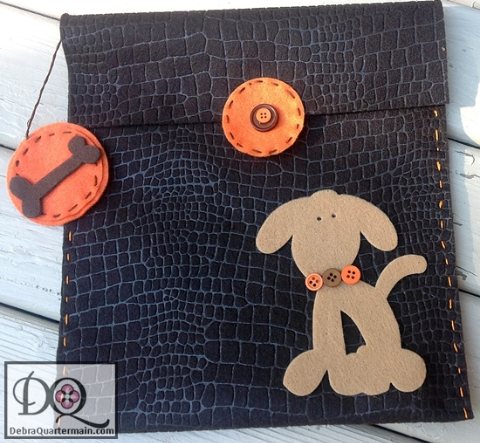
1. Overlap two pieces of brown felt by 2", glue. Fold right sides out with back piece extending 3" beyond front piece. Align sides and straight stitch with orange floss.
2. Die cut puppy from tan, bone from brown and cut three orange circles. Glue two circles together and straight stitch in brown around edges. Repeat for second circle, sew brown button in center of the second circle.
3. Glue dog to front of bag. Glue three buttons to dog's neck for collar. Glue bone to center of two circles. Glue top half of second circle to center of bag flap.
4. Open bag up and sew bone circles to corner with a 3" length of floss. Add Velcro dot to bottom half of inside of center circle. Press to main bag to mark and adhere opposite side of dot.
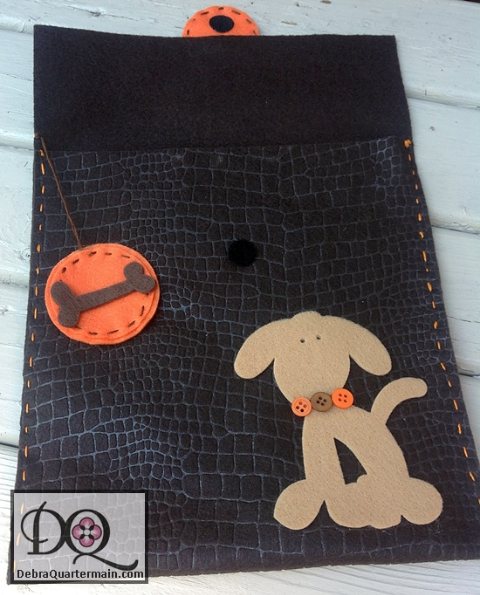
There you have it, a darn cute Doggie Bag, super quick, super easy and super fun! Laura's Pet Shop Collection is a reflection of her bubbly, creative personality, her fun outlook and her dedication as a Mom and Room Mother bringing fun and creativity into the school, home and everywhere!
Thanks Laura!
Debra
Wednesday, September 03 2014

The beginning of each month we hop with the Designer Craft Connection blog hop.
The theme of this month, Vacation Memories. Now that I operate a Bed & Breakfast
along with my design work, my vacation time away is very limited..
Instead Guests come to me creating their vacation memories, This past weekend we
had a wedding in the back garden. Celebrating, weddings, anniversaries, birthdays,
there are many occasions we celebrate with a bottle of wine or champagne.
I created this heart wine bottle charm to make
any occasion even more special!
You will need:
1-2 ½” Heart of Smoothfoam
Key Pearl Accent Cluster by Cousin
Trinkettes Chain by Cousin
¾” Heart Silver Charm
Shimmering Silver Metallic paint by DecoArt
2-1” Cotter Pins
1” paint brush
Jewelry adhesive
- Paint the heart with two coats of silver paint. Let dry in between coats.
- Insert key cluster accent ring onto cotter pin. Repeat for trinket chain on
second cotter pin.
- Insert cotter pin with key cluster into the end point of heart. Push in carefully.
- Insert chain on second cotter pin into center top of heart.
- Glue silver heart to center of Smoothfoam heart.
This is a super quick and easy project. It would make the next bottle of wine you
take as a hostess gift
extra special or make several to give as gifts at the holidays. Each time I
put it out for a guest or occasion
I am reminded it becomes part of the special memories. Follow the DCC button in the
sidebar to catch
some awesome memory ideas!
Happy Celebrating!
Debra
Monday, August 04 2014
Every month a group of very talented professional CHA craft designers host a blog hop, the DCC Designer Crafts Connection. This month's theme is Crafting with School Supplies. I love and design with felt all the time which is a definite school supply staple!
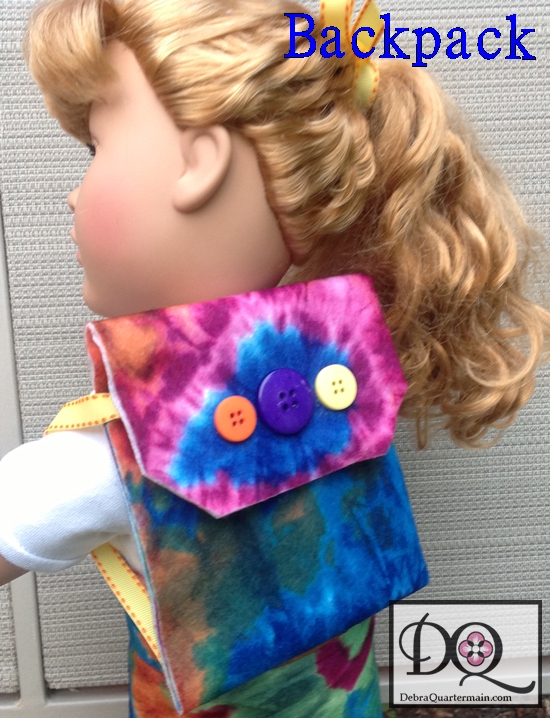
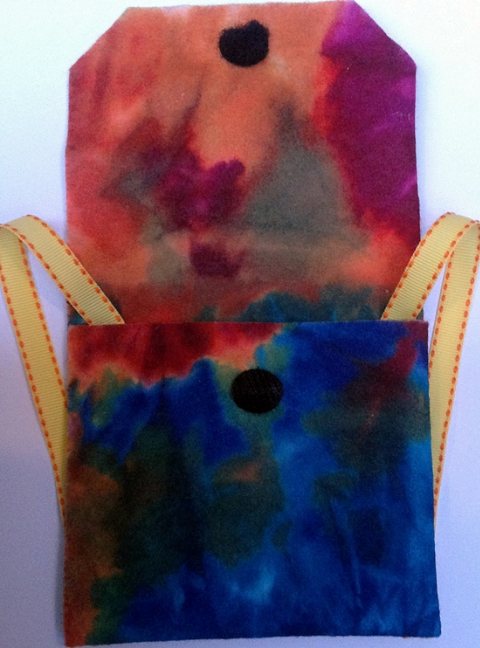
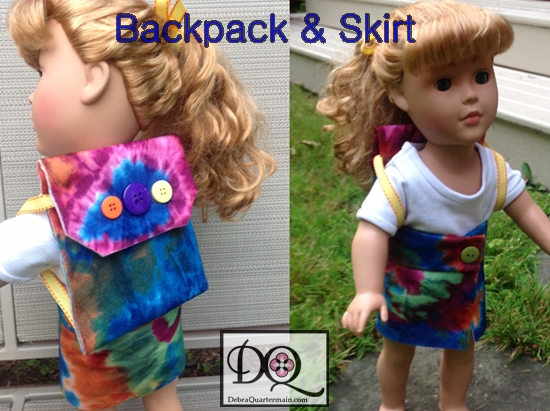
My other fun design work is with Doll Diaries as Kunin Felt is one of the major sponsors of Camp Doll Diaries this summer. I have been creating a wardrobe of fun, fast& fab fashions for my 18" doll McKayla. With back to school not far off I decided to design a cute backpack for McKayla from the tyedye Printzfelt. Super simple!
You will need:
9" x 12" craft cut Kunin Printzfelt, 1 60's TyeDye.
1/2 yd ribbon
Fabri-tac adhesive by Beacon Adhesives
3 buttons by Buttons Galore
1 Hook and loop round fastener by Velcro
Ruler, marker, scissors
1. Mark wrong side of felt at center lengthwise. Mark lines at 4" from bottom and 2 1/2" from top. Angle ruler and mark top corners.
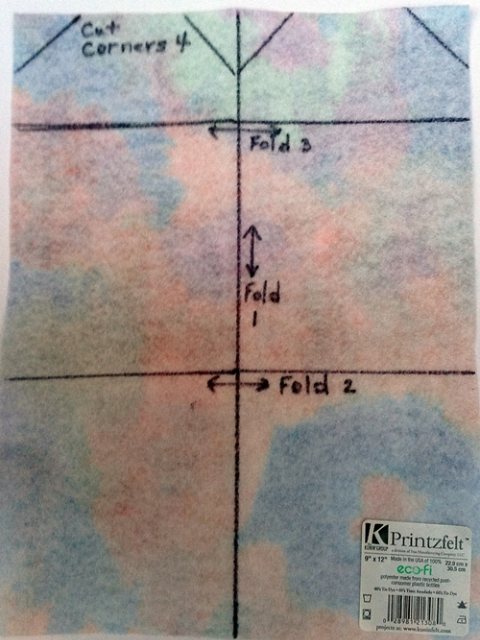
2. Fold wrong side out on center fold, finger press. Cut off top corners on lines.
3. Fold up bottom on second line and finger press. Fold top down on line and finger press.
4. Unfold piece and refold center with tyedye pattern out. Glue open edges shut.
5. Cut two 7" pieces of ribbon.
5. Fold bottom up along pressed line. Glue sides shut, inserting ribbon ends into top of either side before gluing shut.
6. Fold top down along finger pressed line. With hook and loop pieces fastened together adhere to center of upper edge of bottom inside and corresponding top inside.
7. Glue buttons to center of front as shown. Flip backpack over and glue ribbon ends to bottom corners.
Since the backpack turned out so cute I decided to fold another piece of tyedye felt and make McKayla a cute skirt. The felt is a perfect size to fit around the 18" doll, less measuring or cutting! Catch that tutorial coming up on the Doll Diaries blog!
Hop on the DCC button to discover great DIY crafty school supply inspired designs!
Thanks for stopping by! Happy creating!

Monday, July 07 2014

The first Monday of the month we hop with the Designer Crafts Connection! This month's theme is Celebrations. This past week both Canada and the US celebrated on the 1st for Canada and of course July 4th Independence Day! With friends and guests celebrating the 4th I created a super quick easy and inexpensive table runner and napkin rings. made from felt rectangles it can be made to fit any table length just by adding more pieces.
You will need:
9" x 12" Craftcuts of Kunin Classicfelt in Red, White and Blue
Star Diecut by Sizzix
Red, white, blue buttons by Buttons Galore
Fabri-tac Adhesive by Beacon Adhesives
3 yards striped ribbon
Scissors, rotary cutter, cutting mat, ruler, Sizzix Bigshot
How to:
1. Cut felt cuts in half 9" by 6" pieces. Place side by side in red, white, blue pattern, repeat. Cut ribbon in 6" strips and glue to hold pieces of felt together.
2. Die cut stars from white felt and glue to red, blue center sections.
3. Cut a 2" by 7" strip for each napkin ring.
4. Glue strip of ribbon down center of each ring.
5. Overlap ends 1/4" and glue to make a napkin ring.
The same runner can be easily created for other holidays using different colors of felt, red and green for the Christmas holidays, pastels for Easter or maybe green and white for St. Patrick's Day! Keep the celebration going by hopping with the button in the sidebar!

Monday, June 02 2014
It is the first Monday of June and we are hopping with the Designer Crafts Connection! This month's theme is Handmade gifts, a very special and personal way to show someone you care.
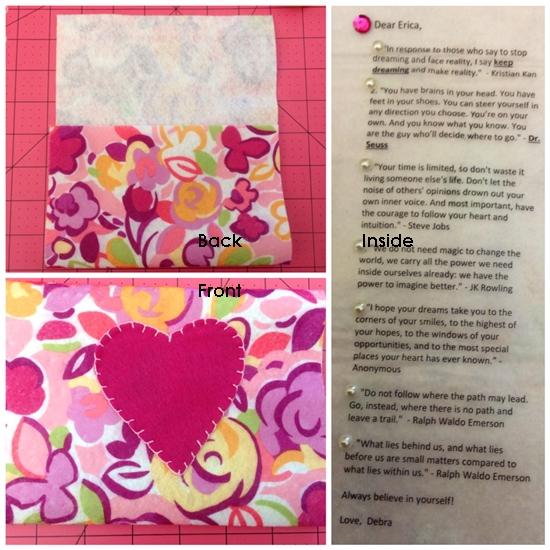
The heart is my favourite icon and felt my material of choice, I combined the two to create a special graduation Heart felt keepsake card for a close friend's daughter. I wanted to incorporate some inspirational quotes into the inside. I used Craft Attitude film to print out the quotes for the inside of the card.

You will need:
9" x 12" Craftcuts of Kunin Rainbow Classicfelt, 1 White, 1 Fuchsia and 1 Printzfelt.
Fabri-tac glue by Beacon Adhesives
Craft Attitude Film for fabric, 1 sheet.
Embellishments, charm, stick on pearls.
1 Hook and loop closure.
Scissors, rotary cutter and mat, embroidery floss and needle, glue stick.

1. Cut from Printzfelt a 7" by 12" piece for envelope. Cut a 3" heart from Fuchsia piece. Cut a 6" by 11" piece from white felt for inside of envelope.
2. Fold Printzfelt piece 4" over to create bottom of envelope, fold the top piece over 3" to create top of envelope. Flip over to position heart in center of piece and glue heart leaving edge of heart open. With floss embroider a blanket stitch around heart. Add stitching along both ends.
3. Print out inspirational quotes on Craft Attitude film in one column to fit white felt piece. Adhere and trim.
4. Glue white felt piece to back of Printzfelt. Embellish.
5. Embellish front of envelope. Fold envelope again and adhere hook and loop closure where the two pieces overlap.
A special gift card with a meaningful message in only a few minutes! Enjoy more crafty handmades by hopping along with our DCC blog hop button!
Debra
Monday, May 05 2014
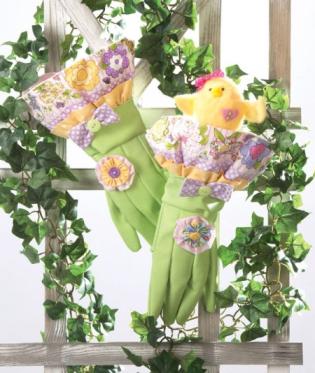
The first Monday of the month the DCC, Designers' Craft Connection Blog Hop shares creative projects from a group of talented designers. This month our theme is flowers, I am sharing a project from the archives that I designed for Creative Homearts magazine a few years ago. It is one of my favourites and especially appropriate because this past weekend was my first in the garden. There may still be a bank of snow in the back yard but there are also tiny green shoots everywhere and the crocus are dotting the garden! Yay, it is finally spring!
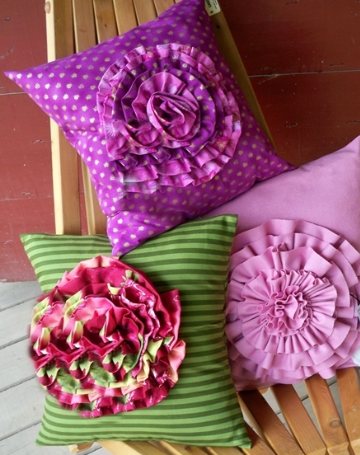
One of the easiest flowers I like to make are these ruffled ones on the garden gloves. So simple and quick. Here's how! Take strips of fabric, 3", 4", 5" widths by 12"-18" lengths. Press in half right sides out. Sew a straight stitch along the raw edges with a strong thread like upholstery or quilting. Pull the stitches and the strip will begin to gather and curl into a circular shape. Take a few stitches to hold shape, add button to center. Add a second narrower ruffle on top for a layered flower.
Gathered strips of 6" by 36" are added to a plain square pillow to make a large flower to add to springtime decor. Always nice to freshen up a space with some new pillows, a colorful throw rug and fresh flowers.
Check out all the other designers flower inspired projects. Just hop along with the button in the sidebar.
Happy creating!

Sunday, April 27 2014
Craft Attitude! When Jonathan Fong asked me to participate in a Mother's Day blog hop using Craft Attitude transparent film I was very excited! Jonathan is a sweetheart and it is an awesome product! I have had this piece of vintage fabric for several years and finally I got to use it. I also wanted to try Craft Attitude with felt. Most of all I wanted to make something to celebrate two very special women who are dear to my heart.
My Grandmother and Great Aunt were remarkable women. My grandmother raised five children along with working at my Grandfather's several businesses. Three of the four boys were haemophiliacs and one also a severe diabetic. She saw them through many crisis all the while working on the chicken farm, at the canning factory and later the woollen shop. My Great Aunt never married and was the book keeper for the Ganong Candy Factory for fifty years.
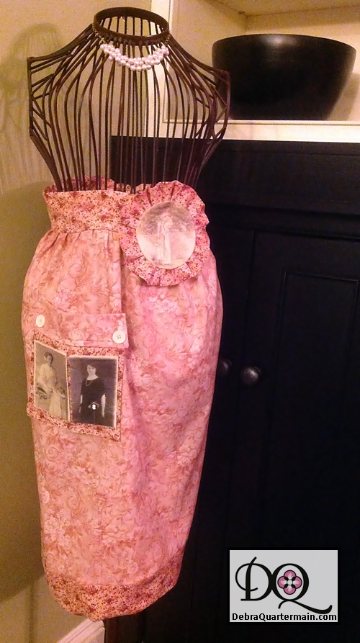
Both were gracious, kind, hard working, patient and so loving. I have many wonderful memories and many are centered around the kitchen. I made this apron to have those memories close and be reminded as I now become a grandmother to create those same kind of memories.
If you don't sew you can take any purchased or vintage apron and add the medallion and button on pocket with a fabric glue. Here's how!
You will need for Pocket and Medallion:
1/2 yard of fabric
9" x 12" Craft cut of Kunin ClassicFelt, 1 Ivory
1 sheet of Shoe Attitude TM
Glue stick
Fabri-tac Glue TM by Beacon Adhesives
1/2" Buttons, 2 Ivory
Needle, Thread, Scissors, Rotary Cutter, Ruler, Cutting Mat, Printer, Iron, Ironing Board
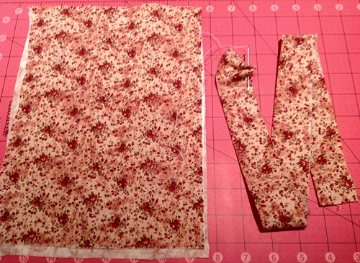
1. Cut from fabric, four 9" by 11" pieces for pocket and cut one 3" by 24" piece for medallion ruffle.
2. Press short ends of strip piece under 1/2". Press strip in half as shown.
3. Sew a gathering stitch along raw edge of strip. Set aside leaving needle attached.
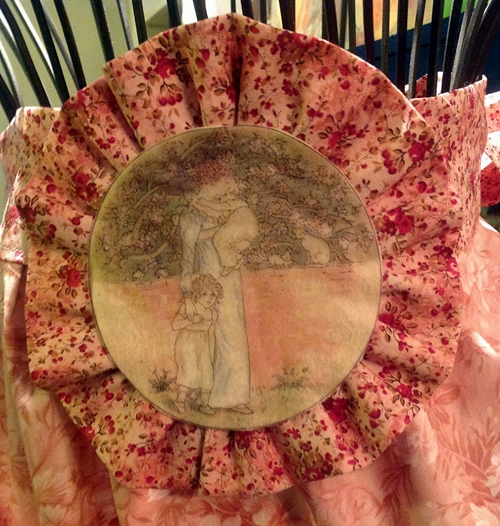
4. Following manufacturer's instructions print images onto film.
5. Cut around images and glue to felt. I have to admit to a craft fail at this point. I glued the wrong side of the film as you can see in the photo below, shiny side down not up!
6. Use rotary cutter to cut images from felt with a 1/8" border. Cut carefully around 4" circle image for medallion. (Tip: If medallion is smaller or larger add or subtract 6" of fabric for each 1" of medallion circle size.)

7. To finish medallion: Pull stitches to ruffle strip fit around medallion 1/4" in from outer edge. Adjust gathers and glue with Fabri-tac.
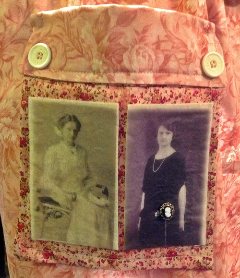
8. To finish pocket: Right sides together place pieces in pairs, glue or sew around three sides for both pairs. Turn right sides out.
9. Fold open end under 1/2". Glue or stitch closed.
10. Fold ends over 2" on each piece, glue or stitch in place. Glue pocket pieces together with folded over ends out.
11. Choose one side as front and glue felt image pieces side by side. Add embellishments of desired.
12. Sew buttons in corners and sew through to apron. Stitch medallion to apron front. (You could also use hook and loop fasteners for easy removal before laundering.
Thank you Gram and Aunt Anna for being the best role models and leaving your legacy of love! Check out the other great Mother's Day projects with Craft Attitude!
Sunday, March 30 2014
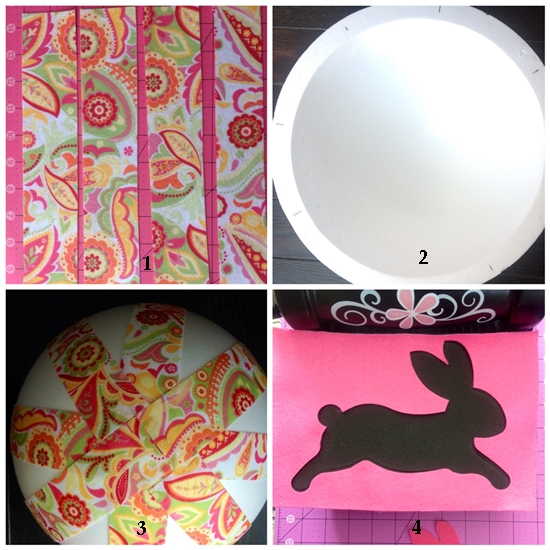
Springtime, Easter and an upcoming Baby Girl Shower have me thinking bunnies, bunnies and more bunnies! Smoothfoam have these hollow sphere halves which come in a variety of sizes. I decided to make a mobile to hang as a centerpiece over the dining room table for the baby shower. Of course the theme being bunnies my new Sizzix bunny diecut was perfect and of course the bunnies had to wear tutus!

You will need:
Smoothfoam 12" Hollow Sphere
9"x12" craft cuts Kunin Classicfelt, 3 Candy Pink, 3 White, 1 Yellow
9" x 12" craft cuts Kunin Printzfelt, 2 Saralma
3 yards each of 4" wide tulle, pink, white
1 1/4 yards each of 1" wide Ribbon, white, pink, yellow gingham
1 1/4 yards each of 1/2" wide Ribbon, pink, yellow, green
6-1" Buttons, yellow
4-3/4" Buttons, green
6 Flower Buttons
Bunny, Flower Dies by Sizzix
Fabri-Tac by Beacon Adhesives
Big Shot or Fabi, rotary cutter, cutting mat, scissors, needle and white thread, ruler, measuring tape.
How to:
1. From the Saralma cut eight 2" by 12" strips. Cut the white, pink and yellow felt pieces in half to measure 6" by 9". Photo 1
2. Die cut four white and four pink bunnies. Die cut two pink, one white and one yellow flower set. Glue bunnies together in pairs. Layer flowers beginning with two large pink, one white and one yellow. Glue three layers together for each flower. Photo 4
3. Cut tulle pieces in half. Fold pieces in half and sew a basting stitch through both layers. Pull tight to fit around bunny's waist. (Not sure if bunnies have a waist? ;) Secure stitches. Repeat for all four bunnies.
4. Tie four yellow and four pink ribbons for bunny necks. Glue in place. Cut four 8" pieces of green felt and make a knot at one end. Glue knot to top of tutu on each bunny. Set bunnies aside.
5. Use ruler to mark edge divided evenly in half, in half again and repeat once more to make eight. Place a 2" width of felt on flat edge with mark centered in middle of strip edge. Stretch felt slightly over curve and glue at center top. Repeat for eight pieces. Tip: To remove bulk at center top trim remaining pieces to just meet the first two joined at center. Photo 2 -3
6. Glue white ribbon around edge extending 1/2" beyond sphere edge. Glue yellow gingham ribbon over top of white ribbon.
7. Cut a 3" piece of the white ribbon and make a loop. glue to center top. Cut pink ribbon in half and tie two bows. Glue to either side of loop. Glue yellow button to center of pink bows. Add a flower button to centres.
8. Alternate around gingham border, centered on the felt strips, a yellow button with a green flower center and the layered felt flowers.
9. Glue end of bunny ribbons alternating at center of every other felt strip.
The rest of the Smoothfoam design team are playing with the spheres too! Check out the Smoothfoam blog April 1st! Check out the Kunin blog too! I am their Design and Social Media Co-ordinator and we have some great projects happening! Keep creating!
Thursday, March 20 2014
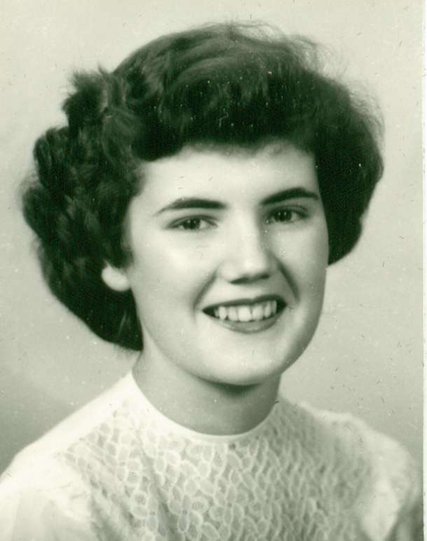
March is (inter)National Craft Month and Kathy Cano-Murillo aka Crafty Chica posed the question and wrote a wonderful blog post on "Why She Crafts". So why do I craft, the question is especially poignant for me this month. My Mom was born at the beginning of March and passed away at the end of March four years ago. The reason I craft, sew and create is because of my parents, my Mom. My first crafty memories are of sitting on the front porch in the summer with my little sewing machine sewing scraps from the material my Mom was making all of our clothes from. She would make herself a dress, me a jumper and my doll a skirt.
One of my other favorite crafty pastimes were the big sheets of newsprint my Mom would fasten up for me on the wall with a house drawn on it. I had the old Sears catalogue, scissors and a bottle of glue. What fun was that furnishing a house!
What is most remarkable is my Mom did all of this with me even though she never knew what it was like to have a mother or a home of her own. I created this Banner of Hope in memory of my Mom for Hope is ...a Place to Call Home.
My Mom was the result of an affair between a young Salvation Army officer and an older married woman he was staying with. A definite scandal in those days. Disgraced her father went into hiding after dropping my mother off at his Aunt's nursing home. Her mother did not want her. There my Mom spent the first six years of her life, her earliest memories of helping out with the residents, not happy ones. She was given a name, Bessie. From there her father picked her up but never said he was her father, she was then boarded out at different places for the next several years, much she would never talk about.
Why I craft, why I am creative is because of my Mother. She was always so proud of what I did and many of my designs would be proudly displayed in her home. She encouraged and supported my "making things".
I sew and craft because time stands still and imagination flows, the results are satisfying and most often make me smile. I went on to have two beautiful daughters and many crafty adventures with them. I love to share my ideas, my projects and techniques, teaching and see the smiles that brings. Basically I just love to make stuff and have found these most wonderful kindred spirits who do too. The most amazing of all, my Mom! With love, Debra
|