Springtime, Easter and an upcoming Baby Girl Shower have me thinking bunnies, bunnies and more bunnies! Smoothfoam have these hollow sphere halves which come in a variety of sizes. I decided to make a mobile to hang as a centerpiece over the dining room table for the baby shower. Of course the theme being bunnies my new Sizzix bunny diecut was perfect and of course the bunnies had to wear tutus!

You will need:
Smoothfoam 12" Hollow Sphere
9"x12" craft cuts Kunin Classicfelt, 3 Candy Pink, 3 White, 1 Yellow
9" x 12" craft cuts Kunin Printzfelt, 2 Saralma
3 yards each of 4" wide tulle, pink, white
1 1/4 yards each of 1" wide Ribbon, white, pink, yellow gingham
1 1/4 yards each of 1/2" wide Ribbon, pink, yellow, green
6-1" Buttons, yellow
4-3/4" Buttons, green
6 Flower Buttons
Bunny, Flower Dies by Sizzix
Fabri-Tac by Beacon Adhesives
Big Shot or Fabi, rotary cutter, cutting mat, scissors, needle and white thread, ruler, measuring tape.
How to:
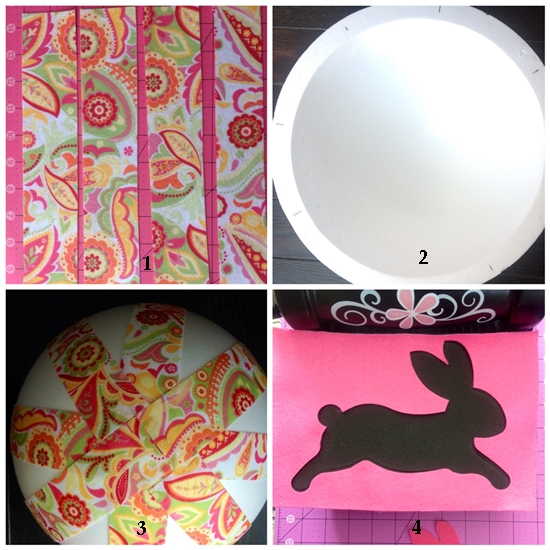
1. From the Saralma cut eight 2" by 12" strips. Cut the white, pink and yellow felt pieces in half to measure 6" by 9". Photo 1
2. Die cut four white and four pink bunnies. Die cut two pink, one white and one yellow flower set. Glue bunnies together in pairs. Layer flowers beginning with two large pink, one white and one yellow. Glue three layers together for each flower. Photo 4
3. Cut tulle pieces in half. Fold pieces in half and sew a basting stitch through both layers. Pull tight to fit around bunny's waist. (Not sure if bunnies have a waist? ;) Secure stitches. Repeat for all four bunnies.
4. Tie four yellow and four pink ribbons for bunny necks. Glue in place. Cut four 8" pieces of green felt and make a knot at one end. Glue knot to top of tutu on each bunny. Set bunnies aside.
5. Use ruler to mark edge divided evenly in half, in half again and repeat once more to make eight. Place a 2" width of felt on flat edge with mark centered in middle of strip edge. Stretch felt slightly over curve and glue at center top. Repeat for eight pieces. Tip: To remove bulk at center top trim remaining pieces to just meet the first two joined at center. Photo 2 -3
6. Glue white ribbon around edge extending 1/2" beyond sphere edge. Glue yellow gingham ribbon over top of white ribbon.
7. Cut a 3" piece of the white ribbon and make a loop. glue to center top. Cut pink ribbon in half and tie two bows. Glue to either side of loop. Glue yellow button to center of pink bows. Add a flower button to centres.
8. Alternate around gingham border, centered on the felt strips, a yellow button with a green flower center and the layered felt flowers.
9. Glue end of bunny ribbons alternating at center of every other felt strip.
The rest of the Smoothfoam design team are playing with the spheres too! Check out the Smoothfoam blog April 1st! Check out the Kunin blog too! I am their Design and Social Media Co-ordinator and we have some great projects happening! Keep creating!